151

Re: E3D on Da Vinci

So.....I was working with Tom's design and.....decided against using it.

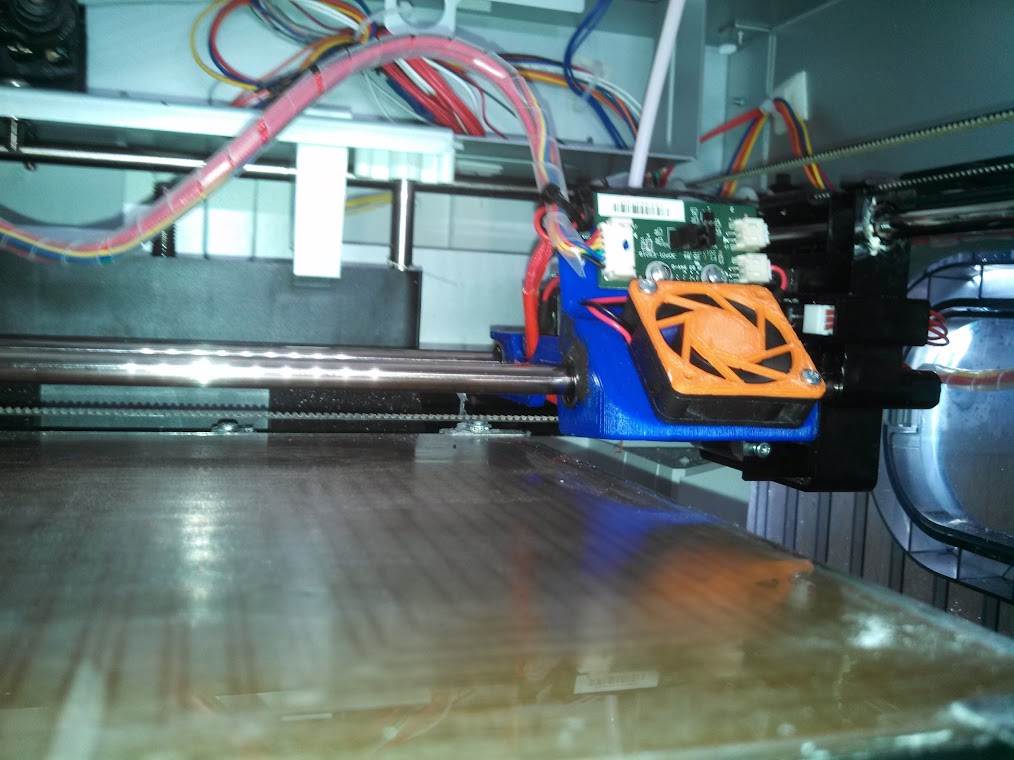
As I was mounting all the parts, I ended up breaking off the one part while inserting the LM8UU bearings. So I'll be printing out that new housing and bowden extruder and mounting the extruder somewhere inside.

But hopefully I'll get it done in the next few days.

152

Re: E3D on Da Vinci

That's odd...

Did you print it laying flat on the build plate, or upright?

Post some photos if you can.

153

Re: E3D on Da Vinci

sigmaz_1 wrote:

That's odd...

Did you print it laying flat on the build plate, or upright?

Post some photos if you can.

It was flat.

I'd have to dig it out of my 'scraps' boxes to take photos.

Part of it was I wanted the bearings to be tight, and they were probably a bit too tight in the housing (I didn't remove much material, so it probably started flexing just slightly. And that was enough to just cause it to break.

Either way, I'm going to give the bowden setup a try.

It's going to take a while to load filament then, isn't it? Or does it load it differently?

154

Re: E3D on Da Vinci

Actually it loads pretty much without effort.
If everything is properly aligned and the end of the filament is straight it should thread right through.

155

Re: E3D on Da Vinci

sigmaz_1 wrote:

Actually it loads pretty much without effort.
If everything is properly aligned and the end of the filament is straight it should thread right through.

I meant more from the aspect that it takes longer since you now have to load it all the way from some point that might be 12 to 24" away from the actual hot end, instead o just 1" from the hot end. So you'd have to spool through that distance. Maybe I'm just thinking about it the wrong way though too.

156 (edited by carl_m1968 2014-12-23 04:16:42)

Re: E3D on Da Vinci

darkhawk wrote:
sigmaz_1 wrote:

Actually it loads pretty much without effort.
If everything is properly aligned and the end of the filament is straight it should thread right through.

I meant more from the aspect that it takes longer since you now have to load it all the way from some point that might be 12 to 24" away from the actual hot end, instead o just 1" from the hot end. So you'd have to spool through that distance. Maybe I'm just thinking about it the wrong way though too.

The extruder on a Bowden setup has spring loaded screws that keep the idler bearing pressed against the filament. You can easily loosen those screws and feed the filament by hand the full length of of the Bowden tube whatever that might be. It only takes a few seconds. If you are using Rep host or others you can also send a feed command of a certain length if you know that length and let it feed to that point automatically. This could take longer depending on feed rate, but that too can be changed to maker it feed faster.

This is actually how you figure out your proper extrusion rate by feeding a set amount and the measuring the amount fed from the extruder and change your steps per mm to dial it in.

I had a Bowden on my previous printer and liked it. It greatly reduces the weight on the head. The draw back is you can't use flexible filaments in a Bowden setup. I however don't plan to use flexible filaments for now. I getting ready to convert my Da Vinci 1.0 to a Bowden and I am also changing out the main board to a Melzi Board. That will allow me to use already tried and proven firmware flavors such as Marlin, Repetier, and many others. As the Melzi is already one board they are pre-configured for. The Melzi will also allow me to use and Host. Such as Cura or even Craftware. Both are extremely powerful and use the Cura slicer which is much better an faster than Slic3r in my opinion. I have used Cura for several years now and just like it much more. I like Craftware though as it allows you to place, remove , and edit support material at will. Both are free unlike another over priced package. So these two will be my printing suite once my conversion is done.

Printing since 2009 and still love it!
Anycubic 4MAX best $225 ever invested.
Voxelabs Proxima SLA. 6 inch 2k Mono LCD.
Anycubic Predator, massive Delta machine. 450 x 370 print envelope.

157

Re: E3D on Da Vinci

Have you tried the overpriced package? You do get what you pay for.

158

Re: E3D on Da Vinci

browning54213 wrote:

Have you tried the overpriced package? You do get what you pay for.


Yeah but I would have to learn the overpriced package. With the other two I know them so well I can even edit internal files and make them behave exactly as I want and even control menu layouts and other features. Because Cura is Python based I have even been able to ad scripts and features to do things that other packages can't do in regards to automation like timed starts, My old unit even had an automated bed that could dump the current print when completed and start another unattended. In that way I could batch process several prints and never even be around the printer.

Can the over priced package do stand alone automation? Yes the Da Vinci could be modded to work the same way. Just needs the bed replaced with the conveyor I had on my previous unit. Once the print is done the conveyor moved forward which is actually a loop that wraps around the bed moves forward enough to give the next print room. The nice thing is a the previous print comes over the edge of the conveyor it automatically pops off so the printer always has a blank spot to print in.

Printing since 2009 and still love it!
Anycubic 4MAX best $225 ever invested.
Voxelabs Proxima SLA. 6 inch 2k Mono LCD.
Anycubic Predator, massive Delta machine. 450 x 370 print envelope.

159

Re: E3D on Da Vinci

I scrapped the idea of the Melzi Board and decide to go with this instead.

http://www.panucatt.com/azteeg_X5_mini_ … x5mini.htm

I like the idea of just having to edit a text file on the SD card to control all attributes of the firmware. It also has the screw terminals I need. My only issue is that I hope my software connects to it. But we will see. He said I can return it if there are any issue. The guy that owns this company is really cool and him and his partner designed all the boards on that site themselves. I used to have the Azteeg X1 in my old printer and loved it. At 16X micro stepping the machine runs incredible quite. This new board like the X1 supports 32X, I just have to hope my motors can do that. Then it would be almost like running just ordinary DC motors in regards to noise.

Printing since 2009 and still love it!
Anycubic 4MAX best $225 ever invested.
Voxelabs Proxima SLA. 6 inch 2k Mono LCD.
Anycubic Predator, massive Delta machine. 450 x 370 print envelope.

160

Re: E3D on Da Vinci

So, using the housing for the bowden extruder, I've managed to at least assemble the e3D into the housing (after a bit of modification). Still need to make some small adjustments (the bearings that are fully enclosed don't quite line up properly after a bit of sanding. Not a huge deal, but just need to remove them and re-do them a little bit).

Then I'll need to really decide if I want to use the Bowden extruder or the direct drive extruder. I'm leaning more towards the direct drive, just because I like the simplicity of it.
I very well might just re-design the entire housing to add it in. Not sure yet. Might re-use the design for the bowden extruder and just relocate it onto the housing too. Plenty of options, of course.

I just hate that I'm still trying to decide what to do. LOL I think I've printed out 4 different housings and at least 2 different types of extruders right now.

161

Re: E3D on Da Vinci

sigmaz_1 wrote:

I haven't had any experience with that particular gear. 
But I have had some experience ruining steppers trying to remove gears.
Since the gear on the DaVinci extruder doesn't have any set screws one would assume it's epoxied on or something.
Trying to rip it off may cause the central shaft to be extracted from the armature.


Be warned.

I replaced mine with a mk7 gear. The stock one is pressed on and is hard to remove without cutting. I eventually just used a dremel with cut off wheel to cut mine where it barely touched the shaft. Then the new one uses a set screw. You want a slightly flat spot on the shaft for that set screw anyways so its no big deal. It definitely helped with grip and extrusion over the stock brass gear.

162

Re: E3D on Da Vinci

maximuscr31 wrote:
sigmaz_1 wrote:

I haven't had any experience with that particular gear. 
But I have had some experience ruining steppers trying to remove gears.
Since the gear on the DaVinci extruder doesn't have any set screws one would assume it's epoxied on or something.
Trying to rip it off may cause the central shaft to be extracted from the armature.


Be warned.

I replaced mine with a mk7 gear. The stock one is pressed on and is hard to remove without cutting. I eventually just used a dremel with cut off wheel to cut mine where it barely touched the shaft. Then the new one uses a set screw. You want a slightly flat spot on the shaft for that set screw anyways so its no big deal. It definitely helped with grip and extrusion over the stock brass gear.


I will have to do this since mine keeps skipping and drives me nuts.. I have to print too slow for my liking.

163

Re: E3D on Da Vinci

maximuscr31 wrote:
sigmaz_1 wrote:

I haven't had any experience with that particular gear. 
But I have had some experience ruining steppers trying to remove gears.
Since the gear on the DaVinci extruder doesn't have any set screws one would assume it's epoxied on or something.
Trying to rip it off may cause the central shaft to be extracted from the armature.


Be warned.

I replaced mine with a mk7 gear. The stock one is pressed on and is hard to remove without cutting. I eventually just used a dremel with cut off wheel to cut mine where it barely touched the shaft. Then the new one uses a set screw. You want a slightly flat spot on the shaft for that set screw anyways so its no big deal. It definitely helped with grip and extrusion over the stock brass gear.


I will have to do this since mine keeps skipping and drives me nuts.. I have to print too slow for my liking.

164

Re: E3D on Da Vinci

Good job man.  I wasn't sure how that wheel was on there.

165

Re: E3D on Da Vinci

Finally got some time to take a pic of my final setup although I am still waiting for my mk8 gear to come.

https://lh4.googleusercontent.com/-jccypGhM7vU/VKBEQPraUJI/AAAAAAAAJ8g/wRKcDarcYOI/w1014-h761-no/IMG_20141228_115446_055.jpg

Prints way better than stock!

https://lh5.googleusercontent.com/-DmUl-4XLtSU/VKR0mo-PEnI/AAAAAAAAJ-A/lIMgR8EA8rk/w570-h761-no/IMG_20141230_123440_517.jpg

166

Re: E3D on Da Vinci

browning54213 wrote:

Finally got some time to take a pic of my final setup although I am still waiting for my mk8 gear to come.

https://lh4.googleusercontent.com/-jccypGhM7vU/VKBEQPraUJI/AAAAAAAAJ8g/wRKcDarcYOI/w1014-h761-no/IMG_20141228_115446_055.jpg

Prints way better than stock!

https://lh5.googleusercontent.com/-DmUl-4XLtSU/VKR0mo-PEnI/AAAAAAAAJ-A/lIMgR8EA8rk/w570-h761-no/IMG_20141230_123440_517.jpg

I am finishing up on my own design using a Bowden setup and E3D. i will post pics once it is finalized and installed. I am also going a step further and getting rid of the stock controller and switching over to a more open source firmware readily available controller based on the smoothieboard project. It is much easier to make changes to the firmware plus I will have control of the microstepping feature on the steppers for better resolution.

Printing since 2009 and still love it!
Anycubic 4MAX best $225 ever invested.
Voxelabs Proxima SLA. 6 inch 2k Mono LCD.
Anycubic Predator, massive Delta machine. 450 x 370 print envelope.

167

Re: E3D on Da Vinci

good for you lol

168

Re: E3D on Da Vinci

Great job man, it looks great!

169

Re: E3D on Da Vinci

browning54213 wrote:

Finally got some time to take a pic of my final setup although I am still waiting for my mk8 gear to come.

https://lh4.googleusercontent.com/-jccypGhM7vU/VKBEQPraUJI/AAAAAAAAJ8g/wRKcDarcYOI/w1014-h761-no/IMG_20141228_115446_055.jpg

Prints way better than stock!

https://lh5.googleusercontent.com/-DmUl-4XLtSU/VKR0mo-PEnI/AAAAAAAAJ-A/lIMgR8EA8rk/w570-h761-no/IMG_20141230_123440_517.jpg


So how hard is it to get the carriage and stuff apart. I have looked at it and it looks to be a bit of a pain to remove the end piece and slide the carriage off.

Printing since 2009 and still love it!
Anycubic 4MAX best $225 ever invested.
Voxelabs Proxima SLA. 6 inch 2k Mono LCD.
Anycubic Predator, massive Delta machine. 450 x 370 print envelope.

170

Re: E3D on Da Vinci

carl_m1968 wrote:

So how hard is it to get the carriage and stuff apart. I have looked at it and it looks to be a bit of a pain to remove the end piece and slide the carriage off.


It's not hard at all really. Just take the sides off, pop out to the two screws on the left y carriage, remove the x axis belt via the tensioner and pop off the belt on the y axis you leave the bushings right on the rails and slide out that side of the carriage. This stuff all comes fairly easy for me though since I am a mechanical engineer, can[t guarantee you will get it all done in a day, but if you work fast you can for sure.

171

Re: E3D on Da Vinci

browning54213 wrote:
carl_m1968 wrote:

So how hard is it to get the carriage and stuff apart. I have looked at it and it looks to be a bit of a pain to remove the end piece and slide the carriage off.


It's not hard at all really. Just take the sides off, pop out to the two screws on the left y carriage, remove the x axis belt via the tensioner and pop off the belt on the y axis you leave the bushings right on the rails and slide out that side of the carriage. This stuff all comes fairly easy for me though since I am a mechanical engineer, can[t guarantee you will get it all done in a day, but if you work fast you can for sure.


I actually have built two printers from part kits so I am not afraid to get into them and tear them down and rebuild them. Just wanted to get an idea of what it was like.

Printing since 2009 and still love it!
Anycubic 4MAX best $225 ever invested.
Voxelabs Proxima SLA. 6 inch 2k Mono LCD.
Anycubic Predator, massive Delta machine. 450 x 370 print envelope.

172

Re: E3D on Da Vinci

carl_m1968 wrote:
browning54213 wrote:
carl_m1968 wrote:

So how hard is it to get the carriage and stuff apart. I have looked at it and it looks to be a bit of a pain to remove the end piece and slide the carriage off.


It's not hard at all really. Just take the sides off, pop out to the two screws on the left y carriage, remove the x axis belt via the tensioner and pop off the belt on the y axis you leave the bushings right on the rails and slide out that side of the carriage. This stuff all comes fairly easy for me though since I am a mechanical engineer, can[t guarantee you will get it all done in a day, but if you work fast you can for sure.


I actually have built two printers from part kits so I am not afraid to get into them and tear them down and rebuild them. Just wanted to get an idea of what it was like.

Oh yeah you should be fine then lol it's definitely a fun project!

173

Re: E3D on Da Vinci

I just installed Tom's design with the fan sideways like SigmaZ's. Seems to be working but I'm not sure the fan is getting enough flow. Most of it's intake is blocked by the frame. I hooked it up to a 12 volt source and haven't had any problems with ABS. I'll be trying PLA shortly. I had originally planned to use a MK 8 extruder gear but it doesn't line up. I'm working on a design based on Tom's now that will raise the head a little to get back some of the lost Z height and align with the Mk 8.

DaVinci 1.0 w/ repetier firmware, Andy's Carriage, E3D V6, Filastruder #1956, Filawinder

174 (edited by sigmaz_1 2015-01-03 22:29:03)

Re: E3D on Da Vinci

I haven't run into any issues yet with the fan sideways. I've run 10+ hour Pla prints with no problems
Just an FYI.

And I really have yet to be dreaming about using the lost 20mm but I'm looking forward to what you come up with.

175

Re: E3D on Da Vinci

Hello everyone, I also modified my printer using drawing of Tom. I'm using repetier 0.91 firmware but I have a problem with the setting of the thermistor. I installed the thermistor recommended for E3D V6 but the temperature is not correct. How did you solve the problem?
I also tried to create a custom table:
#define USER_THERMISTORTABLE0 {{1*4, 713*8},{25*4, 289*8},{49*4, 241*8},{73*4, 215*8},{97*4, 198*8},{121*4, 185*8},{145*4, 174*8},{169*4, 165*8},{193*4, 157*8},{217*4, 150*8},{241*4, 143*8},{265*4, 137*8},{289*4, 132*8},{313*4, 126*8},{337*4, 121*8},{361*4, 116*8},{385*4, 111*8},{409*4, 107*8},{433*4, 102*8},{457*4, 97*8},{481*4, 92*8},{505*4, 87*8},{529*4, 81*8},{553*4, 76*8},{577*4, 69*8},{601*4, 62*8},{625*4, 54*8},{649*4, 43*8},{673*4, 26*8},{696*4, -36*8}}

but the values are not correct
The thermistor installed is 100K Semitec 104GT2 NTC thermistor

Thank You