1

Topic: OOOhh my.

So my supervisor comes up to me the other day. Tosses a Solidoodle SD4 manual on my desk and says "we have this somewhere in the back, see what you can do with it."

Well...I go back there today and find and entire Solidoodle WORKBENCH. Only minor damage to the electronics.

I've never so much as touched a 3d printer before today.

This is going to be interesting.


Anyways, I'm sure I'll be on here and asking questions fairly soon, so there ya go. There's my introduction.

Regards,

ESOCHI

2

Re: OOOhh my.

well OK then
this stuff  is Easy any five year old can do it , with 10 years experience.

Seriously take it step by step and folks here should be able to help.  You did come to the right place. .
Only minor damage to the electronics.
this statement worries me.

Can you be more specific.

Tin Falcon

Soliddoodle 4 stock w glass bed------Folger Tech Prusa 2020 upgraded to and titan /aero extruder mirror bed
FT5 with titan/ E3D Aero------MP mini select w glass bed
MP Utimate maker pro-W bondtech extruder
Marlin/Repetier Host/ Slic3r and Cura

3 (edited by heartless 2019-05-23 22:57:20)

Re: OOOhh my.

what's to worry about Tin?
slap a new board in it and make it better than it was to start with, LOL

But yeah, more details would be helpful

oh, and welcome aboard! smile

SD4 #1 & #2 - Lawsy carriages, E3D v6, Rumba controller board, mirror bed plate, X motor fan, upgraded PSU & Mica bed heater
SD4 #3 - in the works ~ Folgertech FT-5, rev 1
Printit Industries Beta Tester - Horizon H1

4

Re: OOOhh my.

slap a new board in it and make it better than it was to start with, LOL

True but IMHO  it is usually recommended one learn to print  with a printer before learning troubleshooting, repair , building etc. 

And yes welcome to the forum.

Soliddoodle 4 stock w glass bed------Folger Tech Prusa 2020 upgraded to and titan /aero extruder mirror bed
FT5 with titan/ E3D Aero------MP mini select w glass bed
MP Utimate maker pro-W bondtech extruder
Marlin/Repetier Host/ Slic3r and Cura

5

Re: OOOhh my.

Tin Falcon wrote:

slap a new board in it and make it better than it was to start with, LOL

True but IMHO  it is usually recommended one learn to print  with a printer before learning troubleshooting, repair , building etc. 

And yes welcome to the forum.

So s kit as a first printer is bad? I think it depends on the person and their technical level. I mean I built my first computer before I ever learned to use one. Same with my first printer.

Printing since 2009 and still love it!
Anycubic 4MAX best $225 ever invested.
Voxelabs Proxima SLA. 6 inch 2k Mono LCD.
Anycubic Predator, massive Delta machine. 450 x 370 print envelope.

6

Re: OOOhh my.

Tin Falcon wrote:

Only minor damage to the electronics.
this statement worries me.

Can you be more specific.

Tin Falcon

I considered making this a new topic, but I'll reply first here.

Board is good to go, had some screws loose from impact damage (not literally but kind of literally). Plexiglas shield was shattered and metal frame was bent. Plugs didn't want to plug in all the way.  I wiggled everything back into place as best I could and it all came to life.

I managed to get it connected and running via Repetier-Host V2.1.3 and now I'm educating myself on setup and 1st run stuff.

I know the configuration file is set for an 8x8 Solidoodle, so I know I'm gonna have to set it for the 12x12x12 Workbench sitting next to me. Slowly using this forum to find all the hidden tidbits I'll need to get a first print out of this thing!

Should be interesting. Thanks for all the replies!

Regards,
ESOCHI

7

Re: OOOhh my.

I bought my Workbench used, and replaced the electronics with a Duet WiFi, different bed heater, power supply, hot ends and extruders.  I'm not any help with settings and such for using the PrintrBoard in a dual-extruder situation.  I can attest that the mechanical hardware seems to be pretty good. 

I did replace the front pulleys with ones that had bearings...I should have done the same thing with the Y-axis pulley.  I'll probably order one for that.

Keep us posted on your progress.

-Kevin

8 (edited by ESOCHI 2019-06-04 12:37:00)

Re: OOOhh my.

Thanks for the info knowack, I've read your post and it's all quite interesting.

I'm printing 1st articles right now, and while I'm sure calibration is much needed, it is spitting fillament and it is sticking to the bed.

I'm running a full stock setup with Repetier-Host V2.1.3, Slicing with CURA with manual settings overriding a few areas.

40mm print speed, .2mm quality. It wasn't running the lower of the 3 cooling fans so I kicked that on after realizing it a few minutes in. I think that's important.

Manual Control forcing 94 degree bed and 185 degree extruder. It's printing from the second extruder for whatever reason so I'm just rolling with it.

I think my feed is about 10% shy of 100mm/100mm so that needs to change.

Here's a clip of the non-uniform printing I'm getting currently. The first head sometimes rips up the bumpy extrusion from the second.

YouTube link

Regards,
ESOCHI

9

Re: OOOhh my.

You shouldn't have bumpy extrusion. If you do it sounds like over extrusion. You cannot calibrate any of the other metrics until you have your feedrate and flowrate dialed in. If you ask for 100mm you should get 100mm no more, no less. You single perimeter wall should also be measuring .48mm wide. If it is not then your flowrate is too high. But don't change flowrate until your feedrate is correct.

Printing since 2009 and still love it!
Anycubic 4MAX best $225 ever invested.
Voxelabs Proxima SLA. 6 inch 2k Mono LCD.
Anycubic Predator, massive Delta machine. 450 x 370 print envelope.

10

Re: OOOhh my.

I understand, I'll retry that process after this print is done. It's coming out quite nicely now, for whatever reason. The second print head is kind of ironing out any small imperfections with the print.

I was running into some odd feed issue where the filament wasn't feeding and I was getting a guhguhguhguh sound when I clicked "extrude" in the manual controls. This happened after a first test feed that hit ~90mm so I was quite confused. I clicked print just to see what would happen and it started going. The skirt was all messed up and I kept pulling it off and watching it feed more. I just wanted to get as much filament through the nozzle to see if that would clear things up.

Here's where we're at now. Same print.

YouTube link

11

Re: OOOhh my.

The sound was caused by your temp being too low and the filament cooling in the extruder. For PLA 190 should be you lowest temp you use. Some PLA even needs as high as 210. When you are doing a long feed like 100mm the filament acts like a heatsink and sucks heat away from the heatblock. To counter you have to raise the temp so the temp stays in melting range the entire time of the extrusion. It works for you while printing because the feed time is varied and the long extrusions are limited.

Printing since 2009 and still love it!
Anycubic 4MAX best $225 ever invested.
Voxelabs Proxima SLA. 6 inch 2k Mono LCD.
Anycubic Predator, massive Delta machine. 450 x 370 print envelope.

12

Re: OOOhh my.

I'm not sure about the Workbench, but on the SD4's the stock print head setup would read 20°C-30°C low.  Just be prepared to experiment a bit with temps.

-Kevin

13

Re: OOOhh my.

knowack wrote:

I'm not sure about the Workbench, but on the SD4's the stock print head setup would read 20°C-30°C low.  Just be prepared to experiment a bit with temps.

-Kevin


Also depends on if you are using XYZ material or third party. XYZ material is a special formula that melts at 20 to 30 degrees lower than third party material. Their PLA melts at 20 to 30 less than brand A form Amazon. Most othird party Brands melt around the 230 range. Melt points also depends on if your actual temp is the same as reported temp which in many case is not.

Printing since 2009 and still love it!
Anycubic 4MAX best $225 ever invested.
Voxelabs Proxima SLA. 6 inch 2k Mono LCD.
Anycubic Predator, massive Delta machine. 450 x 370 print envelope.

14 (edited by ESOCHI 2019-06-04 17:52:28)

Re: OOOhh my.

Interesting.. maybe I should drag my laser thermometer from home and see what's what.
For the record I'm using 3D Passion PLA (1.75mm)

When printing a skirt the filament often pops out like a water hose that isn't primed. I've slowed the feed rate and increased the speed for the skirt/raft setting and it's clear I'll need to keep playing with those. the interesting thing is how it makes a pattern on curves, which I wouldn't expect from random popping.

Testing skirt/raft settings, Imgur link (1st test is lowest, then 2nd and 3rd ascending)

15

Re: OOOhh my.

I would say definite over extrusion based on that image. You can see where the head drags through the excessively high plastic.

Printing since 2009 and still love it!
Anycubic 4MAX best $225 ever invested.
Voxelabs Proxima SLA. 6 inch 2k Mono LCD.
Anycubic Predator, massive Delta machine. 450 x 370 print envelope.

16 (edited by ESOCHI 2019-06-04 21:43:54)

Re: OOOhh my.

I'm also realizing the bed may be too close to the head.

I've dropped the filament flow from 90% to 75% and then to 60%

75% gave me the best results so far, and I killed 60% because it folded the skirt over on itself.

Hi-res Imgur pic. 75% on left and 90% on right.

I'd like to mess with the Z offset, and I'm hoping I can just put something in G-code to do that. Just the tiniest scootch away from the nozzle and then see what happens.

Thanks for following along with me!

EDIT: I've pasted in the G-Code for the auto bed level feature and things are getting interesting (in a good way).

Regards,
ESOCHI

17 (edited by carl_m1968 2019-06-04 21:32:38)

Re: OOOhh my.

I am also going to ask how long the filament you are using has been exposed to air? I see in the last print what looks to be wet filament meaning it  has absorbed water and you are getting steam bubbles popping during extrusion causing small voids and rough spots.

G1 Z290 F5000 will move the Z to whatever position you desire. In this example it is in my ending gcode to move my bed down to the 290 position to make removing prints easier. Decimal values can be used as well as negative numbers. The F number is the speed it moves at and the G1 is the move command in gcode speak. Z could also be exchanged for another axis as well. So in your case if Zero is to close then you could add a line at the end of your start gcode or where needed in the gcode sequence like the following.

G1 Z.20 F200that would add .2mm to your current Z Zero position. If a positive value makes the space closer then you will naturally want to change it to a negative value. I forget which way the XYZ machine move from home.

Printing since 2009 and still love it!
Anycubic 4MAX best $225 ever invested.
Voxelabs Proxima SLA. 6 inch 2k Mono LCD.
Anycubic Predator, massive Delta machine. 450 x 370 print envelope.

18 (edited by ESOCHI 2019-06-04 21:39:46)

Re: OOOhh my.

It's brand new, opened today and ordered last week.

I think the head was so close to the Z axis that it was just blocking the flow until it build up enough pressure to "pop" out. This hypothesis would also explain the patterned pops on the circular sections of the first picture (on the right side of the large skirt/raft)

I just added the code for the auto bed leveling feature and that's where this hypothesis becomes a theory.

Look at the print on the right. I dropped the flow to 70% and ran the auto level code prior to printing.

Imgur link

Thanks for the G-code info, I'll definitely be putting that in my word document!

Regards,
ESOCHI

19 (edited by ESOCHI 2019-06-05 15:01:49)

Re: OOOhh my.

Alright so I tested the G1 Z.20 F200 and it TOTALLY DID SOMETHING.....but only for the first layer.

The second layer actually removed some from the top. As always, I'm including pictures.


First pass with only bed leveling
https://i.imgur.com/lB8recl.jpg

Tried the G1 Z.20 F200, It worked for the first layer (see the little blop in the same place as the huge bloppple in pic 1)
HOWEVER the second layer seemed to eat into the first. I'm assuming the code to drop the Z axis only held for the first later.
https://i.imgur.com/cq4BtGP.jpg

1st and 2nd layers are pictured here. Second layer is 50% done but actually looks thinner.
https://i.imgur.com/vh2S6Wp.jpg


We're getting close to perfect! I can smell it.

Regards,
ESOCHI

20 (edited by carl_m1968 2019-06-05 16:31:08)

Re: OOOhh my.

ESOCHI wrote:

Alright so I tested the G1 Z.20 F200 and it TOTALLY DID SOMETHING.....but only for the first layer.

The second layer actually removed some from the top. As always, I'm including pictures.


First pass with only bed leveling
https://i.imgur.com/lB8recl.jpg

Tried the G1 Z.20 F200, It worked for the first layer (see the little blop in the same place as the huge bloppple in pic 1)
HOWEVER the second layer seemed to eat into the first. I'm assuming the code to drop the Z axis only held for the first later.
https://i.imgur.com/cq4BtGP.jpg

1st and 2nd layers are pictured here. Second layer is 50% done but actually looks thinner.
https://i.imgur.com/vh2S6Wp.jpg


We're getting close to perfect! I can smell it.

Regards,
ESOCHI


The Gcode I gave you only sets an offset for the first layer. The rest of the layers simply stack on that layer with a slight compression. What you are after is an appearance like the middle region of this image..

http://soliforum.com/i/?8QihV3T.jpg

As you can see your current offset is creating excessively thin layers like the left side of the image.

Your first layers right no are almost nothing but the nozzle leaving outlines on the glass. The second layer is then being laid on that and still has issues. I can't really tell if it is over extrusion or not. You really need to calibrate the feed rate before you worry about sticking or not. You need to make sure over extrusion is not causing any of the issues you are having.

The normal process of printer calibration is first calibrate the feed rate, then the offset, then once you are sticking you can print a single wall hollow cube to verify and or calibrate your flow rate. Once that is right then you print a 50mm cube to confirm and or calibrate your steps per mm on each axis.

You are kind of jumping the gun here and probably shooting yourself in the foot with said gun.

Printing since 2009 and still love it!
Anycubic 4MAX best $225 ever invested.
Voxelabs Proxima SLA. 6 inch 2k Mono LCD.
Anycubic Predator, massive Delta machine. 450 x 370 print envelope.

21 (edited by ESOCHI 2019-06-05 17:33:58)

Re: OOOhh my.

I'll try a cube next.

Yeah my print head doesn't lift at all for the first 5 layers. Only on the 6th does it start to go. That code worked for the first layer and then it dropped back down to ~0.0

So strange. It's like it's using an absolute value every time.

It's certainly adhering well! I just chipped some glass from my last print. Of course over-adhesion is another symptom of my issue, but I'm glad to be able to use just clean glass.

22

Re: OOOhh my.

It could be using a different positioning system.  Some printers use relative positioning and some use absolute. If it is using relative then the command I gave you will not work as all moves are made a certain distance from the relative zero position.

While in absolute like most systems use you tell it to move X steps in a desired direction from the current position. Another issue is the placement of the offset in your start gcode. There maybe code after it that puts the head in a different position.

If you can, paste your start gcode here.

Printing since 2009 and still love it!
Anycubic 4MAX best $225 ever invested.
Voxelabs Proxima SLA. 6 inch 2k Mono LCD.
Anycubic Predator, massive Delta machine. 450 x 370 print envelope.

23

Re: OOOhh my.

Bold I've added. Printing a cube now.


;Generated with Cura_SteamEngine 15.01
; Default start code
G28 ; Home extruder
G1 Z15 F100
M107 ; Turn off fan
G90 ; Absolute positioning
M82 ; Extruder in absolute mode
M190 S20
; Activate all used extruder
M104 T0 S195
G92 E0 ; Reset extruder position
; Wait for all used extruders to reach temperature
M109 T0 S195
;Layer count: 100
;LAYER:0
M107

G28 X0 Y0 ;home X and Y
G29 ;probe bed
G90; set absolute coordinates
G92 E0; reset extruder distance
G1 Z5 F300 ;move platform down 5mm
G1 X145 Y145 F3000 ; move to back right corner

G0 F6600 X130.316 Y243.079 Z0.200
;TYPE:SKIRT
G1 F3000 X161.516 Y243.079 E1.03772
G1 X161.516 Y274.279 E2.07543
G1 X138.516 Y274.279 E2.84042
G1 X138.516 Y285.939 E3.22823
G1 X118.656 Y285.939 E3.88877
G1 X118.656 Y266.079 E4.54932
G1 X130.316 Y266.079 E4.93713
G1 X130.316 Y243.079 E5.70212
G0 F6600 X130.716 Y243.479
G1 F3000 X161.116 Y243.479 E6.71323
G1 X161.116 Y273.879 E7.72433
G1 X138.116 Y273.879 E8.48932
G1 X138.116 Y285.539 E8.87713
G1 X119.056 Y285.539 E9.51107
G1 X119.056 Y266.479 E10.14501
G1 X130.716 Y266.479 E10.53282
G1 X130.716 Y243.479 E11.29780
G1 F2400 E7.29780
G0 F6600 X136.516 Y249.279
;TYPE:WALL-INNER
G1 F2400 E11.29780
G1 F3000 X155.316 Y249.279 E11.92309
G1 X155.316 Y268.079 E12.54838
G1 X136.516 Y268.079 E13.17367
G1 X136.516 Y249.279 E13.79896
G0 F6600 X142.455 Y255.090
G1 F3000 X142.455 Y257.026 E13.86336
G1 X145.715 Y261.042 E14.03540
G1 X142.303 Y261.042 E14.14888
G1 X142.303 Y263.448 E14.22891
G1 X149.319 Y263.448 E14.46226
G1 X149.319 Y261.332 E14.53264
G1 X146.217 Y257.501 E14.69659
G1 X148.894 Y257.501 E14.78563
G1 X148.894 Y255.090 E14.86582
G1 X142.455 Y255.090 E15.07998
G0 F6600 X142.855 Y255.490
;TYPE:WALL-OUTER
G1 F3000 X142.855 Y256.884 E15.12634
G1 X146.555 Y261.442 E15.32160
G1 X142.703 Y261.442 E15.44972
G1 X142.703 Y263.048 E15.50314
G1 X148.919 Y263.048 E15.70988
G1 X148.919 Y261.473 E15.76227
G1 X145.378 Y257.101 E15.94939
G1 X148.494 Y257.101 E16.05303
G1 X148.494 Y255.490 E16.10661
G1 X142.855 Y255.490 E16.29417
G0 F6600 X142.855 Y255.190
G0 X136.416 Y249.089
G0 X136.116 Y248.879
G1 F3000 X155.716 Y248.879 E16.94607
G1 X155.716 Y268.479 E17.59797
G1 X136.116 Y268.479 E18.24986
G1 X136.116 Y248.879 E18.90176
G0 F6600 X136.655 Y249.509
;TYPE:SKIN
G1 F2700 X142.315 Y255.169 E19.16799
G0 F6600 X142.660 Y254.948
G1 F2700 X137.129 Y249.418 E19.42813
G0 F6600 X137.695 Y249.418
G1 F2700 X143.225 Y254.948 E19.68824
G0 F6600 X143.791 Y254.948
G1 F2700 X138.261 Y249.418 E19.94836
G0 F6600 X138.826 Y249.418
G1 F2700 X144.357 Y254.948 E20.20850
G0 F6600 X144.922 Y254.948
G1 F2700 X139.392 Y249.418 E20.46861
G0 F6600 X139.958 Y249.418
G1 F2700 X145.488 Y254.948 E20.72872
G0 F6600 X146.054 Y254.948
G1 F2700 X140.524 Y249.418 E20.98884
G0 F6600 X141.089 Y249.418
G1 F2700 X146.620 Y254.948 E21.24898
G0 F6600 X147.185 Y254.948
G1 F2700 X141.655 Y249.418 E21.50909
G0 F6600 X142.221 Y249.418
G1 F2700 X147.751 Y254.948 E21.76920
G0 F6600 X148.317 Y254.948
G1 F2700 X142.786 Y249.418 E22.02934
G0 F6600 X143.352 Y249.418
G1 F2700 X148.882 Y254.948 E22.28946
G0 F6600 X149.034 Y255.100
G1 F2700 X155.175 Y261.242 E22.57833
G0 F6600 X155.175 Y261.807
G1 F2700 X149.034 Y255.665 E22.86721
G0 F6600 X149.034 Y256.231
G1 F2700 X155.175 Y262.373 E23.15609
G0 F6600 X155.175 Y262.939
G1 F2700 X149.034 Y256.797 E23.44497
G0 F6600 X149.034 Y257.362
G1 F2700 X155.175 Y263.504 E23.73384
G0 F6600 X155.175 Y264.070
G1 F2700 X148.746 Y257.640 E24.03627
G0 F6600 X148.180 Y257.640
G1 F2700 X155.175 Y264.636 E24.36531
G0 F6600 X155.175 Y265.201
G1 F2700 X147.614 Y257.640 E24.72096
G0 F6600 X147.049 Y257.640
G1 F2700 X155.175 Y265.767 E25.10321
G0 F6600 X155.175 Y266.333
G1 F2700 X146.632 Y257.789 E25.50507
G0 F6600 X149.307 Y261.336
G0 X149.260 Y263.389
G0 X142.362 Y263.389
G0 X142.362 Y261.101
G0 X143.855 Y258.972
G1 F2700 X136.655 Y251.772 E25.84373
G0 F6600 X136.655 Y252.338
G1 F2700 X145.218 Y260.901 E26.24651
G0 F6600 X144.652 Y260.901
G1 F2700 X136.655 Y252.903 E26.62269
G0 F6600 X136.655 Y253.469
G1 F2700 X144.087 Y260.901 E26.97227
G0 F6600 X143.521 Y260.901
G1 F2700 X136.655 Y254.035 E27.29522
G0 F6600 X136.655 Y254.600
G1 F2700 X142.955 Y260.901 E27.59158
G0 F6600 X142.390 Y260.901
G1 F2700 X136.655 Y255.166 E27.86133
G0 F6600 X136.655 Y255.732
G1 F2700 X142.163 Y261.239 E28.12039
G0 F6600 X142.163 Y261.805
G1 F2700 X136.655 Y256.297 E28.37947

24 (edited by carl_m1968 2019-06-05 18:34:27)

Re: OOOhh my.

The fourth line in gcode is G1 Z15 F100 that will move the Z down to 15mm. Then when it executes your code it will move the Z back to 5mm. So is 5mm exactly where it needs to be? I would think you would need a decimal value to get it dialed in. If you Zeroed the bed properly then the 5mm move should put you 5mm above the bed and not at .2 like desired. I also where it probes the bed. That suggest an autoleveling system that could be overriding your move.

This line just below your bold text is going to make it move back to the .2 position where it actually should be for a first layer.

G0 F6600 X130.316 Y243.079 Z0.200

The desired thickness for a first layer is .2mm or less. Ideally it should half of your desired build layer thickness.

The correct process for zeroing and leveling a bed is to start a print. Kill the power once the head moves to the start position. Then moving the head around by hand use the adjusting screws so that a piece of paper just fits between the bed and nozzle with slight friction.

http://www.soliforum.com/topic/8408/bed … beginners/

Printing since 2009 and still love it!
Anycubic 4MAX best $225 ever invested.
Voxelabs Proxima SLA. 6 inch 2k Mono LCD.
Anycubic Predator, massive Delta machine. 450 x 370 print envelope.

25 (edited by ESOCHI 2019-06-10 15:39:30)

Re: OOOhh my.

It's Monday and I'm back in the office for another few rounds!

2cm cube printed with correct measurements except Z was 1mm off, due to the first few layers not leaving the bed. After it started lifting everything was perfectly dialed in.

Carl, I'm in agreeance that a manual calibration of the extruder would be ideal. I have no clue if that can even be done on the Workbench, as the screw I assume would be a setscrew didn't allow the extruder to move. I'm searching for help on that but haven't found anything yet. Maybe knowack would know as they have swapped parts on theirs.

I'm getting much more used to messing with G-code now, and I get what you meant by "Start Gcode"

I had just given you the first 150 lines but I'm now editing and saving and testing the actual "start" section within the Cura settings. I've been trying to add a full mm to the Z absolute positioning, because it most definitely is that.

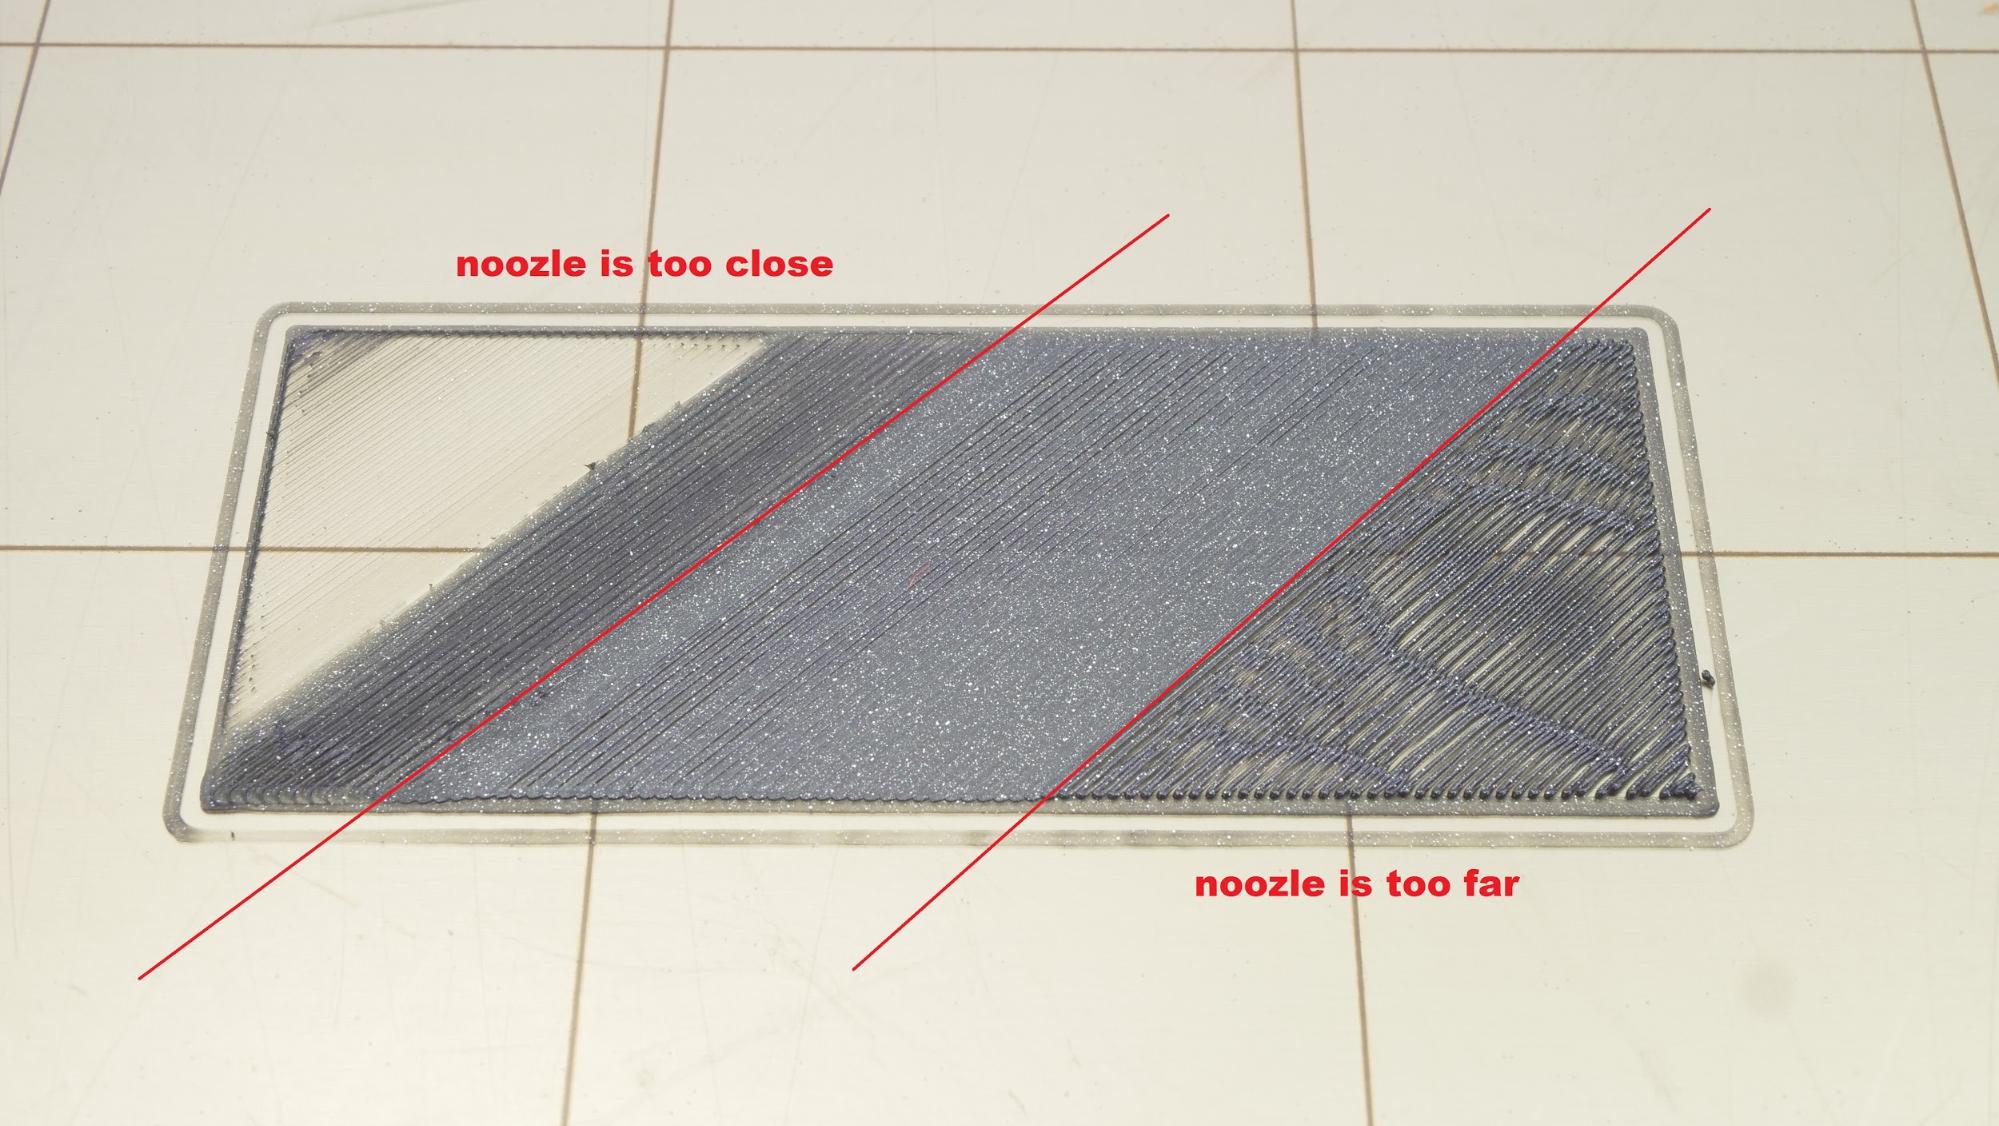
My feed rates and extrusion rates are 100% on point, the distance between layers is perfect, the temperatures are set nominally.

This thing is awesome aside from the last gremlin.

Allow me to re-post that start code and show what I've been trying. I didn't do all of these at once, but rather 1 by 1

; Default start code
G28 ; Home extruder
G1 Z15 F{Z_TRAVEL_SPEED}
M107 ; Turn off fan

G28 X0 Y0 ;home X and Y
G29 ;probe bed
G1 Z+/-1 F200 ; I want to add this somewhere so that it changes the absolute coord to what I need
G90; set absolute coordinates
G92 E0; reset extruder distance
G1 Z4 F300 ;move platform down 5mm EDITED TO 4 no difference here didn't work
G1 X145 Y145 F3000 ; move to back right corner

G1 Z1 F200 ; TESTING HERE RIGHT NOW
G90 ; Absolute positioning (redundant, do I need 2 G90s? this was originally here)
M82 ; Extruder in absolute mode
{IF_BED}M190 S{BED}
; Activate all used extruder
{IF_EXT0}M104 T0 S{TEMP0}
G92 E0 ; Reset extruder position
; Wait for all used extruders to reach temperature
{IF_EXT0}M109 T0 S{TEMP0}