Re: Davinci Jr/Mini emulating the NFC reader and tag on demand UID cycling
Are those the one I sent you? If they are then they should work fine. Did you remove the rhys emulator and put the tag reader back in?
You are not logged in. Please login or register.
SoliForum - 3D Printing Community → XYZ Printing Hacks & Mods → Davinci Jr/Mini emulating the NFC reader and tag on demand UID cycling
Are those the one I sent you? If they are then they should work fine. Did you remove the rhys emulator and put the tag reader back in?
Are those the one I sent you? If they are then they should work fine. Did you remove the rhys emulator and put the tag reader back in?
Yes and yes. I just placed them on the top of the white tag holder and hung it back in place. The third try I zip tied the white piece ad close to the holder as possible and that seemed to take care of the spool error. that print went to 32 percent and just stopped for no apparent reason. screen looked normal all buttons worked. paused and resumed the print but it would not move from where it stopped at.
Well, that sounds like a different issue. Did you check and make sure there are no loose connections?
I was not blaming your tags or the emulator. That is the next step is to pull all covers and check the connections. Printer is not a high priority right now just didnt want to leave any one hanging.
Ok
Very interested in the emulator solution, but the Voltprojects store (from the first post) says the product is not available and the ebay listing has ended. Is there any chance of getting the board? If not, I'm willing to try and build one (I have a lot less experience with PIC programming, but access to the PIC ecosystem) but would appreciate any pointers or suggestions in where to start.
I have an xyzPrinting daVinci miniMaker, but using the stock filament has become very frustrating for me ![]()
Hi sorry,
I'm currently out of stock. (Only have enough parts to forfill existing order back log)
Next week. I plan working on a new design.
Stock of new design
should be available in coming weeks probably about 3 or more
Also on my to-do list is releasing a firmware update for existing board version.
What is the pinout of the pn512 board? I understand it's I2C bus there, will it be possible to use Arduino to emulate all the stuff?
Hi, I just got my card, and it sort of works. My problem is that the usb connector is slightly broken. If I pull it out a bit it connects, but I can't get a stable connection for long. I have managed to get it to work long enough to write a tag to it, and then get it stable long enough to get it showing in XYZware. Are there any points bigger than the ones on the connector itself that I can solder wires from a usb cable to?
Hi, I just got my card, and it sort of works. My problem is that the usb connector is slightly broken. If I pull it out a bit it connects, but I can't get a stable connection for long. I have managed to get it to work long enough to write a tag to it, and then get it stable long enough to get it showing in XYZware. Are there any points bigger than the ones on the connector itself that I can solder wires from a usb cable to?
that's unfortunate the usb port is not very easy to solder, if your not able to re-flow the connector it's self.
here is the part of the PCB layout hopefully that helps
beyond whats see there the d+/d- just go to the relevant pins of the pic32mx250f128B micro controller USB id is not used.
Ok I've finished the new design. It will change the UID when there is less when there is less then 10m remaining and it is powered up. or can be changed on demand using the reed switch (wave a magnet at the board). I expect to have the new boards available in the coming weeks.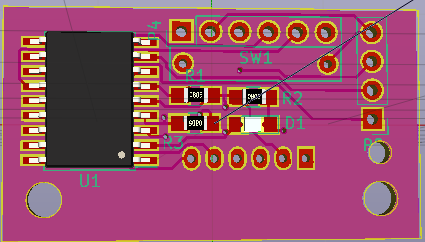
if you have the existing board version and want to test the new version send me a PM I may give a small number away for free. I'm hoping the reed switch will work through the plastic enclosure but haven't tested this.
As promised I also will soon make available a firmware update for existing boards.
Sverre wrote:Hi, I just got my card, and it sort of works. My problem is that the usb connector is slightly broken. If I pull it out a bit it connects, but I can't get a stable connection for long. I have managed to get it to work long enough to write a tag to it, and then get it stable long enough to get it showing in XYZware. Are there any points bigger than the ones on the connector itself that I can solder wires from a usb cable to?
that's unfortunate the usb port is not very easy to solder, if your not able to re-flow the connector it's self.
here is the part of the PCB layout hopefully that helps
beyond whats see there the d+/d- just go to the relevant pins of the pic32mx250f128B micro controller USB id is not used.
Thanks for the reply. Were you trying to add a picture?
rhys wrote:Sverre wrote:Hi, I just got my card, and it sort of works. My problem is that the usb connector is slightly broken. If I pull it out a bit it connects, but I can't get a stable connection for long. I have managed to get it to work long enough to write a tag to it, and then get it stable long enough to get it showing in XYZware. Are there any points bigger than the ones on the connector itself that I can solder wires from a usb cable to?
that's unfortunate the usb port is not very easy to solder, if your not able to re-flow the connector it's self.
here is the part of the PCB layout hopefully that helps
beyond whats see there the d+/d- just go to the relevant pins of the pic32mx250f128B micro controller USB id is not used.Thanks for the reply. Were you trying to add a picture?
Yes, I only just noticed it was missing. 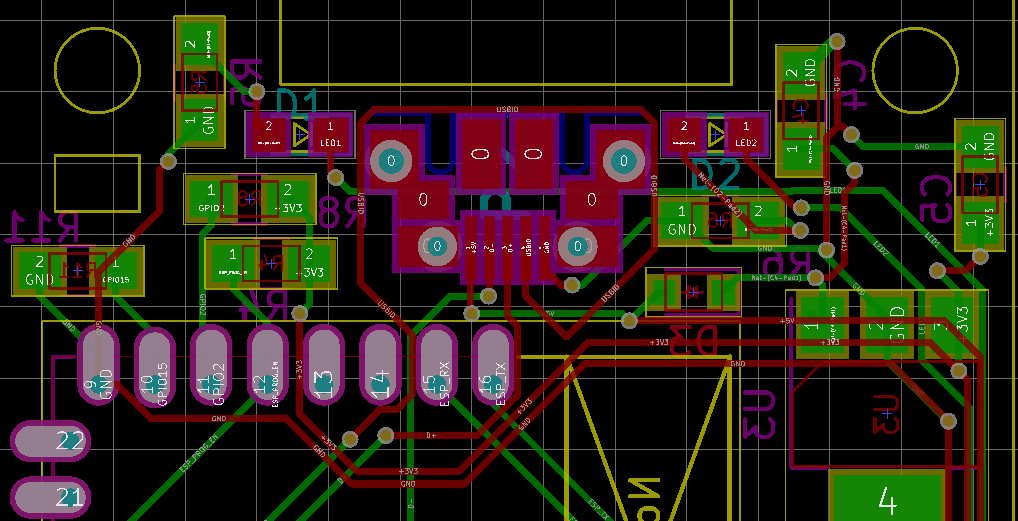
Sverre wrote:rhys wrote:that's unfortunate the usb port is not very easy to solder, if your not able to re-flow the connector it's self.
here is the part of the PCB layout hopefully that helps
beyond whats see there the d+/d- just go to the relevant pins of the pic32mx250f128B micro controller USB id is not used.Thanks for the reply. Were you trying to add a picture?
Yes, I only just noticed it was missing.
Thanks a lot! So, I should be able to get it working by wiring D+ and D- to the controller directly, +5 to D3, and GND to GND on R6?
rhys wrote:Sverre wrote:Thanks for the reply. Were you trying to add a picture?
Yes, I only just noticed it was missing.
Thanks a lot! So, I should be able to get it working by wiring D+ and D- to the controller directly, +5 to D3, and GND to GND on R6?
yes that should work
Sverre wrote:rhys wrote:Yes, I only just noticed it was missing.
Thanks a lot! So, I should be able to get it working by wiring D+ and D- to the controller directly, +5 to D3, and GND to GND on R6?
yes that should work
It did! Thank you so much for the help, and for making this cool bit of chip wizardry!
Ok I've finished the new design. It will change the UID when there is less when there is less then 10m remaining and it is powered up. or can be changed on demand using the reed switch (wave a magnet at the board). I expect to have the new boards available in the coming weeks.
if you have the existing board version and want to test the new version send me a PM I may give a small number away for free. I'm hoping the reed switch will work through the plastic enclosure but haven't tested this.
As promised I also will soon make available a firmware update for existing boards.
Update:
I've received and assembled the first batch of boards with the new design, I've been testing them over the weekend. so far no major issues. I hope to send the the 3 or so that I said I would give away in the next day or 2. I'll start accepting new orders hopefully by next week.
Good to hear you were able to implement the self roll over.
Update:
I've spent a large chunk of time working on the firmware this took much longer then hoped but it's finished for now.
I'm planning on publishing the new board for sale by end of next week.
The new board has 3 modes as follows.
Activate reed-switch with a magnet for 2,6 or 8 seconds to reset with temperature 191,200 or 210.
the led has 3 brightness levels that gives an indication of the mode.
I have parts on hand to make round 30 boards (including a small number of test units already assembled) so availability should not be an issue unlike the last design.
Update:
I've spent a large chunk of time working on the firmware this took much longer then hoped but it's finished for now.
I'm planning on publishing the new board for sale by end of next week.The new board has 3 modes as follows.
Activate reed-switch with a magnet for 2,6 or 8 seconds to reset with temperature 191,200 or 210.
the led has 3 brightness levels that gives an indication of the mode.I have parts on hand to make round 30 boards (including a small number of test units already assembled) so availability should not be an issue unlike the last design.
Received the new card today - will give it a try tonight/tomorrow.
**EDIT**
At first look, it looks good.
Put the magnet next to the reed switch and the flashing LED stops, after 2 secs, it comes on low, then a few secs later it's medium and a few more it's brighter - you don't have to count the secs.
Colours are set as Nature, Purple and White for the 3 temps.
Just need to decide what to print ![]()
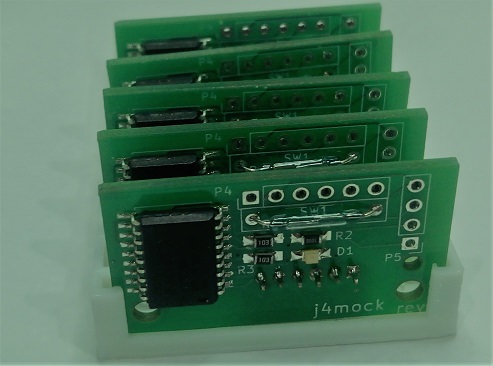
New design looks nice.
rhys wrote:Update:
I've spent a large chunk of time working on the firmware this took much longer then hoped but it's finished for now.
I'm planning on publishing the new board for sale by end of next week.The new board has 3 modes as follows.
Activate reed-switch with a magnet for 2,6 or 8 seconds to reset with temperature 191,200 or 210.
the led has 3 brightness levels that gives an indication of the mode.I have parts on hand to make round 30 boards (including a small number of test units already assembled) so availability should not be an issue unlike the last design.
Received the new card today - will give it a try tonight/tomorrow.
**EDIT**
At first look, it looks good.
Put the magnet next to the reed switch and the flashing LED stops, after 2 secs, it comes on low, then a few secs later it's medium and a few more it's brighter - you don't have to count the secs.Colours are set as Nature, Purple and White for the 3 temps.
Just need to decide what to print
good to hear. how did you go about mounting it?, if you've got that far. I've just made up the attached bracket for the jr
cgrillo wrote:rhys wrote:Update:
I've spent a large chunk of time working on the firmware this took much longer then hoped but it's finished for now.
I'm planning on publishing the new board for sale by end of next week.The new board has 3 modes as follows.
Activate reed-switch with a magnet for 2,6 or 8 seconds to reset with temperature 191,200 or 210.
the led has 3 brightness levels that gives an indication of the mode.I have parts on hand to make round 30 boards (including a small number of test units already assembled) so availability should not be an issue unlike the last design.
Received the new card today - will give it a try tonight/tomorrow.
**EDIT**
At first look, it looks good.
Put the magnet next to the reed switch and the flashing LED stops, after 2 secs, it comes on low, then a few secs later it's medium and a few more it's brighter - you don't have to count the secs.Colours are set as Nature, Purple and White for the 3 temps.
Just need to decide what to print
good to hear. how did you go about mounting it?, if you've got that far. I've just made up the attached bracket for the jr
Did a 4h print last night and had no issues at all.
This is definitely my recommended solution nor the printers now - by far the easiest to use ![]()
It isn't mounted yet - I'll print off the mount you have supplied
I received the new board a week or two ago. Since my son now has the printer, I sent it to him. He just installed it ( not yet mounted) and tested it. It works as promised. The printer did have a spool error before he installed it. Just put it in, powered it up and its ready to go.
So, I do have to say, I think this is the BEST method eliminate the need for tag data.
Thank you Rhys.................
Hello, I have a da Vinci Jr. 1.0. My firmware is 2.2.8. I am interested in buying one of these if it can be used to reset a nfc chip to be able to use different spools in the system.
Do you have a video showing how to use it on a da Vinci Jr. 1.0
How can I purchase one of these from you?
SoliForum - 3D Printing Community → XYZ Printing Hacks & Mods → Davinci Jr/Mini emulating the NFC reader and tag on demand UID cycling
Powered by PunBB, supported by Informer Technologies, Inc.