# Robot module configurations : general handling of movement G-codes and slicing into moves
default_feed_rate 4000 # Default rate ( mm/minute ) for G1/G2/G3 moves
default_seek_rate 4000 # Default rate ( mm/minute ) for G0 moves
mm_per_arc_segment 0.5 # Arcs are cut into segments ( lines ), this is the length for these segments. Smaller values mean more resolution, higher values mean faster computation
#mm_per_line_segment 5 # Lines can be cut into segments ( not usefull with cartesian coordinates robots ).
# Arm solution configuration : Cartesian robot. Translates mm positions into stepper positions
alpha_steps_per_mm 80 # Steps per mm for alpha stepper
beta_steps_per_mm 80 # Steps per mm for beta stepper
gamma_steps_per_mm 1637.7953 # Steps per mm for gamma stepper
# Planner module configuration : Look-ahead and acceleration configuration
planner_queue_size 32 # DO NOT CHANGE THIS UNLESS YOU KNOW EXACTLY WHAT YOUR ARE DOING
acceleration 3000 # Acceleration in mm/second/second.
#z_acceleration 500 # Acceleration for Z only moves in mm/s^2, 0 disables it, disabled by default. DO NOT SET ON A DELTA
junction_deviation 0.05 # Similar to the old "max_jerk", in millimeters, see : https://github.com/grbl/grbl/blob/master/planner.c#L409
# and https://github.com/grbl/grbl/wiki/Configuring-Grbl-v0.8 . Lower values mean being more careful, higher values means being faster and have more jerk
# Stepper module configuration
microseconds_per_step_pulse 1 # Duration of step pulses to stepper drivers, in microseconds
base_stepping_frequency 100000 # Base frequency for stepping
# Stepper module pins ( ports, and pin numbers, appending "!" to the number will invert a pin )
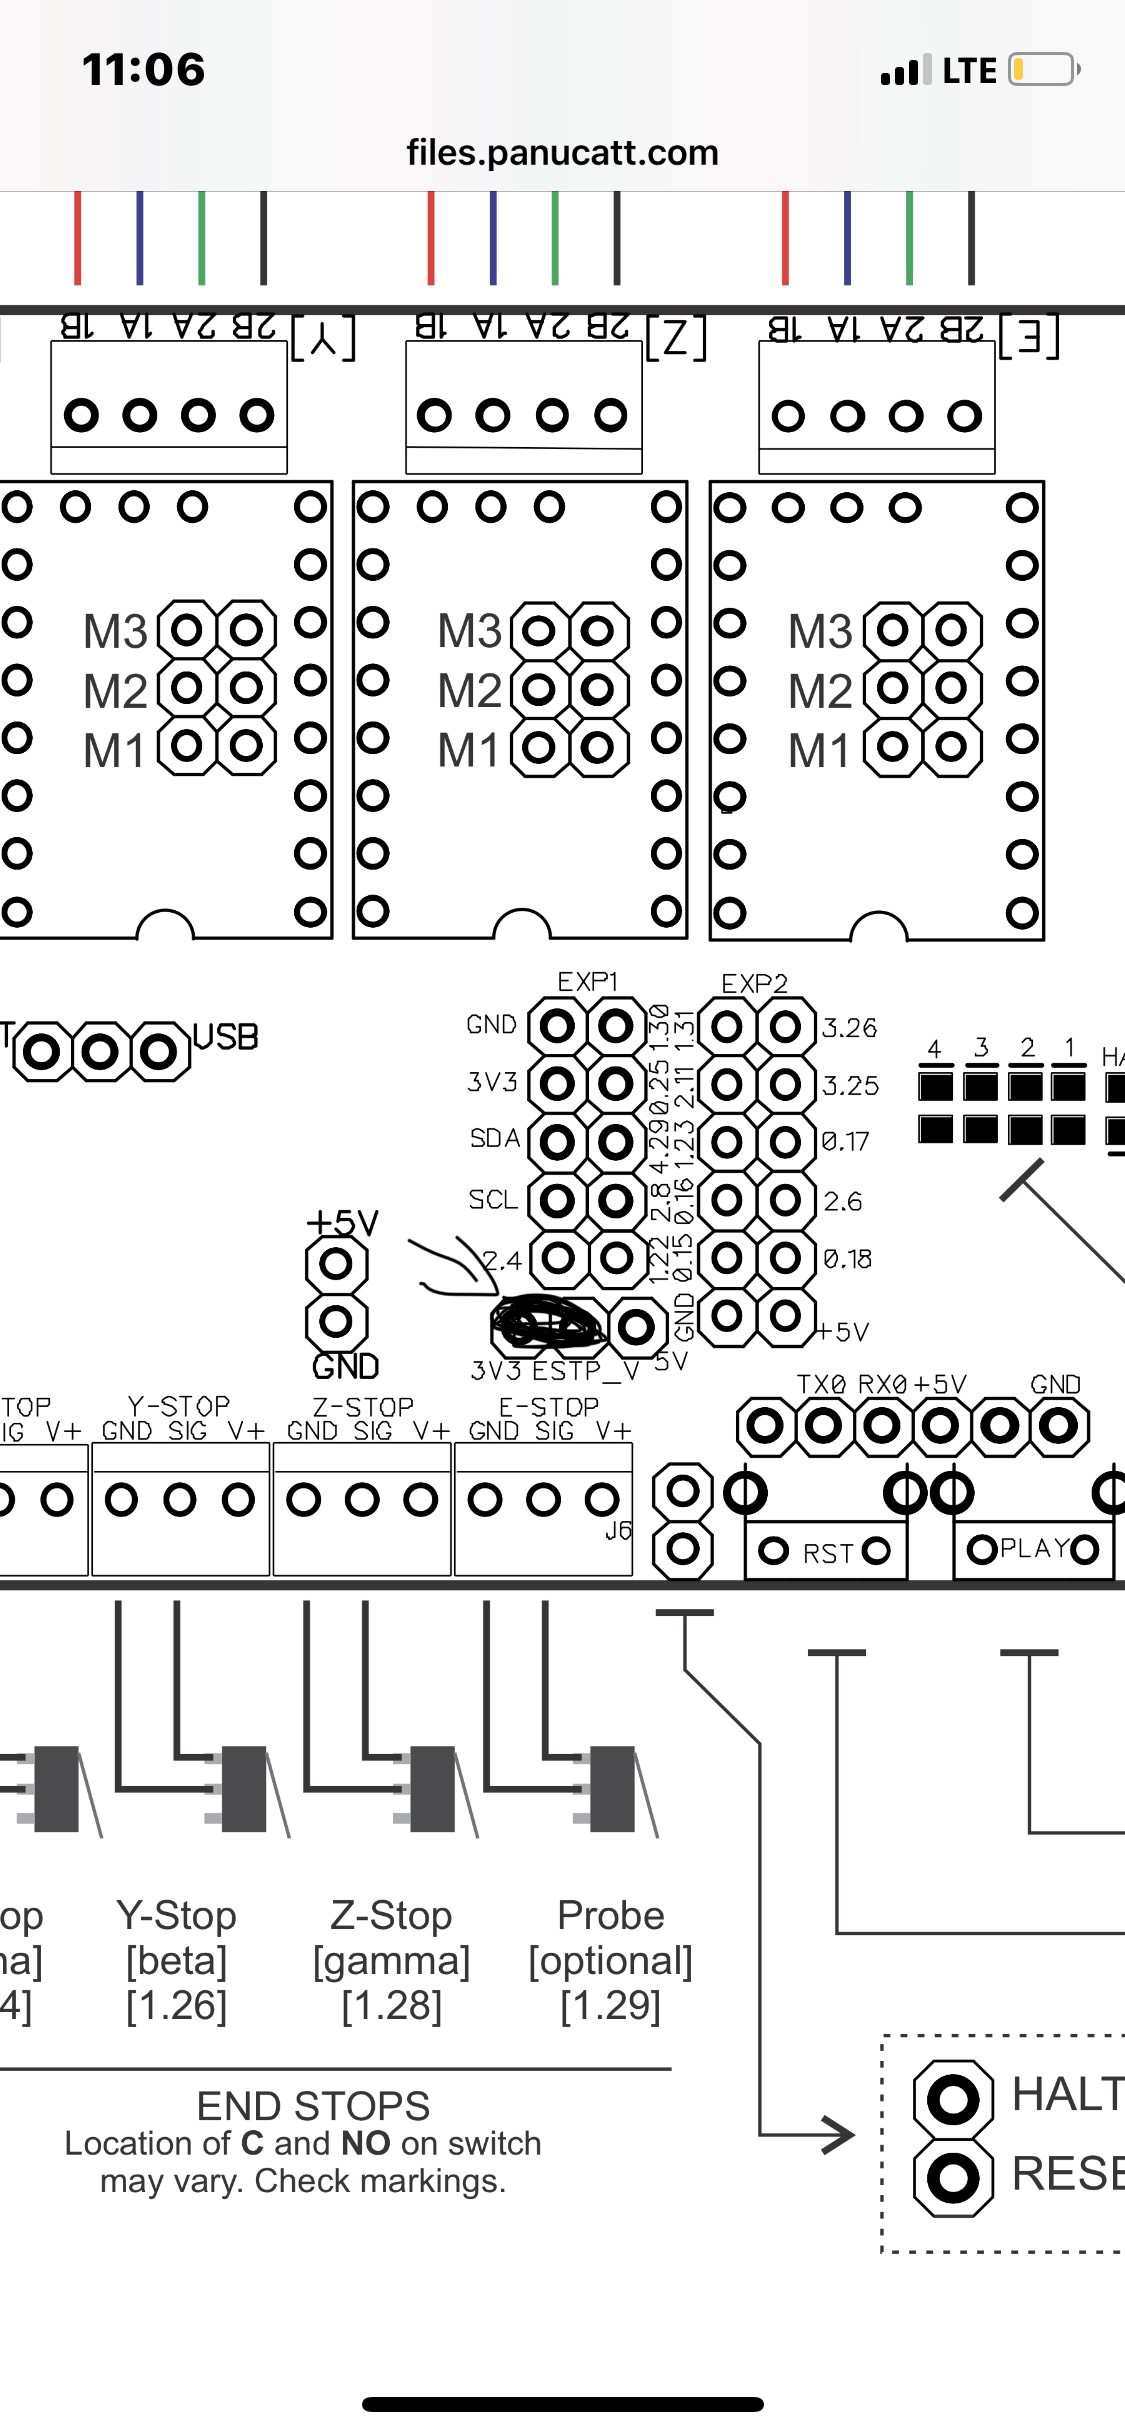
alpha_step_pin 2.1 # Pin for alpha stepper step signal
alpha_dir_pin 0.11 # Pin for alpha stepper direction
alpha_en_pin 0.10 # Pin for alpha enable pin
alpha_current 0.5 # X stepper motor current
x_axis_max_speed 30000 # mm/min
alpha_max_rate 30000.0 # mm/min actuator max speed
beta_step_pin 2.2 # Pin for beta stepper step signal
beta_dir_pin 0.20 # Pin for beta stepper direction
beta_en_pin 0.19 # Pin for beta enable
beta_current 0.5 # Y stepper motor current
y_axis_max_speed 30000 # mm/min
beta_max_rate 30000.0 # mm/min actuator max speed
gamma_step_pin 2.3 # Pin for gamma stepper step signal
gamma_dir_pin 0.22 # Pin for gamma stepper direction
gamma_en_pin 0.21 # Pin for gamma enable
gamma_current 0.5 # Z stepper motor current
z_axis_max_speed 300 # mm/min
gamma_max_rate 300.0 # mm/min actuator max speed
# Serial communications configuration ( baud rate default to 9600 if undefined )
uart0.baud_rate 115200 # Baud rate for the default hardware serial port
second_usb_serial_enable false # This enables a second usb serial port (to have both pronterface and a terminal connected)
#msd_disable false # disable the MSD (USB SDCARD) when set to true
#leds_disable true # disable using leds after config loaded
#dfu_enable false # for linux developers, set to true to enable DFU
#watchdog_timeout 10 # watchdog timeout in seconds, default is 10, set to 0 to disable the watchdog
## Extruder module configuration
extruder.hotend.enable true # Whether to activate the extruder module at all. All configuration is ignored if false
extruder.hotend.steps_per_mm 140 # Steps per mm for extruder stepper
extruder.hotend.default_feed_rate 600 # Default rate ( mm/minute ) for moves where only the extruder moves
extruder.hotend.acceleration 500 # Acceleration for the stepper motor mm/sec²
extruder.hotend.max_speed 50 # mm/s
extruder.hotend.step_pin 2.0 # Pin for extruder step signal
extruder.hotend.dir_pin 0.5 # Pin for extruder dir signal
extruder.hotend.en_pin 0.4 # Pin for extruder enable signal
delta_current 1.0 # Extruder stepper motor current
# Laser module configuration
laser_module_enable false # Whether to activate the laser module at all. All configuration is
# ignored if false.
#laser_module_pin 2.5 # this pin will be PWMed to control the laser. Only P2.0 - P2.5, P1.18, P1.20, P1.21, P1.23, P1.24, P1.26, P3.25, P3.26
# can be used since laser requires hardware PWM
#laser_module_maximum_power 1.0 # this is the maximum duty cycle that will be applied to the laser
#laser_module_minimum_power 0.0 # This is a value just below the minimum duty cycle that keeps the laser
# active without actually burning.
#laser_module_default_power 0.8 # This is the default laser power that will be used for cuts if a power has not been specified. The value is a scale between
# the maximum and minimum power levels specified above
#laser_module_pwm_period 20 # this sets the pwm frequency as the period in microseconds
# Hotend temperature control configuration
temperature_control.hotend.enable true # Whether to activate this ( "hotend" ) module at all. All configuration is ignored if false.
temperature_control.hotend.thermistor_pin 0.24 # Pin for the thermistor to read
temperature_control.hotend.heater_pin 2.5 # Pin that controls the heater
temperature_control.hotend.thermistor EPCOS100K # see http://smoothieware.org/temperaturecontrol#toc5
#temperature_control.hotend.beta 4066 # or set the beta value
temperature_control.hotend.set_m_code 104 #
temperature_control.hotend.set_and_wait_m_code 109 #
temperature_control.hotend.designator T #
#temperature_control.hotend.max_temp 300 # Set maximum temperature - Will prevent heating above 300 by default
#temperature_control.hotend.min_temp 0 # Set minimum temperature - Will prevent heating below 0 by default
# safety control is enabled by default and can be overidden here, the values show the defaults
#temperature_control.hotend.runaway_heating_timeout 900 # max is 2040 seconds, how long it can take to heat up
#temperature_control.hotend.runaway_cooling_timeout 0 # max is 2040 seconds, how long it can take to cool down if temp is set lower
#temperature_control.hotend.runaway_range 20 # Max setting is 63°C
temperature_control.hotend.p_factor 13.7 #
temperature_control.hotend.i_factor 0.097 #
temperature_control.hotend.d_factor 24 #
temperature_control.bed.enable false #
temperature_control.bed.thermistor_pin 0.23 #
temperature_control.bed.heater_pin 2.7 #
temperature_control.bed.thermistor EPCOS100K # see http://smoothieware.org/temperaturecontrol#toc5
#temperature_control.bed.beta 4066 # or set the beta value
temperature_control.bed.set_m_code 140 #
temperature_control.bed.set_and_wait_m_code 190 #
temperature_control.bed.designator B #
# Switch module for fan control
switch.fan.enable true #
switch.fan.input_on_command M106 #
switch.fan.input_off_command M107 #
switch.fan.output_pin 1.25 #
switch.misc.enable false #
switch.misc.input_on_command M42 #
switch.misc.input_off_command M43 #
switch.misc.output_pin 0.26 #
# automatically toggle a switch at a specified temperature. Different ones of these may be defined to monitor different temperatures and switch different swithxes
# useful to turn on a fan or water pump to cool the hotend
#temperatureswitch.hotend.enable true #
#temperatureswitch.hotend.designator T # first character of the temperature control designator to use as the temperature sensor to monitor
#temperatureswitch.hotend.switch misc # select which switch to use, matches the name of the defined switch
#temperatureswitch.hotend.threshold_temp 60.0 # temperature to turn on (if rising) or off the switch
#temperatureswitch.hotend.heatup_poll 15 # poll heatup at 15 sec intervals
#temperatureswitch.hotend.cooldown_poll 60 # poll cooldown at 60 sec intervals
# filament out detector
#filament_detector.enable true #
#filament_detector.encoder_pin 0.26 # must be interrupt enabled pin (0.26, 0.27, 0.28)
#filament_detector.seconds_per_check 2 # may need to be longer
#filament_detector.pulses_per_mm 1 .0 # will need to be tuned
#filament_detector.bulge_pin 0.27 # optional bulge detector switch and/or manual suspend
# Switch module for spindle control
#switch.spindle.enable false #
# Endstops
endstops_enable true # the endstop module is enabled by default and can be disabled here
#corexy_homing false # set to true if homing on a hbot or corexy
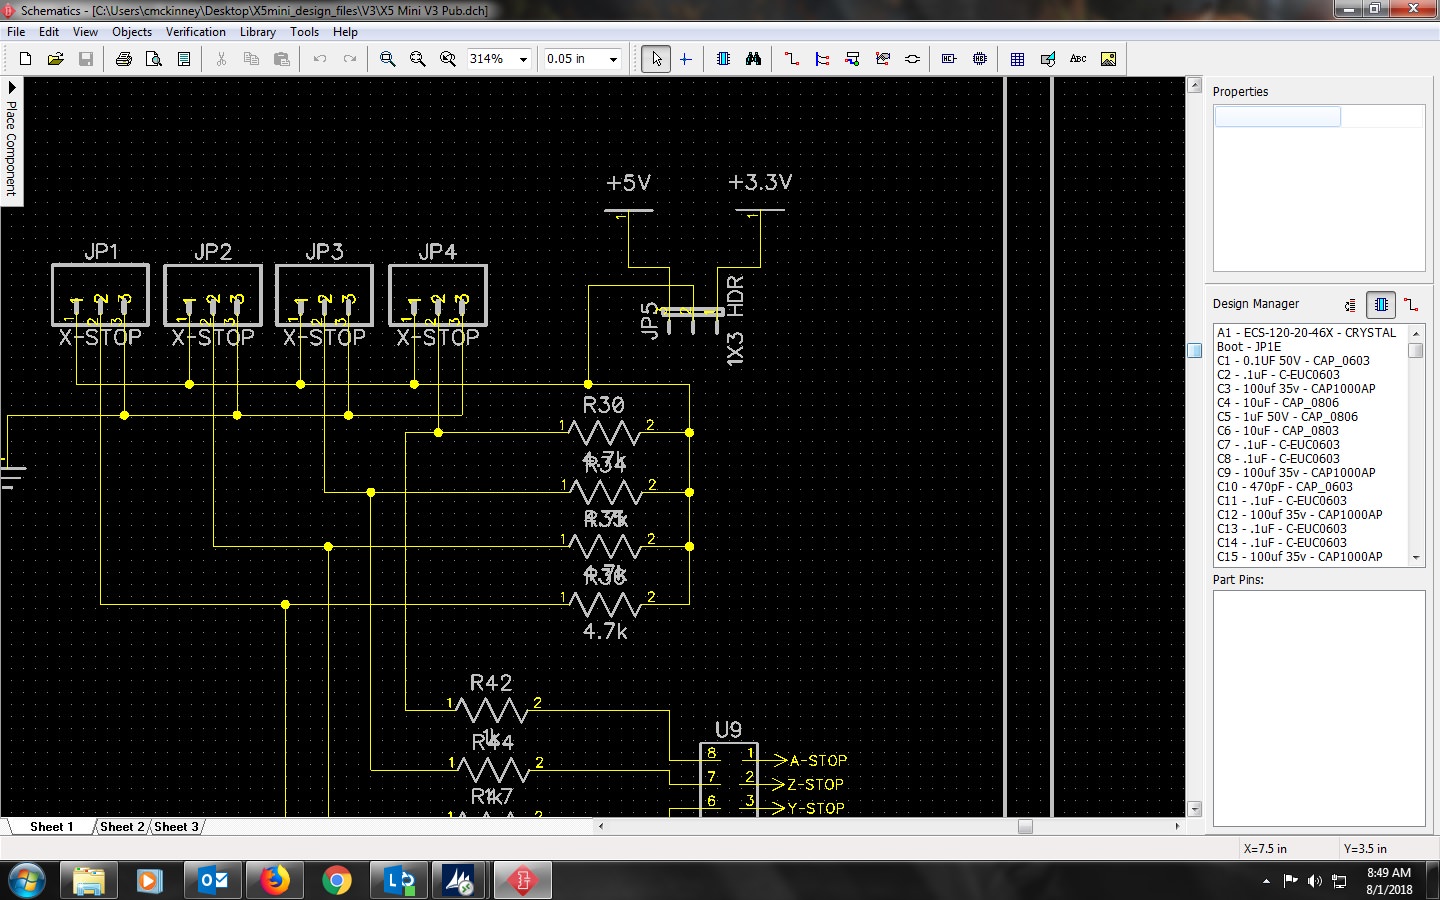
alpha_min_endstop 1.24^ # add a ! to invert if endstop is NO connected to ground
#alpha_max_endstop 1.24^ #
alpha_homing_direction home_to_min # or set to home_to_max and set alpha_max
alpha_min 0 # this gets loaded after homing when home_to_min is set
alpha_max 200 # this gets loaded after homing when home_to_max is set
beta_min_endstop 1.26^ #
#beta_max_endstop 1.26^ #
beta_homing_direction home_to_min #
beta_min 0 #
beta_max 200 #
gamma_min_endstop 1.28^ #
#gamma_max_endstop 1.28^ #
gamma_homing_direction home_to_min #
gamma_min 0 #
gamma_max 200 #
alpha_max_travel 500 # max travel in mm for alpha/X axis when homing
beta_max_travel 500 # max travel in mm for beta/Y axis when homing
gamma_max_travel 500 # max travel in mm for gamma/Z axis when homing
# optional enable limit switches, actions will stop if any enabled limit switch is triggered
#alpha_limit_enable false # set to true to enable X min and max limit switches
#beta_limit_enable false # set to true to enable Y min and max limit switches
#gamma_limit_enable false # set to true to enable Z min and max limit switches
#move_to_origin_after_home false # move XY to 0,0 after homing
#probe endstop
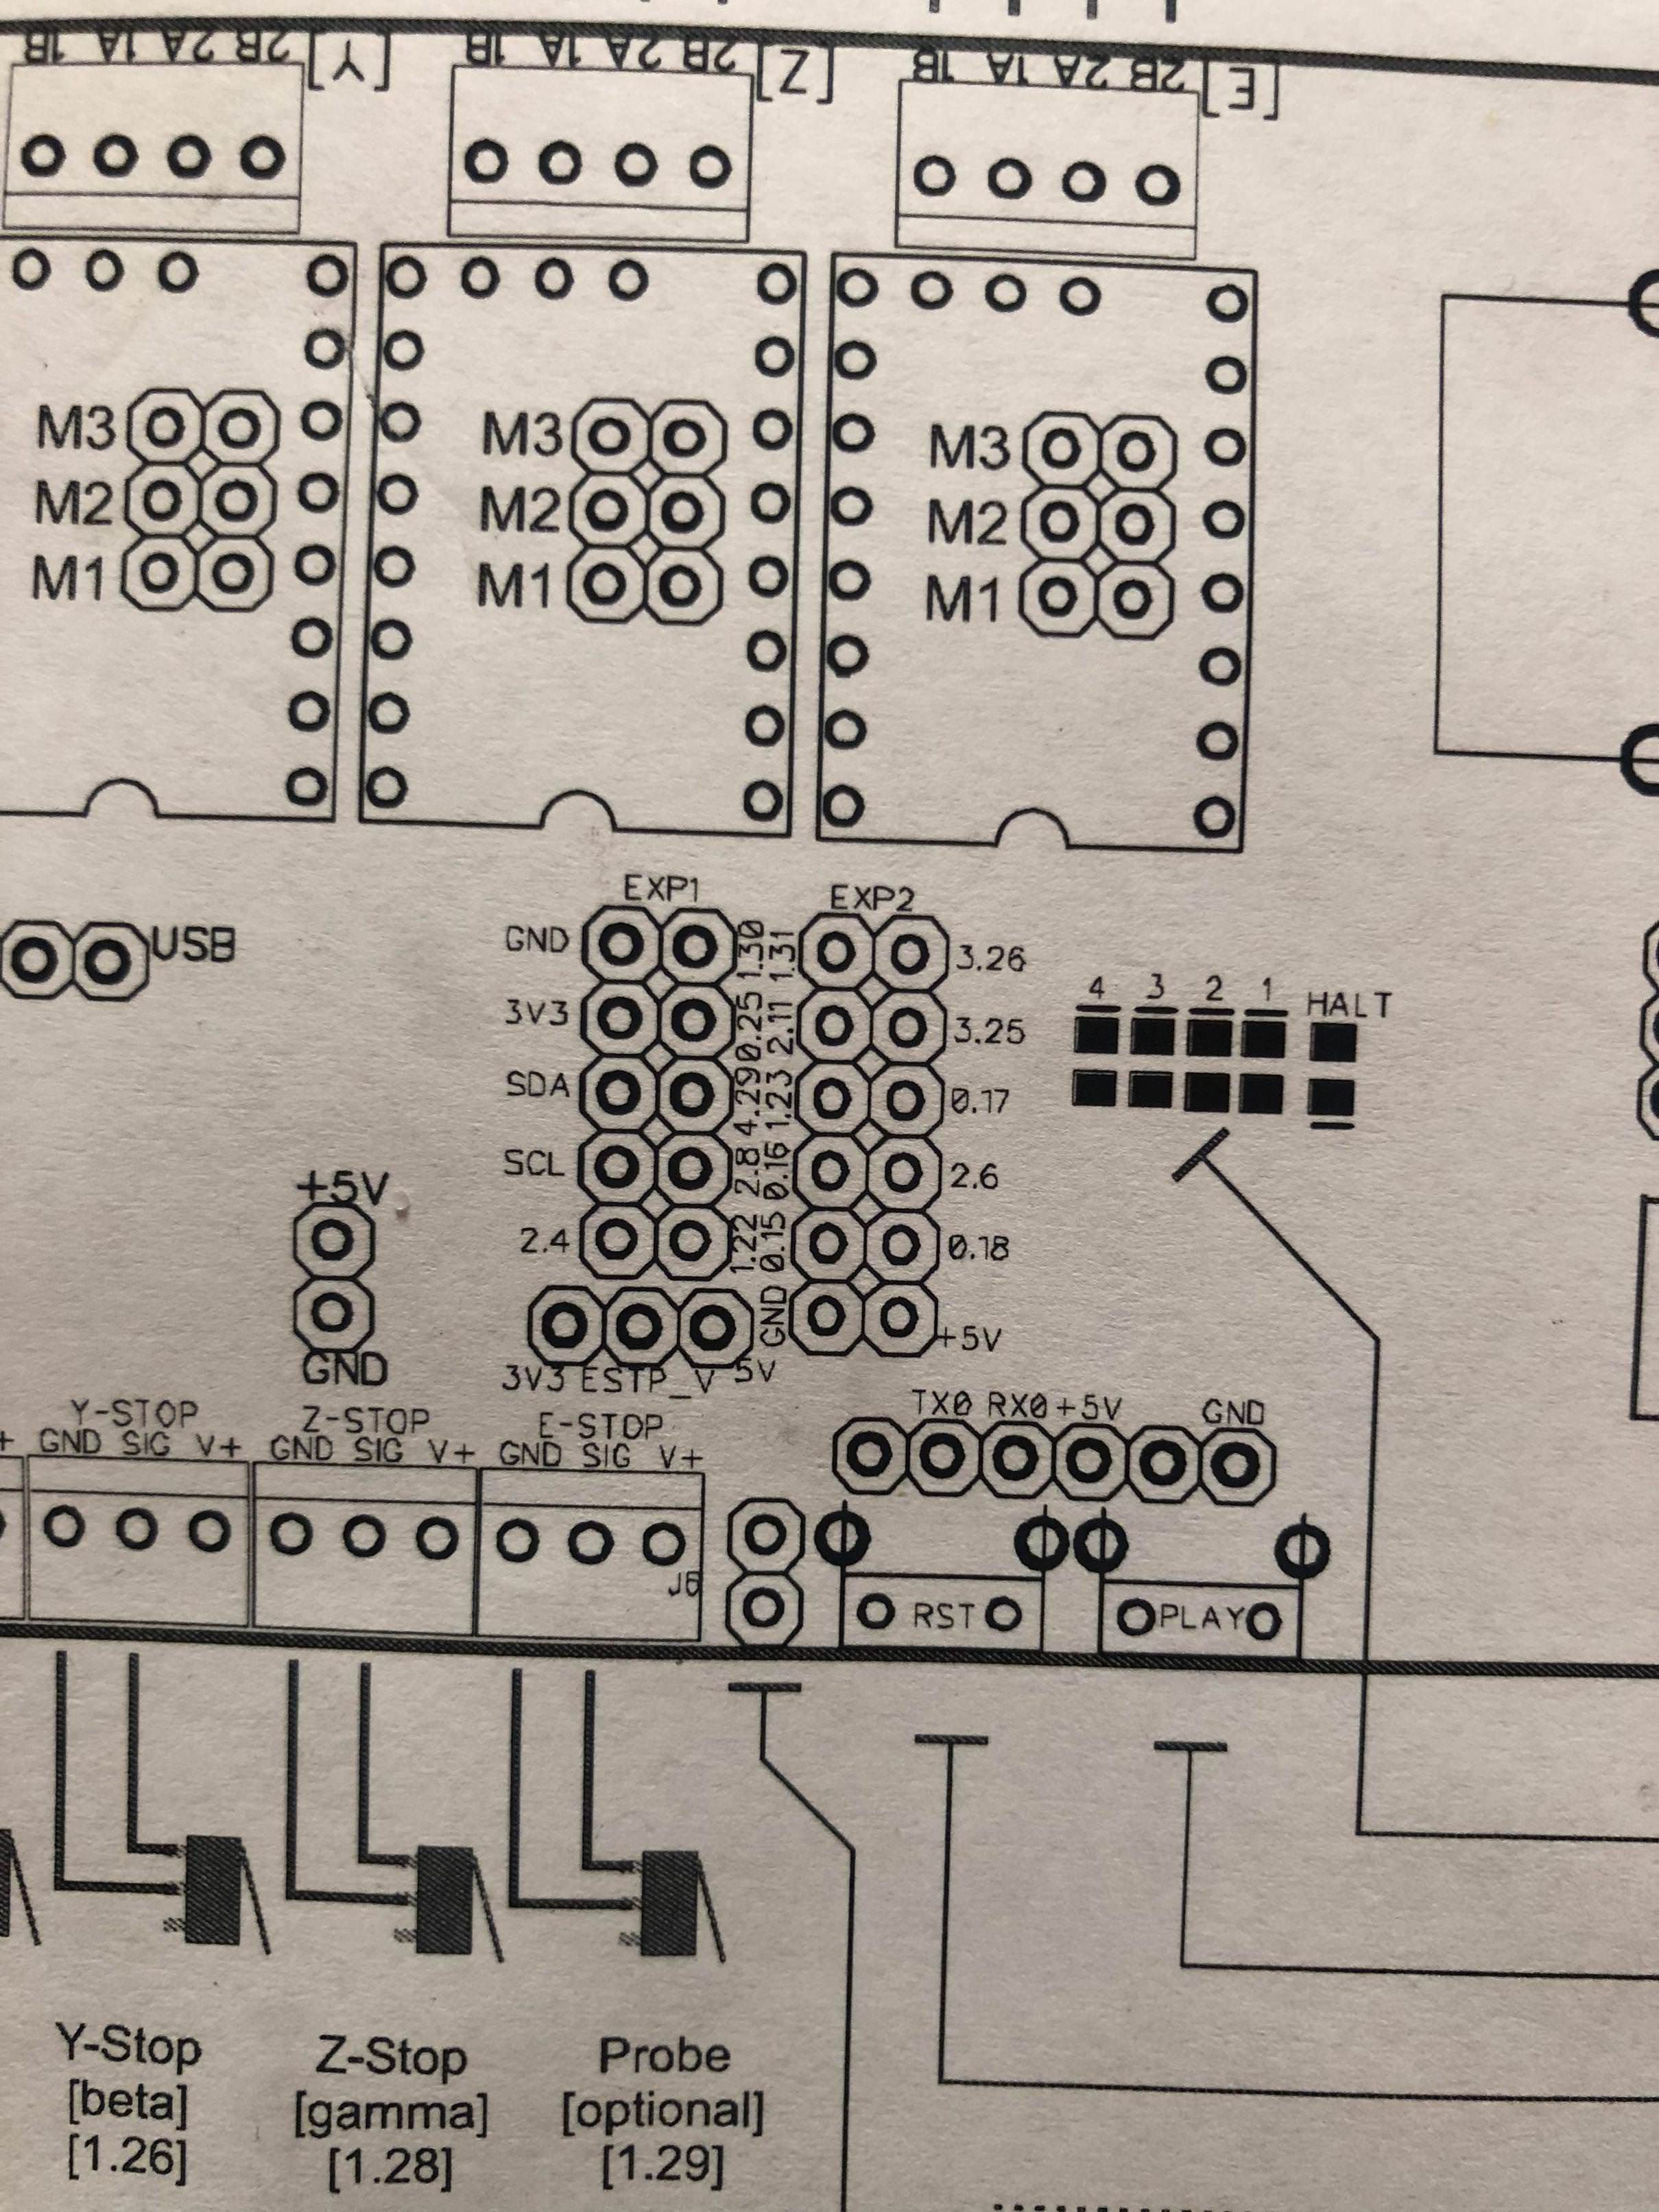
#probe_pin 1.29 # optional pin for probe
alpha_fast_homing_rate_mm_s 50 # feedrates in mm/second
beta_fast_homing_rate_mm_s 50 # "
gamma_fast_homing_rate_mm_s 4 # "
alpha_slow_homing_rate_mm_s 25 # "
beta_slow_homing_rate_mm_s 25 # "
gamma_slow_homing_rate_mm_s 2 # "
alpha_homing_retract_mm 5 # distance in mm
beta_homing_retract_mm 5 # "
gamma_homing_retract_mm 1 # "
#endstop_debounce_count 100 # uncomment if you get noise on your endstops, default is 100
# optional Z probe
zprobe.enable false # set to true to enable a zprobe
zprobe.probe_pin 1.29!^ # pin probe is attached to if NC remove the !
zprobe.slow_feedrate 5 # mm/sec probe feed rate
#zprobe.debounce_ms 1 # set if noisy
zprobe.fast_feedrate 100 # move feedrate mm/sec
zprobe.probe_height 5 # how much above bed to start probe
# associated with zprobe the leveling strategy to use
#leveling-strategy.three-point-leveling.enable true # a leveling strategy that probes three points to define a plane and keeps the Z parallel to that plane
#leveling-strategy.three-point-leveling.point1 100.0,0.0 # the first probe point (x,y) optional may be defined with M557
#leveling-strategy.three-point-leveling.point2 200.0,200.0 # the second probe point (x,y)
#leveling-strategy.three-point-leveling.point3 0.0,200.0 # the third probe point (x,y)
#leveling-strategy.three-point-leveling.home_first true # home the XY axis before probing
#leveling-strategy.three-point-leveling.tolerance 0.03 # the probe tolerance in mm, anything less that this will be ignored, default is 0.03mm
#leveling-strategy.three-point-leveling.probe_offsets 0,0,0 # the probe offsets from nozzle, must be x,y,z, default is no offset
#leveling-strategy.three-point-leveling.save_plane false # set to true to allow the bed plane to be saved with M500 default is false
# kill button (used to be called pause) maybe assigned to a different pin, set to the onboard pin by default
kill_button_enable true # set to true to enable a kill button
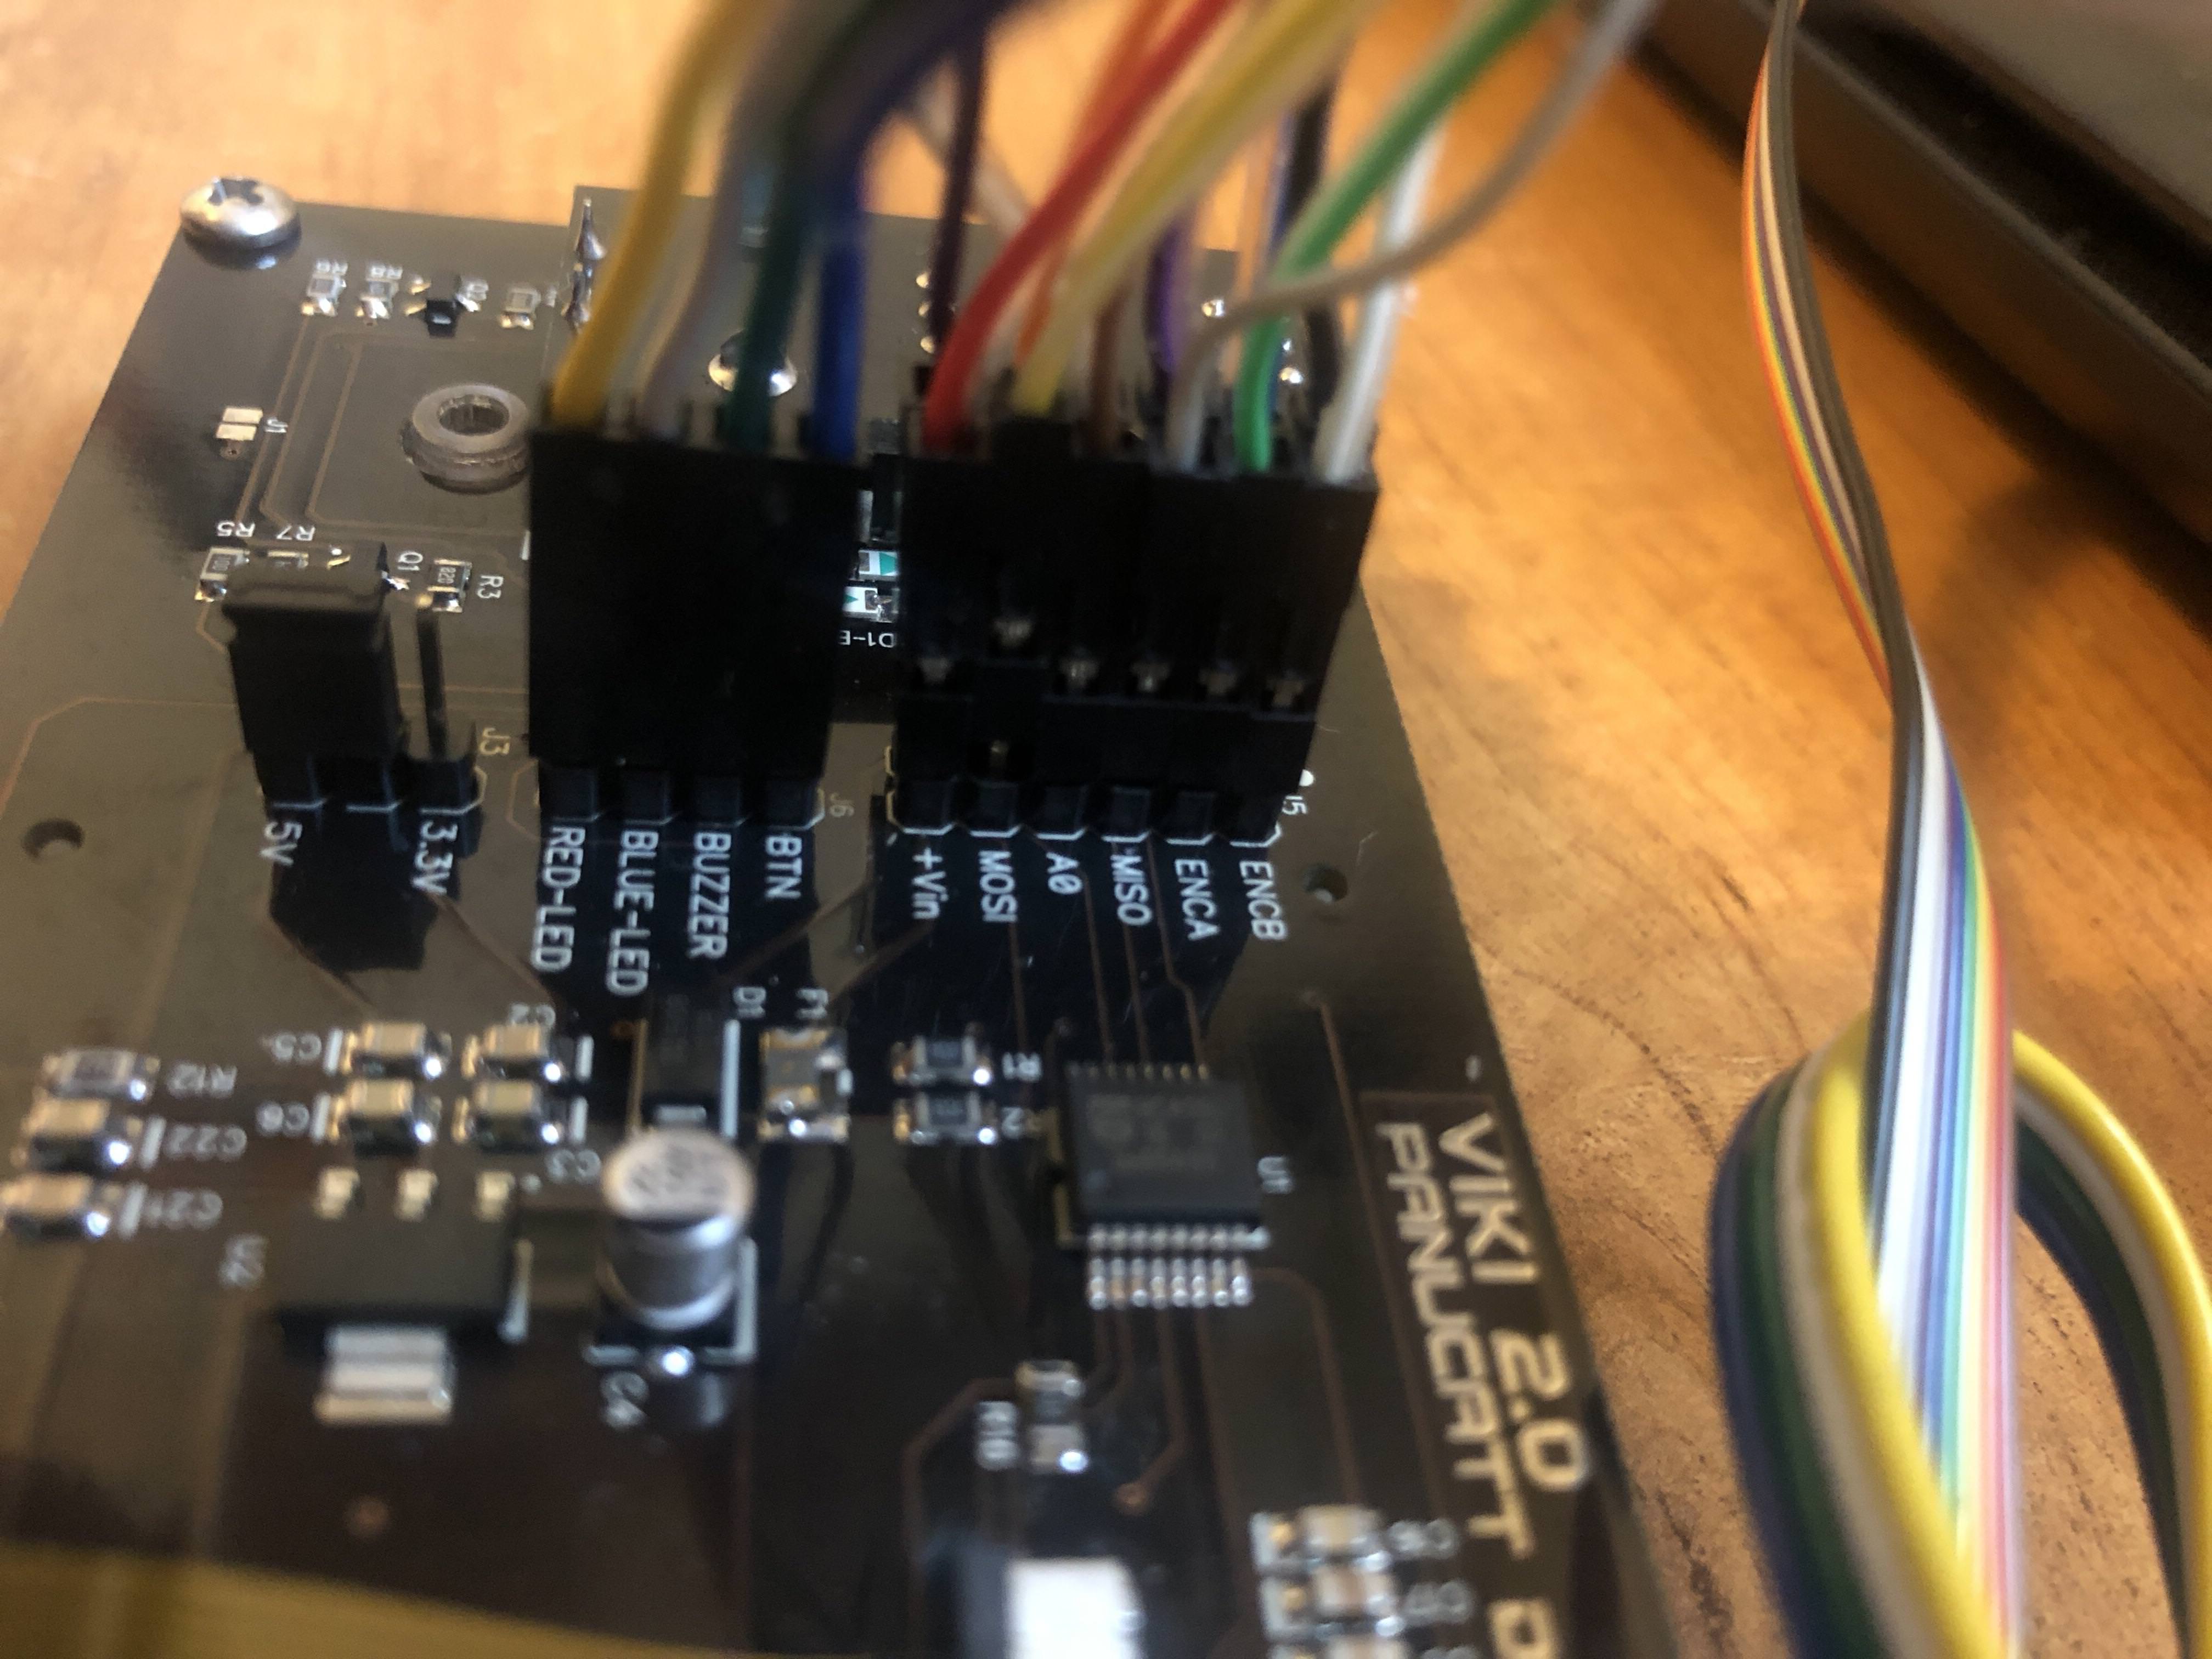
kill_button_pin 2.12 # kill button pin. default is same as pause button 2.12 (2.11 is another good choice)
# Panel See http://smoothieware.org/panel
panel.enable true # set to true to enable the panel code
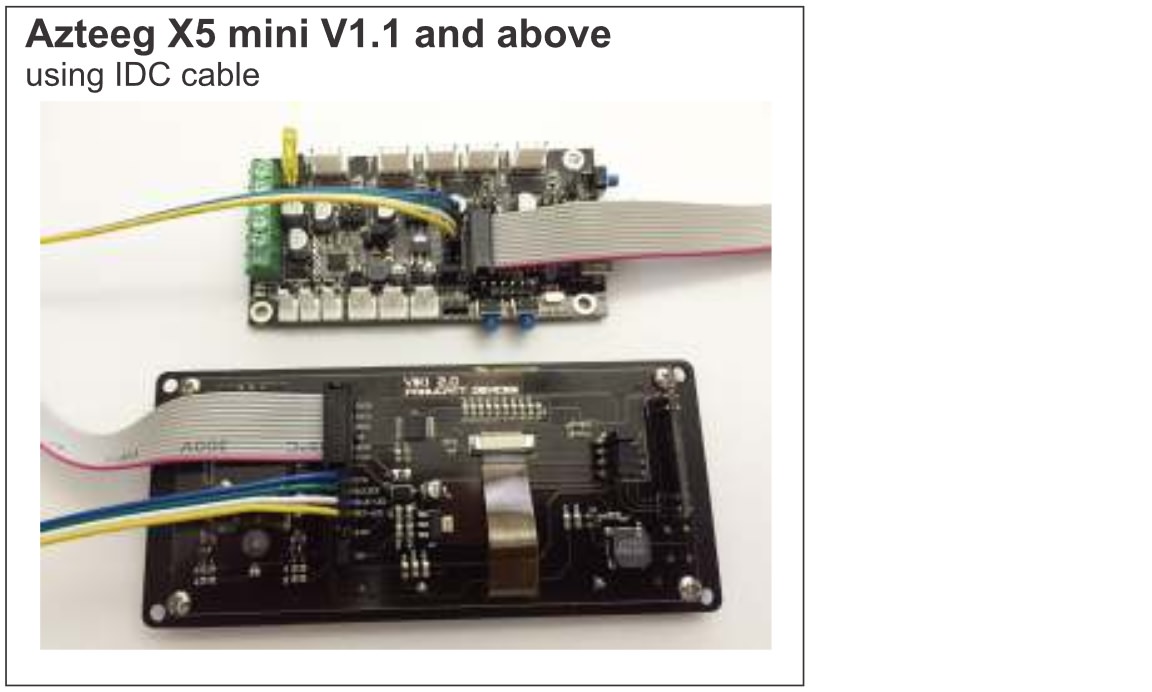
# Example viki2 config for an azteeg mini V2 with IDC cable
panel.lcd viki2 # set type of panel
panel.spi_channel 0 # set spi channel to use P0_18,P0_15 MOSI,SCLK
panel.spi_cs_pin 0.16 # set spi chip select
panel.encoder_a_pin 3.25!^ # encoder pin
panel.encoder_b_pin 3.26!^ # encoder pin
panel.click_button_pin 2.11!^ # click button
panel.a0_pin 2.6 # st7565 needs an a0
panel.contrast 8 # override contrast setting (default is 9) miniViki (4 or lower)
#panel.encoder_resolution 4 # override number of clicks to move 1 item (default is 4)
#panel.button_pause_pin 1.30^ # kill/pause set one of these for the auxilliary button on viki2
#panel.back_button_pin 1.30!^ # back button recommended to use this on EXP1
panel.buzz_pin 0.25 # pin for buzzer on EXP2
panel.red_led_pin 2.8 # pin for red led on viki2 on EXP1
panel.blue_led_pin 4.29 # pin for blue led on viki2 on EXP1
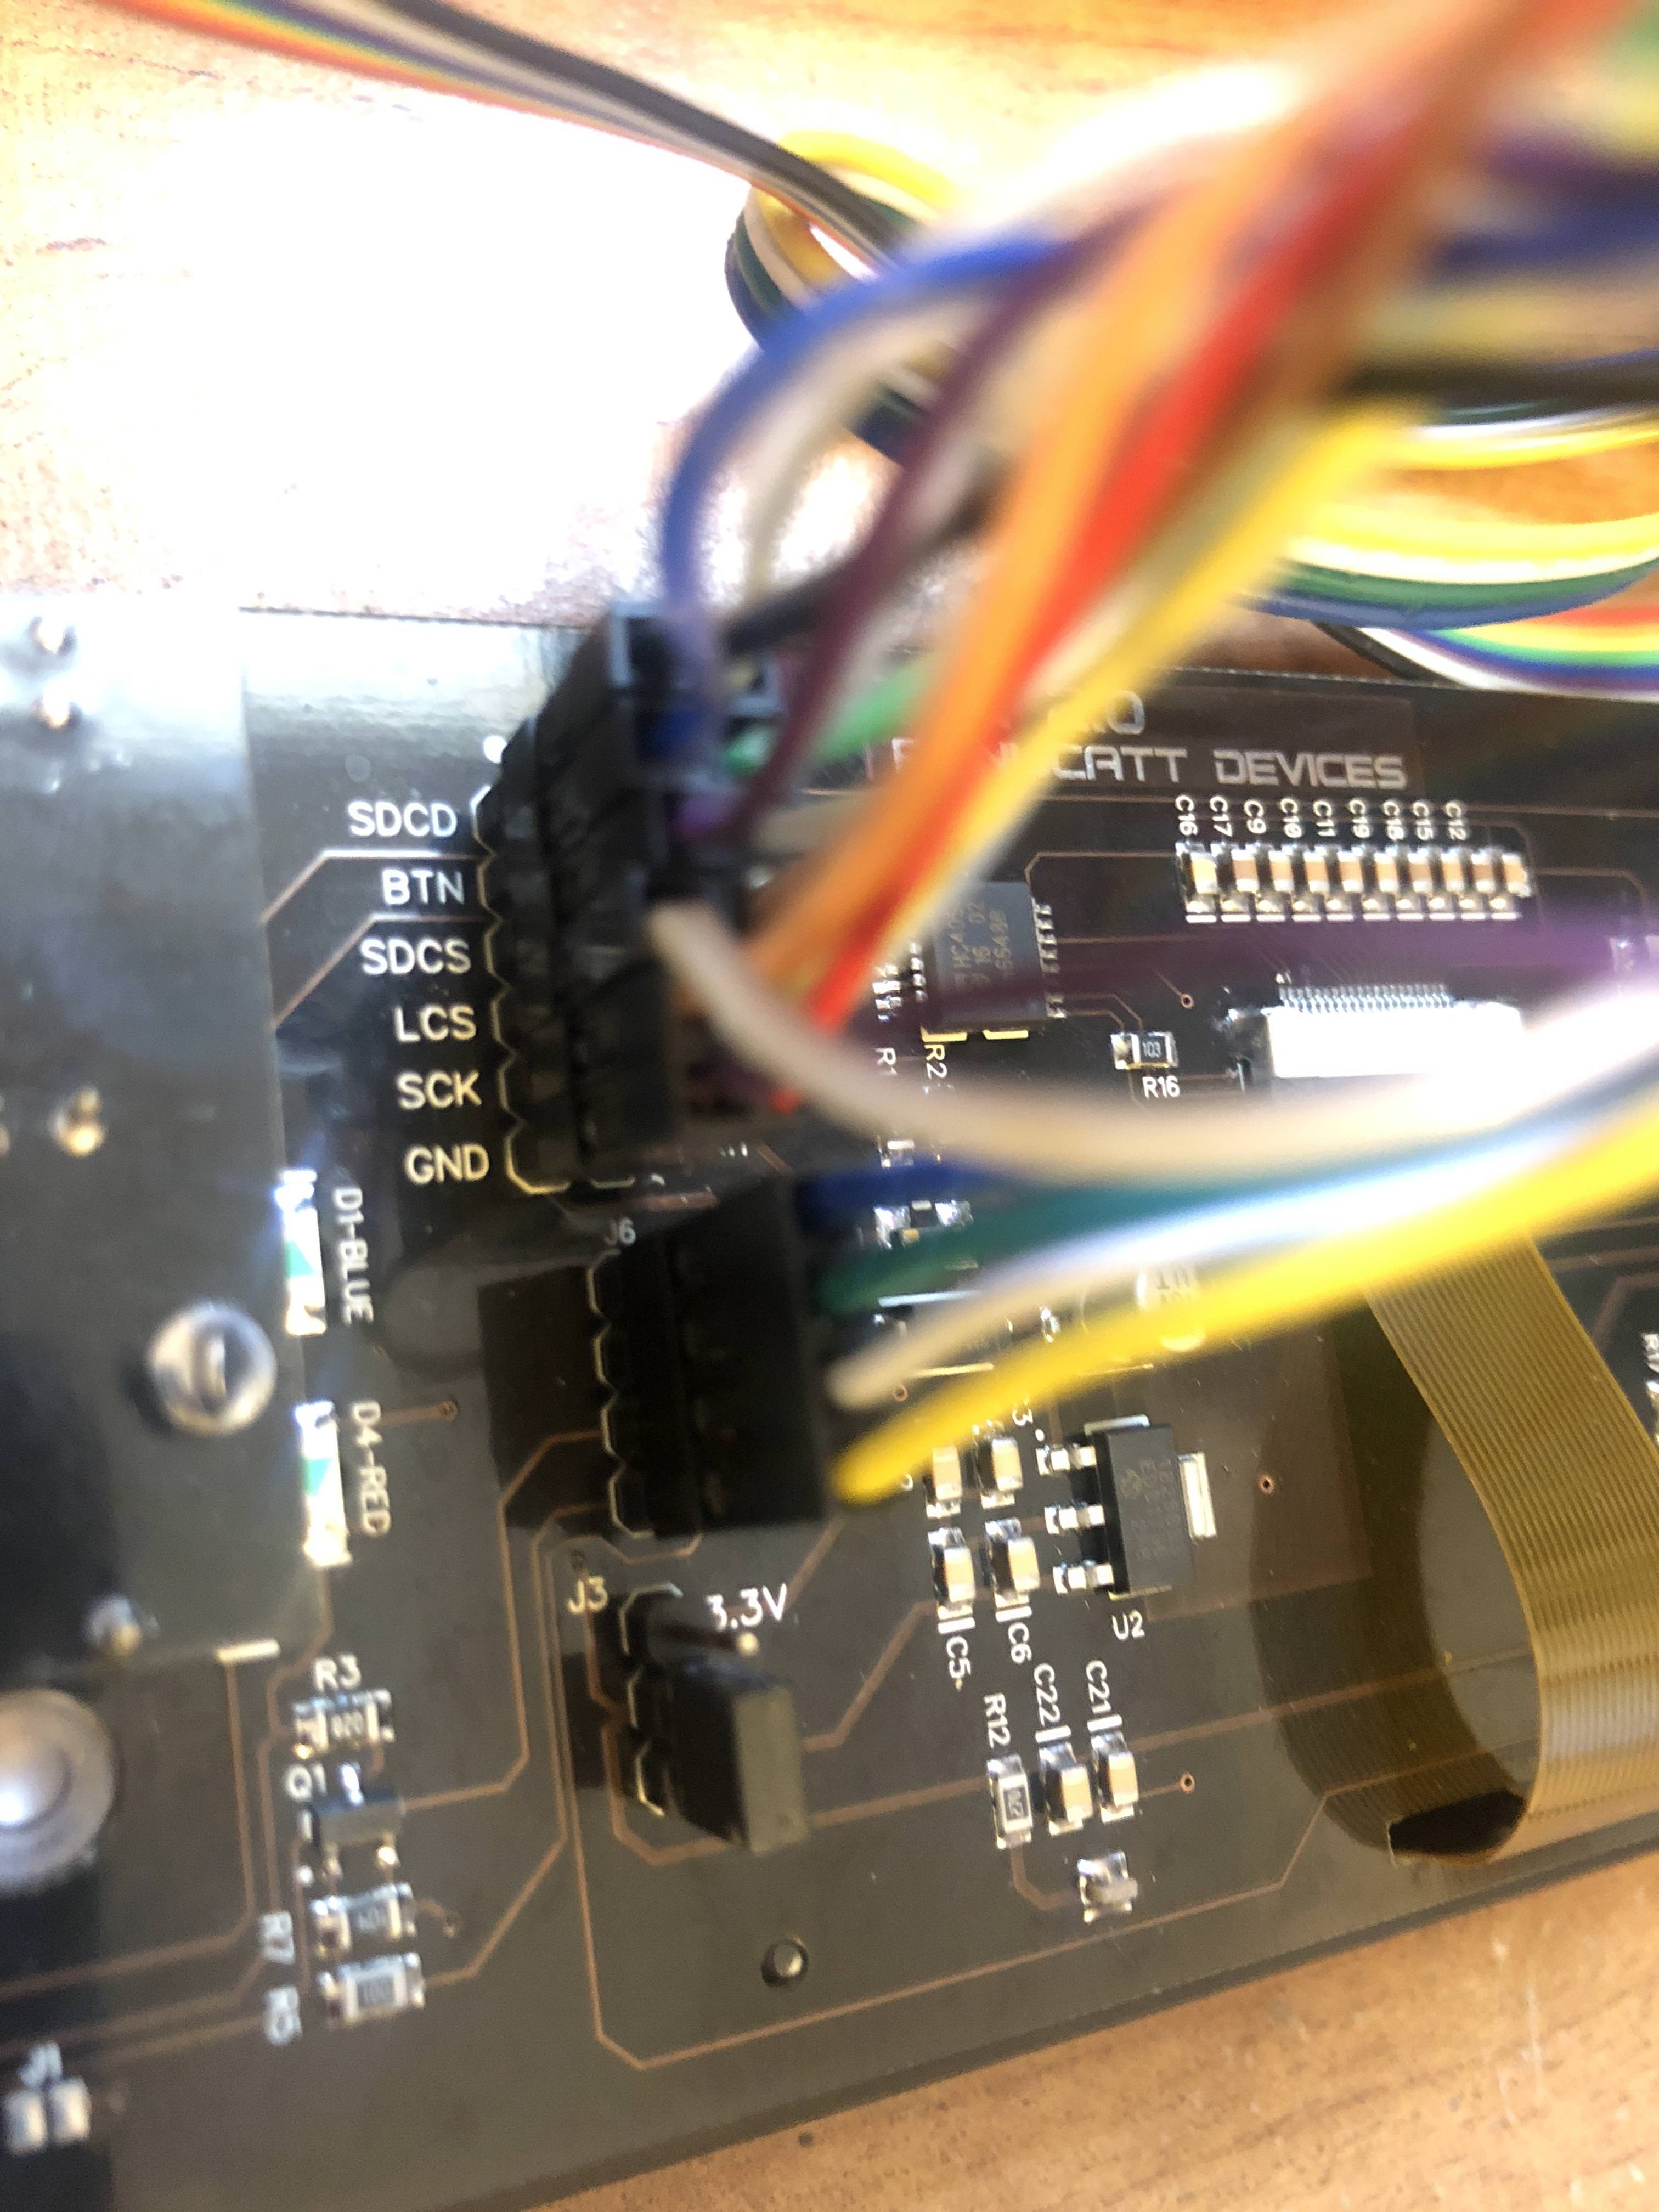
panel.external_sd false # set to true to use external sd WARNING not supported.
panel.external_sd.spi_channel 0 # set spi channel the sdcard is on
panel.external_sd.spi_cs_pin 1.23 # set spi chip select for the sdcard
panel.external_sd.sdcd_pin 1.31!^ # sd detect signal (set to nc if no sdcard detect)
panel.menu_offset 1 # some panels will need 1 here
panel.alpha_jog_feedrate 6000 # x jogging feedrate in mm/min
panel.beta_jog_feedrate 6000 # y jogging feedrate in mm/min
panel.gamma_jog_feedrate 200 # z jogging feedrate in mm/min
panel.hotend_temperature 185 # temp to set hotend when preheat is selected
panel.bed_temperature 60 # temp to set bed when preheat is selected
# Example of a custom menu entry, which will show up in the Custom entry.
# NOTE _ gets converted to space in the menu and commands, | is used to separate multiple commands
custom_menu.power_on.enable true #
custom_menu.power_on.name Power_on #
custom_menu.power_on.command M80 #
custom_menu.power_off.enable true #
custom_menu.power_off.name Power_off #
custom_menu.power_off.command M81 #
# network settings
network.enable false # enable the ethernet network services
network.webserver.enable true # enable the webserver
network.telnet.enable true # enable the telnet server
network.plan9.enable true # enable the plan9 network filesystem
network.ip_address auto # the IP address
#network.ip_mask 255.255.255.0 # the ip mask
#network.ip_gateway 192.168.3.1 # the gateway address
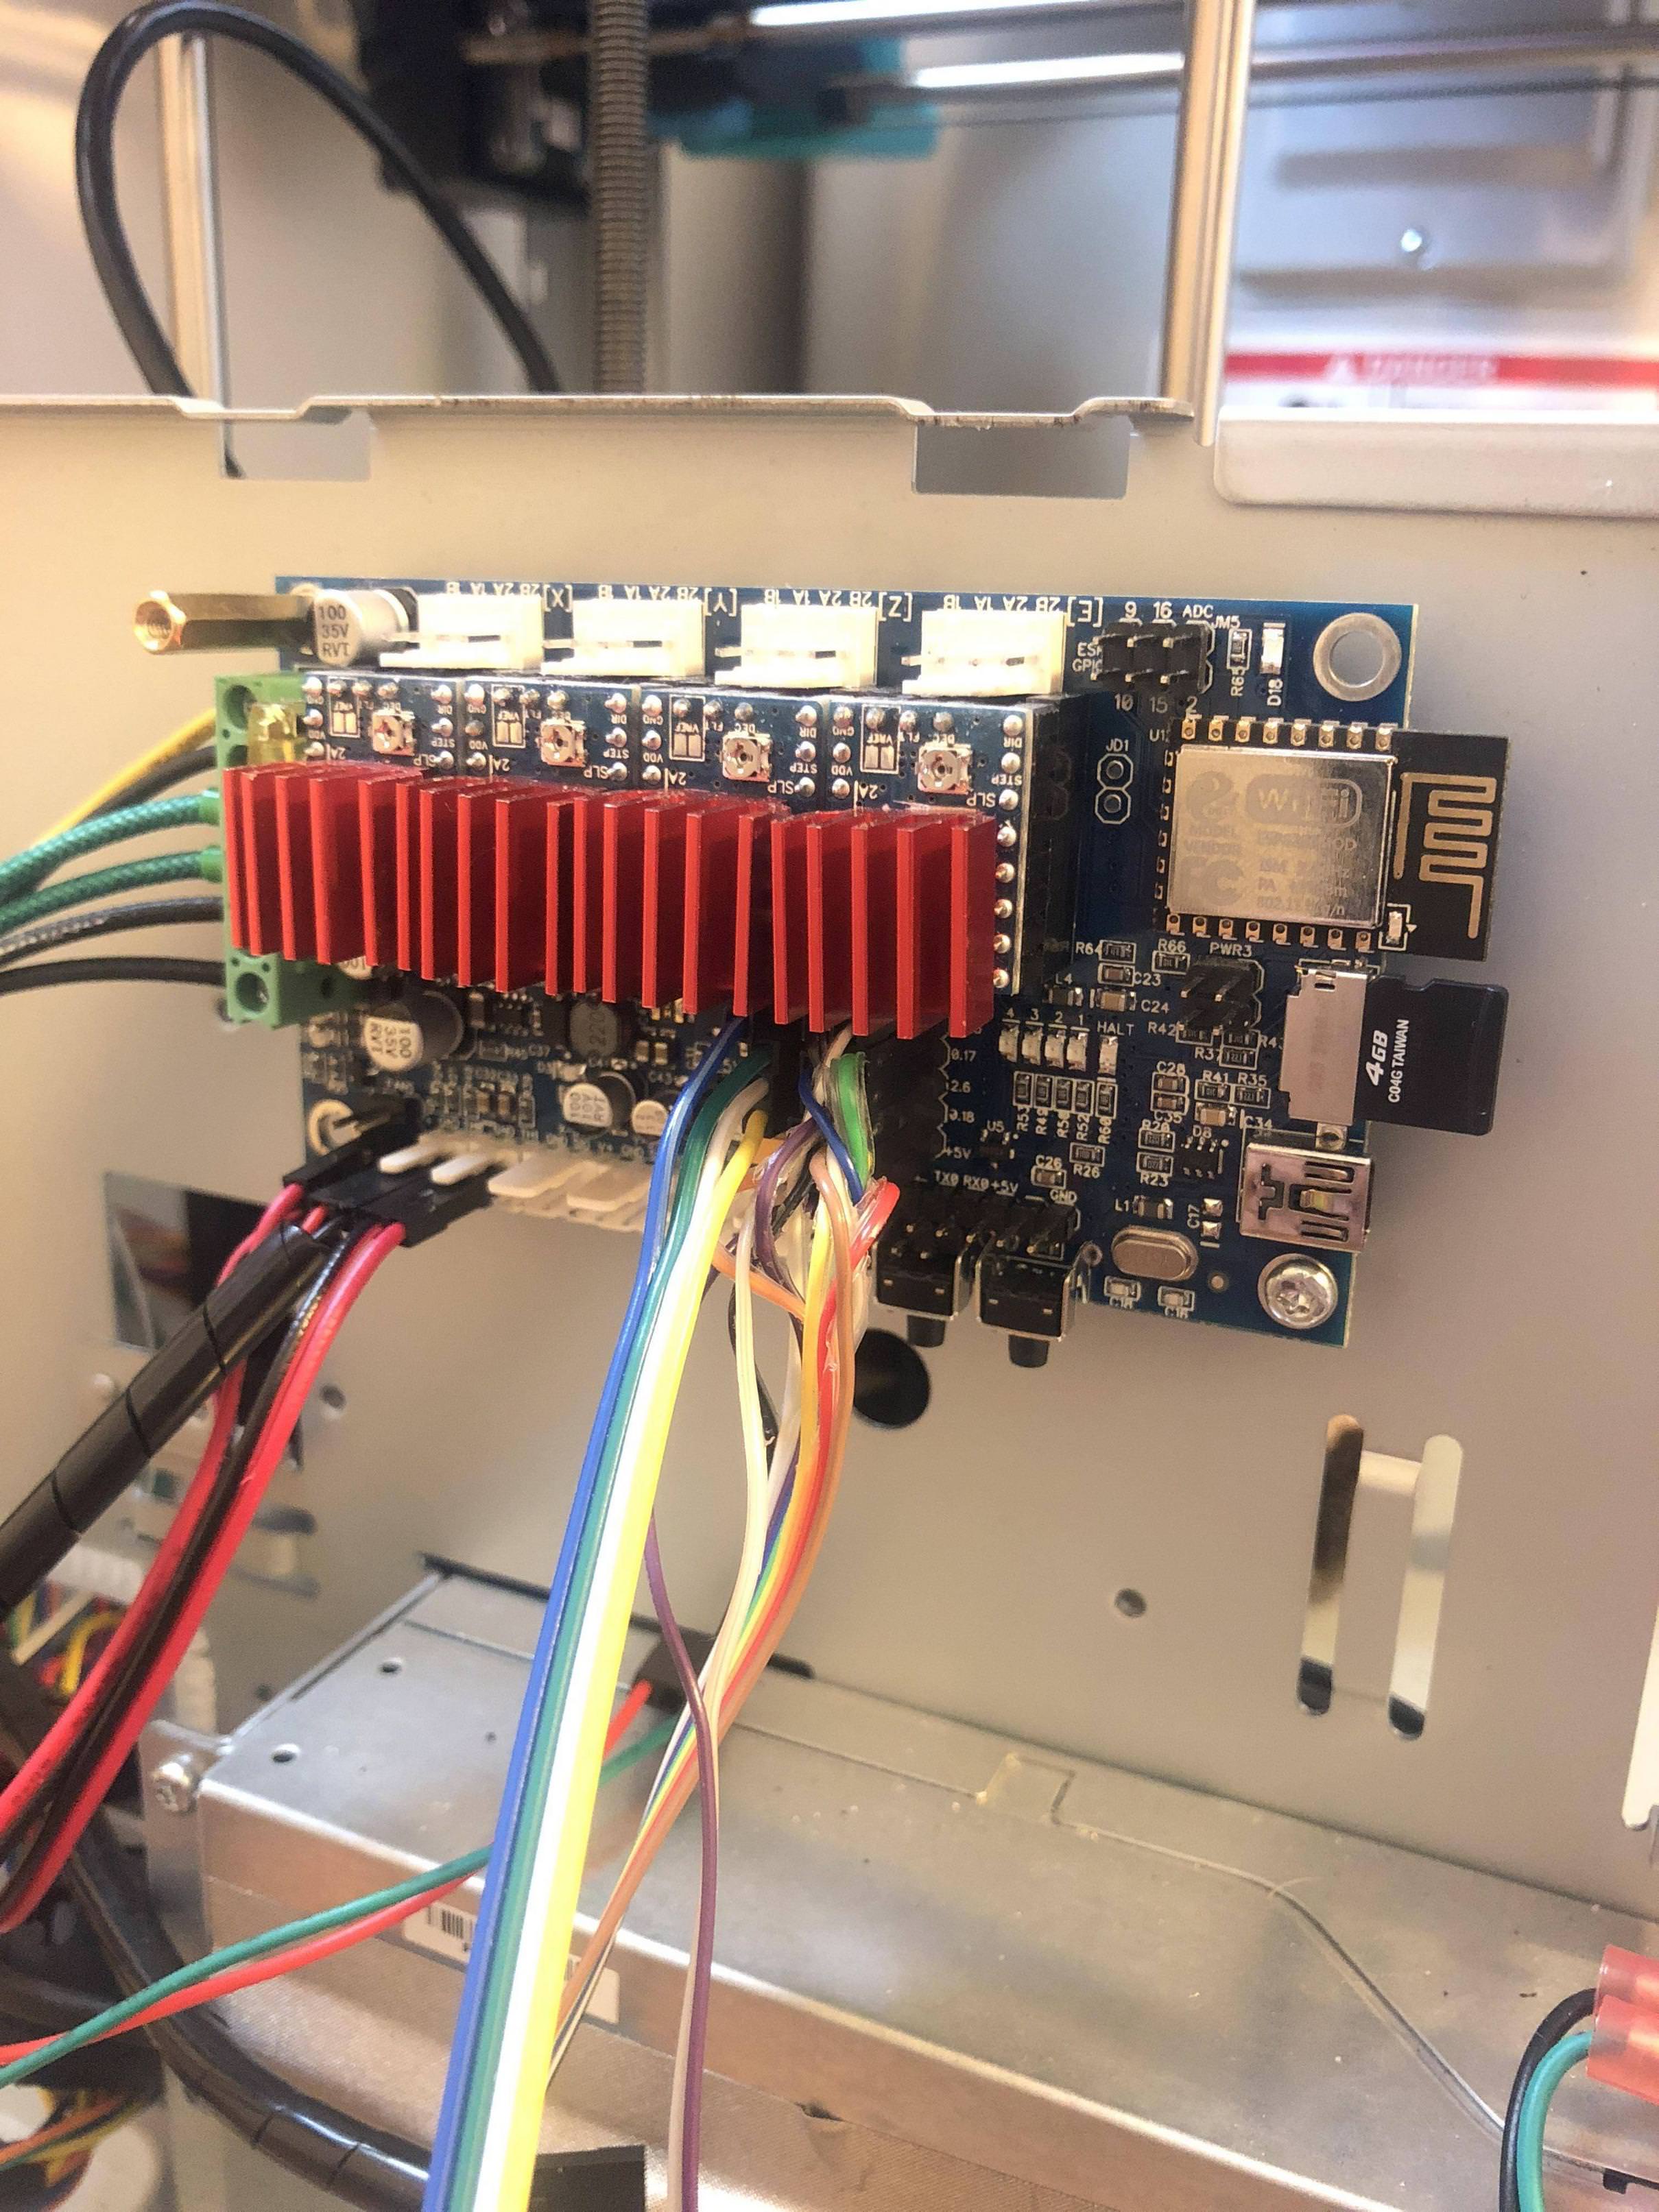
# Azteeg specific settings do not change
currentcontrol_module_enable true #
digipot_max_current 2.0 # max current
digipot_factor 113.5 # factor for converting current to digipot value
Da Vinci 1.0 Azteeg x5 mini WiFi running Smoothieware, e3d v6.