Quick question before we get into the rest of this post. Look at your board, there is a 3 pin header just below the Y stepper driver. It is marked INT USB. Do you have a jumper on that header and if so what position is it in? that header determines the power source for the logic. If the jumper is from center pin to USB side then the board will only power fully with USB connected and plugged into a PC. If the Jumper is shorting center pin to INT then the board will power fully with the main power supply. Note that USB will only power logic it does not supply enough power to heat or drive motors. The mains supply still has to be connected and turned on. However if it is set to USB but no USB is connected then the board logic will not come up fully.
Ok, lets first get some things out of the way. This is a Panucatt board. That being said you should only be using files and information supplied by Panucatt. The only thing you are going to get from the Smoothie site are the drivers if needed, and the files linked from the Panucatt site. Ignore any other information given by Smoothie and their site and config files.
Now go to this page and use only information supplied in the links at the bottom of this page.
http://www.panucatt.com/azteeg_X5_mini_ … x5mini.htm
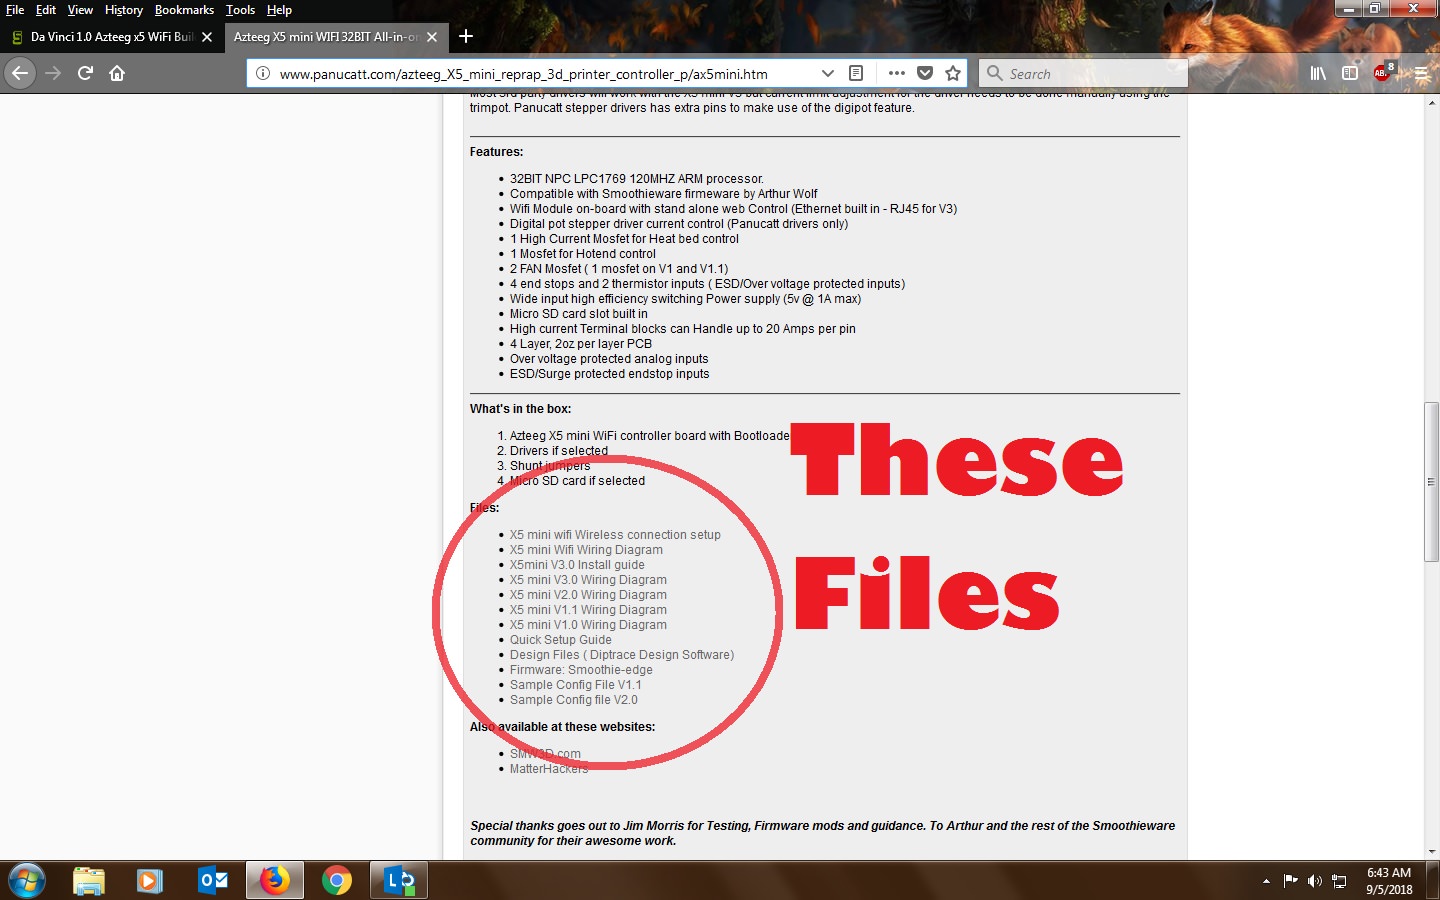
In this list there are you need to confirm what version board you have in order to know which files you need. There is a version 1.0, 2.0, and 3.0. I assume yours is 2.0 or 3.0. There should be artwork on the board telling you which it is if you look at the board.
Based on the information supplied you should be using the configuration file for the 2.0 and the wiring guide for the 2.0 or maybe the 3.0 if yours is a 3.0 if yours has the onboard RJ45 for Ethernet.
If you look at a config file you will see many lines that have a # in front. These are called comments and the firmware ignores any line with # in front of it. If you move down to the section for displays you see these lines.
# Panel See http://smoothieware.org/panel
panel.enable false # set to true to enable the panel code
# Example viki2 config for an azteeg miniV2 with IDC cable
panel.lcd viki2 # set type of panel
panel.spi_channel 0 # set spi channel to use P0_18,P0_15 MOSI,SCLK
panel.spi_cs_pin 0.16 # set spi chip select
panel.encoder_a_pin 3.25!^ # encoder pin
panel.encoder_b_pin 3.26!^ # encoder pin
panel.click_button_pin 2.11!^ # click button
panel.a0_pin 2.6 # st7565 needs an a0
#panel.contrast 8 # override contrast setting (default is 9)
#panel.encoder_resolution 4 # override number of clicks to move 1 item (default is 4)
#panel.button_pause_pin 1.22^ # kill/pause set one of these for the auxilliary button on viki2
#panel.back_button_pin 1.22!^ # back button recommended to use this on EXP1
panel.buzz_pin 0.25 # pin for buzzer on EXP2
panel.red_led_pin 2.8 # pin for red led on viki2 on EXP1
panel.blue_led_pin 4.29 # pin for blue led on viki2 on EXP1
panel.external_sd false # set to true to use external sd WARNING not supported.
panel.external_sd.spi_channel 0 # set spi channel the sdcard is on
panel.external_sd.spi_cs_pin 1.23 # set spi chip select for the sdcard
panel.external_sd.sdcd_pin 1.31!^ # sd detect signal (set to nc if no sdcard detect)
panel.menu_offset 1 # some panels will need 1 here
# Example miniviki2 config
#panel.lcd mini_viki2 # set type of panel
#panel.spi_channel 0 # set spi channel to use P0_18,P0_15 MOSI,SCLK
#panel.spi_cs_pin 0.16 # set spi chip select
#panel.encoder_a_pin 3.25!^ # encoder pin
#panel.encoder_b_pin 3.26!^ # encoder pin
#panel.click_button_pin 2.11!^ # click button
#panel.a0_pin 2.6 # st7565 needs an a0
##panel.contrast 18 # override contrast setting (default is 18)
##panel.encoder_resolution 2 # override number of clicks to move 1 item (default is 2)
#panel.menu_offset 1 # here controls how sensitive the menu is. some panels will need 1
panel.alpha_jog_feedrate 6000 # x jogging feedrate in mm/min
panel.beta_jog_feedrate 6000 # y jogging feedrate in mm/min
panel.gamma_jog_feedrate 200 # z jogging feedrate in mm/min
panel.hotend_temperature 185 # temp to set hotend when preheat is selected
panel.bed_temperature 60 # temp to set bed when preheat is selected
# Example of a custom menu entry, which will show up in the Custom entry.
# NOTE _ gets converted to space in the menu and commands, | is used to separate multiple commands
custom_menu.power_on.enable true #
custom_menu.power_on.name Power_on #
custom_menu.power_on.command M80 #
custom_menu.power_off.enable true #
custom_menu.power_off.name Power_off #
custom_menu.power_off.command M81 #
So the question is, are you using a VIKI 2 or a Mini Viki? I assume you are using a Viki 2. If that is the case the the config file as it is is all you need. You just need to set the following line to TRUE.
panel.enable false # set to true to enable the panel code
panel.enable true # set to true to enable the panel code
All edits you make to the config file needs to be done in Notepad and only Notepad to preserve the proper formatting. The file needs to be saved as config.txt. You can use other names for other versions or test version. The firmware only looks at the one called config.txt on the sdcard. So it will ignore a file called _config.txt or config1.txt.
If notice the section for the mini viki has # in front of all the lines. The firmware sees those as comments and ignores them. If you had a mini Viki instead of a viki 2 then you would remove the # from the mini viki section and add # to the viki2 sections. In sort any line in the config.txt file you do not want the firmware reading or that you want for your reference needs to have a # (hashmark) in front of it.
This tells the firmware to ignore these lines. Keep in mind anything without a # will be interpreted as an instruction so if the format is not right such as being a simple comment it could cause an issue. There are other symbols you will see in the instructions such as ! and ^ these can mark a pin as a pull up or pull down or active high or active low. Ignore this for now until we get the display working.
I think you did it already but please post your current config file as it is now or the sdcard so I can look over it once more please. Not the one you have on another location but the one that is on the sdcard that the firmware is trying to use.
Printing since 2009 and still love it!
Anycubic 4MAX best $225 ever invested.
Voxelabs Proxima SLA. 6 inch 2k Mono LCD.
Anycubic Predator, massive Delta machine. 450 x 370 print envelope.