Lets back track a bit and make sure you understand the basics of smoothie first as this board and setting it up relies heavily on that knowledge.
Smoothieware is unlike any other Firmware in the fact it consist of two files. One is the firmware which is probably already installed on your board and then two the config.txt file that will reside on the first micro-SD card that is actually plugged into the board. This card will never be removed and is not for putting models to be printed on. It is only for holding the config.txt file which is what the firmware uses to setup and operate the printer. If you are familiar with Marlin or Repetier firmware then you can think of this config.txt file as the configuration.h tab in the other two. But instead of needing to use Arduino to edit the settings and then re-flash each time, all you need to do on smoothie is open the text file in notepad, make the changes you want then save it.
Here is a copy of that config.txt file that will be placed on your sd-card and edited for your machine.
# Robot module configurations : general handling of movement G-codes and slicing into moves
default_feed_rate 4000 # Default rate ( mm/minute ) for G1/G2/G3 moves
default_seek_rate 4000 # Default rate ( mm/minute ) for G0 moves
mm_per_arc_segment 0.5 # Arcs are cut into segments ( lines ), this is the length for these segments. Smaller values mean more resolution, higher values mean faster computation
#mm_per_line_segment 5 # Lines can be cut into segments ( not usefull with cartesian coordinates robots ).
# Arm solution configuration : Cartesian robot. Translates mm positions into stepper positions
alpha_steps_per_mm 80 # Steps per mm for alpha stepper
beta_steps_per_mm 80 # Steps per mm for beta stepper
gamma_steps_per_mm 1637.7953 # Steps per mm for gamma stepper
# Planner module configuration : Look-ahead and acceleration configuration
planner_queue_size 32 # DO NOT CHANGE THIS UNLESS YOU KNOW EXACTLY WHAT YOUR ARE DOING
acceleration 3000 # Acceleration in mm/second/second.
#z_acceleration 500 # Acceleration for Z only moves in mm/s^2, 0 disables it, disabled by default. DO NOT SET ON A DELTA
junction_deviation 0.05 # Similar to the old "max_jerk", in millimeters, see : https://github.com/grbl/grbl/blob/master/planner.c#L409
# and https://github.com/grbl/grbl/wiki/Configuring-Grbl-v0.8 . Lower values mean being more careful, higher values means being faster and have more jerk
# Stepper module configuration
microseconds_per_step_pulse 1 # Duration of step pulses to stepper drivers, in microseconds
base_stepping_frequency 100000 # Base frequency for stepping
# Stepper module pins ( ports, and pin numbers, appending "!" to the number will invert a pin )
alpha_step_pin 2.1 # Pin for alpha stepper step signal
alpha_dir_pin 0.11 # Pin for alpha stepper direction
alpha_en_pin 0.10 # Pin for alpha enable pin
alpha_current 0.5 # X stepper motor current
x_axis_max_speed 30000 # mm/min
alpha_max_rate 30000.0 # mm/min actuator max speed
beta_step_pin 2.2 # Pin for beta stepper step signal
beta_dir_pin 0.20 # Pin for beta stepper direction
beta_en_pin 0.19 # Pin for beta enable
beta_current 0.5 # Y stepper motor current
y_axis_max_speed 30000 # mm/min
beta_max_rate 30000.0 # mm/min actuator max speed
gamma_step_pin 2.3 # Pin for gamma stepper step signal
gamma_dir_pin 0.22 # Pin for gamma stepper direction
gamma_en_pin 0.21 # Pin for gamma enable
gamma_current 0.5 # Z stepper motor current
z_axis_max_speed 300 # mm/min
gamma_max_rate 300.0 # mm/min actuator max speed
# Serial communications configuration ( baud rate default to 9600 if undefined )
uart0.baud_rate 115200 # Baud rate for the default hardware serial port
second_usb_serial_enable false # This enables a second usb serial port (to have both pronterface and a terminal connected)
#msd_disable false # disable the MSD (USB SDCARD) when set to true
#leds_disable true # disable using leds after config loaded
#dfu_enable false # for linux developers, set to true to enable DFU
#watchdog_timeout 10 # watchdog timeout in seconds, default is 10, set to 0 to disable the watchdog
## Extruder module configuration
extruder.hotend.enable true # Whether to activate the extruder module at all. All configuration is ignored if false
extruder.hotend.steps_per_mm 140 # Steps per mm for extruder stepper
extruder.hotend.default_feed_rate 600 # Default rate ( mm/minute ) for moves where only the extruder moves
extruder.hotend.acceleration 500 # Acceleration for the stepper motor mm/sec²
extruder.hotend.max_speed 50 # mm/s
extruder.hotend.step_pin 2.0 # Pin for extruder step signal
extruder.hotend.dir_pin 0.5 # Pin for extruder dir signal
extruder.hotend.en_pin 0.4 # Pin for extruder enable signal
delta_current 1.0 # Extruder stepper motor current
# Laser module configuration
laser_module_enable false # Whether to activate the laser module at all. All configuration is
# ignored if false.
#laser_module_pin 2.5 # this pin will be PWMed to control the laser. Only P2.0 - P2.5, P1.18, P1.20, P1.21, P1.23, P1.24, P1.26, P3.25, P3.26
# can be used since laser requires hardware PWM
#laser_module_maximum_power 1.0 # this is the maximum duty cycle that will be applied to the laser
#laser_module_minimum_power 0.0 # This is a value just below the minimum duty cycle that keeps the laser
# active without actually burning.
#laser_module_default_power 0.8 # This is the default laser power that will be used for cuts if a power has not been specified. The value is a scale between
# the maximum and minimum power levels specified above
#laser_module_pwm_period 20 # this sets the pwm frequency as the period in microseconds
# Hotend temperature control configuration
temperature_control.hotend.enable true # Whether to activate this ( "hotend" ) module at all. All configuration is ignored if false.
temperature_control.hotend.thermistor_pin 0.24 # Pin for the thermistor to read
temperature_control.hotend.heater_pin 2.5 # Pin that controls the heater
temperature_control.hotend.thermistor EPCOS100K # see http://smoothieware.org/temperaturecontrol#toc5
#temperature_control.hotend.beta 4066 # or set the beta value
temperature_control.hotend.set_m_code 104 #
temperature_control.hotend.set_and_wait_m_code 109 #
temperature_control.hotend.designator T #
#temperature_control.hotend.max_temp 300 # Set maximum temperature - Will prevent heating above 300 by default
#temperature_control.hotend.min_temp 0 # Set minimum temperature - Will prevent heating below 0 by default
# safety control is enabled by default and can be overidden here, the values show the defaults
#temperature_control.hotend.runaway_heating_timeout 900 # max is 2040 seconds, how long it can take to heat up
#temperature_control.hotend.runaway_cooling_timeout 0 # max is 2040 seconds, how long it can take to cool down if temp is set lower
#temperature_control.hotend.runaway_range 20 # Max setting is 63°C
temperature_control.hotend.p_factor 13.7 #
temperature_control.hotend.i_factor 0.097 #
temperature_control.hotend.d_factor 24 #
temperature_control.bed.enable false #
temperature_control.bed.thermistor_pin 0.23 #
temperature_control.bed.heater_pin 2.7 #
temperature_control.bed.thermistor EPCOS100K # see http://smoothieware.org/temperaturecontrol#toc5
#temperature_control.bed.beta 4066 # or set the beta value
temperature_control.bed.set_m_code 140 #
temperature_control.bed.set_and_wait_m_code 190 #
temperature_control.bed.designator B #
# Switch module for fan control
switch.fan.enable true #
switch.fan.input_on_command M106 #
switch.fan.input_off_command M107 #
switch.fan.output_pin 1.25 #
switch.misc.enable false #
switch.misc.input_on_command M42 #
switch.misc.input_off_command M43 #
switch.misc.output_pin 0.26 #
# automatically toggle a switch at a specified temperature. Different ones of these may be defined to monitor different temperatures and switch different swithxes
# useful to turn on a fan or water pump to cool the hotend
#temperatureswitch.hotend.enable true #
#temperatureswitch.hotend.designator T # first character of the temperature control designator to use as the temperature sensor to monitor
#temperatureswitch.hotend.switch misc # select which switch to use, matches the name of the defined switch
#temperatureswitch.hotend.threshold_temp 60.0 # temperature to turn on (if rising) or off the switch
#temperatureswitch.hotend.heatup_poll 15 # poll heatup at 15 sec intervals
#temperatureswitch.hotend.cooldown_poll 60 # poll cooldown at 60 sec intervals
# filament out detector
#filament_detector.enable true #
#filament_detector.encoder_pin 0.26 # must be interrupt enabled pin (0.26, 0.27, 0.28)
#filament_detector.seconds_per_check 2 # may need to be longer
#filament_detector.pulses_per_mm 1 .0 # will need to be tuned
#filament_detector.bulge_pin 0.27 # optional bulge detector switch and/or manual suspend
# Switch module for spindle control
#switch.spindle.enable false #
# Endstops
endstops_enable true # the endstop module is enabled by default and can be disabled here
#corexy_homing false # set to true if homing on a hbot or corexy
alpha_min_endstop 1.24^ # add a ! to invert if endstop is NO connected to ground
#alpha_max_endstop 1.24^ #
alpha_homing_direction home_to_min # or set to home_to_max and set alpha_max
alpha_min 0 # this gets loaded after homing when home_to_min is set
alpha_max 200 # this gets loaded after homing when home_to_max is set
beta_min_endstop 1.26^ #
#beta_max_endstop 1.26^ #
beta_homing_direction home_to_min #
beta_min 0 #
beta_max 200 #
gamma_min_endstop 1.28^ #
#gamma_max_endstop 1.28^ #
gamma_homing_direction home_to_min #
gamma_min 0 #
gamma_max 200 #
alpha_max_travel 500 # max travel in mm for alpha/X axis when homing
beta_max_travel 500 # max travel in mm for beta/Y axis when homing
gamma_max_travel 500 # max travel in mm for gamma/Z axis when homing
# optional enable limit switches, actions will stop if any enabled limit switch is triggered
#alpha_limit_enable false # set to true to enable X min and max limit switches
#beta_limit_enable false # set to true to enable Y min and max limit switches
#gamma_limit_enable false # set to true to enable Z min and max limit switches
#move_to_origin_after_home false # move XY to 0,0 after homing
#probe endstop
#probe_pin 1.29 # optional pin for probe
alpha_fast_homing_rate_mm_s 50 # feedrates in mm/second
beta_fast_homing_rate_mm_s 50 # "
gamma_fast_homing_rate_mm_s 4 # "
alpha_slow_homing_rate_mm_s 25 # "
beta_slow_homing_rate_mm_s 25 # "
gamma_slow_homing_rate_mm_s 2 # "
alpha_homing_retract_mm 5 # distance in mm
beta_homing_retract_mm 5 # "
gamma_homing_retract_mm 1 # "
#endstop_debounce_count 100 # uncomment if you get noise on your endstops, default is 100
# optional Z probe
zprobe.enable false # set to true to enable a zprobe
zprobe.probe_pin 1.29!^ # pin probe is attached to if NC remove the !
zprobe.slow_feedrate 5 # mm/sec probe feed rate
#zprobe.debounce_ms 1 # set if noisy
zprobe.fast_feedrate 100 # move feedrate mm/sec
zprobe.probe_height 5 # how much above bed to start probe
# associated with zprobe the leveling strategy to use
#leveling-strategy.three-point-leveling.enable true # a leveling strategy that probes three points to define a plane and keeps the Z parallel to that plane
#leveling-strategy.three-point-leveling.point1 100.0,0.0 # the first probe point (x,y) optional may be defined with M557
#leveling-strategy.three-point-leveling.point2 200.0,200.0 # the second probe point (x,y)
#leveling-strategy.three-point-leveling.point3 0.0,200.0 # the third probe point (x,y)
#leveling-strategy.three-point-leveling.home_first true # home the XY axis before probing
#leveling-strategy.three-point-leveling.tolerance 0.03 # the probe tolerance in mm, anything less that this will be ignored, default is 0.03mm
#leveling-strategy.three-point-leveling.probe_offsets 0,0,0 # the probe offsets from nozzle, must be x,y,z, default is no offset
#leveling-strategy.three-point-leveling.save_plane false # set to true to allow the bed plane to be saved with M500 default is false
# kill button (used to be called pause) maybe assigned to a different pin, set to the onboard pin by default
kill_button_enable true # set to true to enable a kill button
kill_button_pin 2.12 # kill button pin. default is same as pause button 2.12 (2.11 is another good choice)
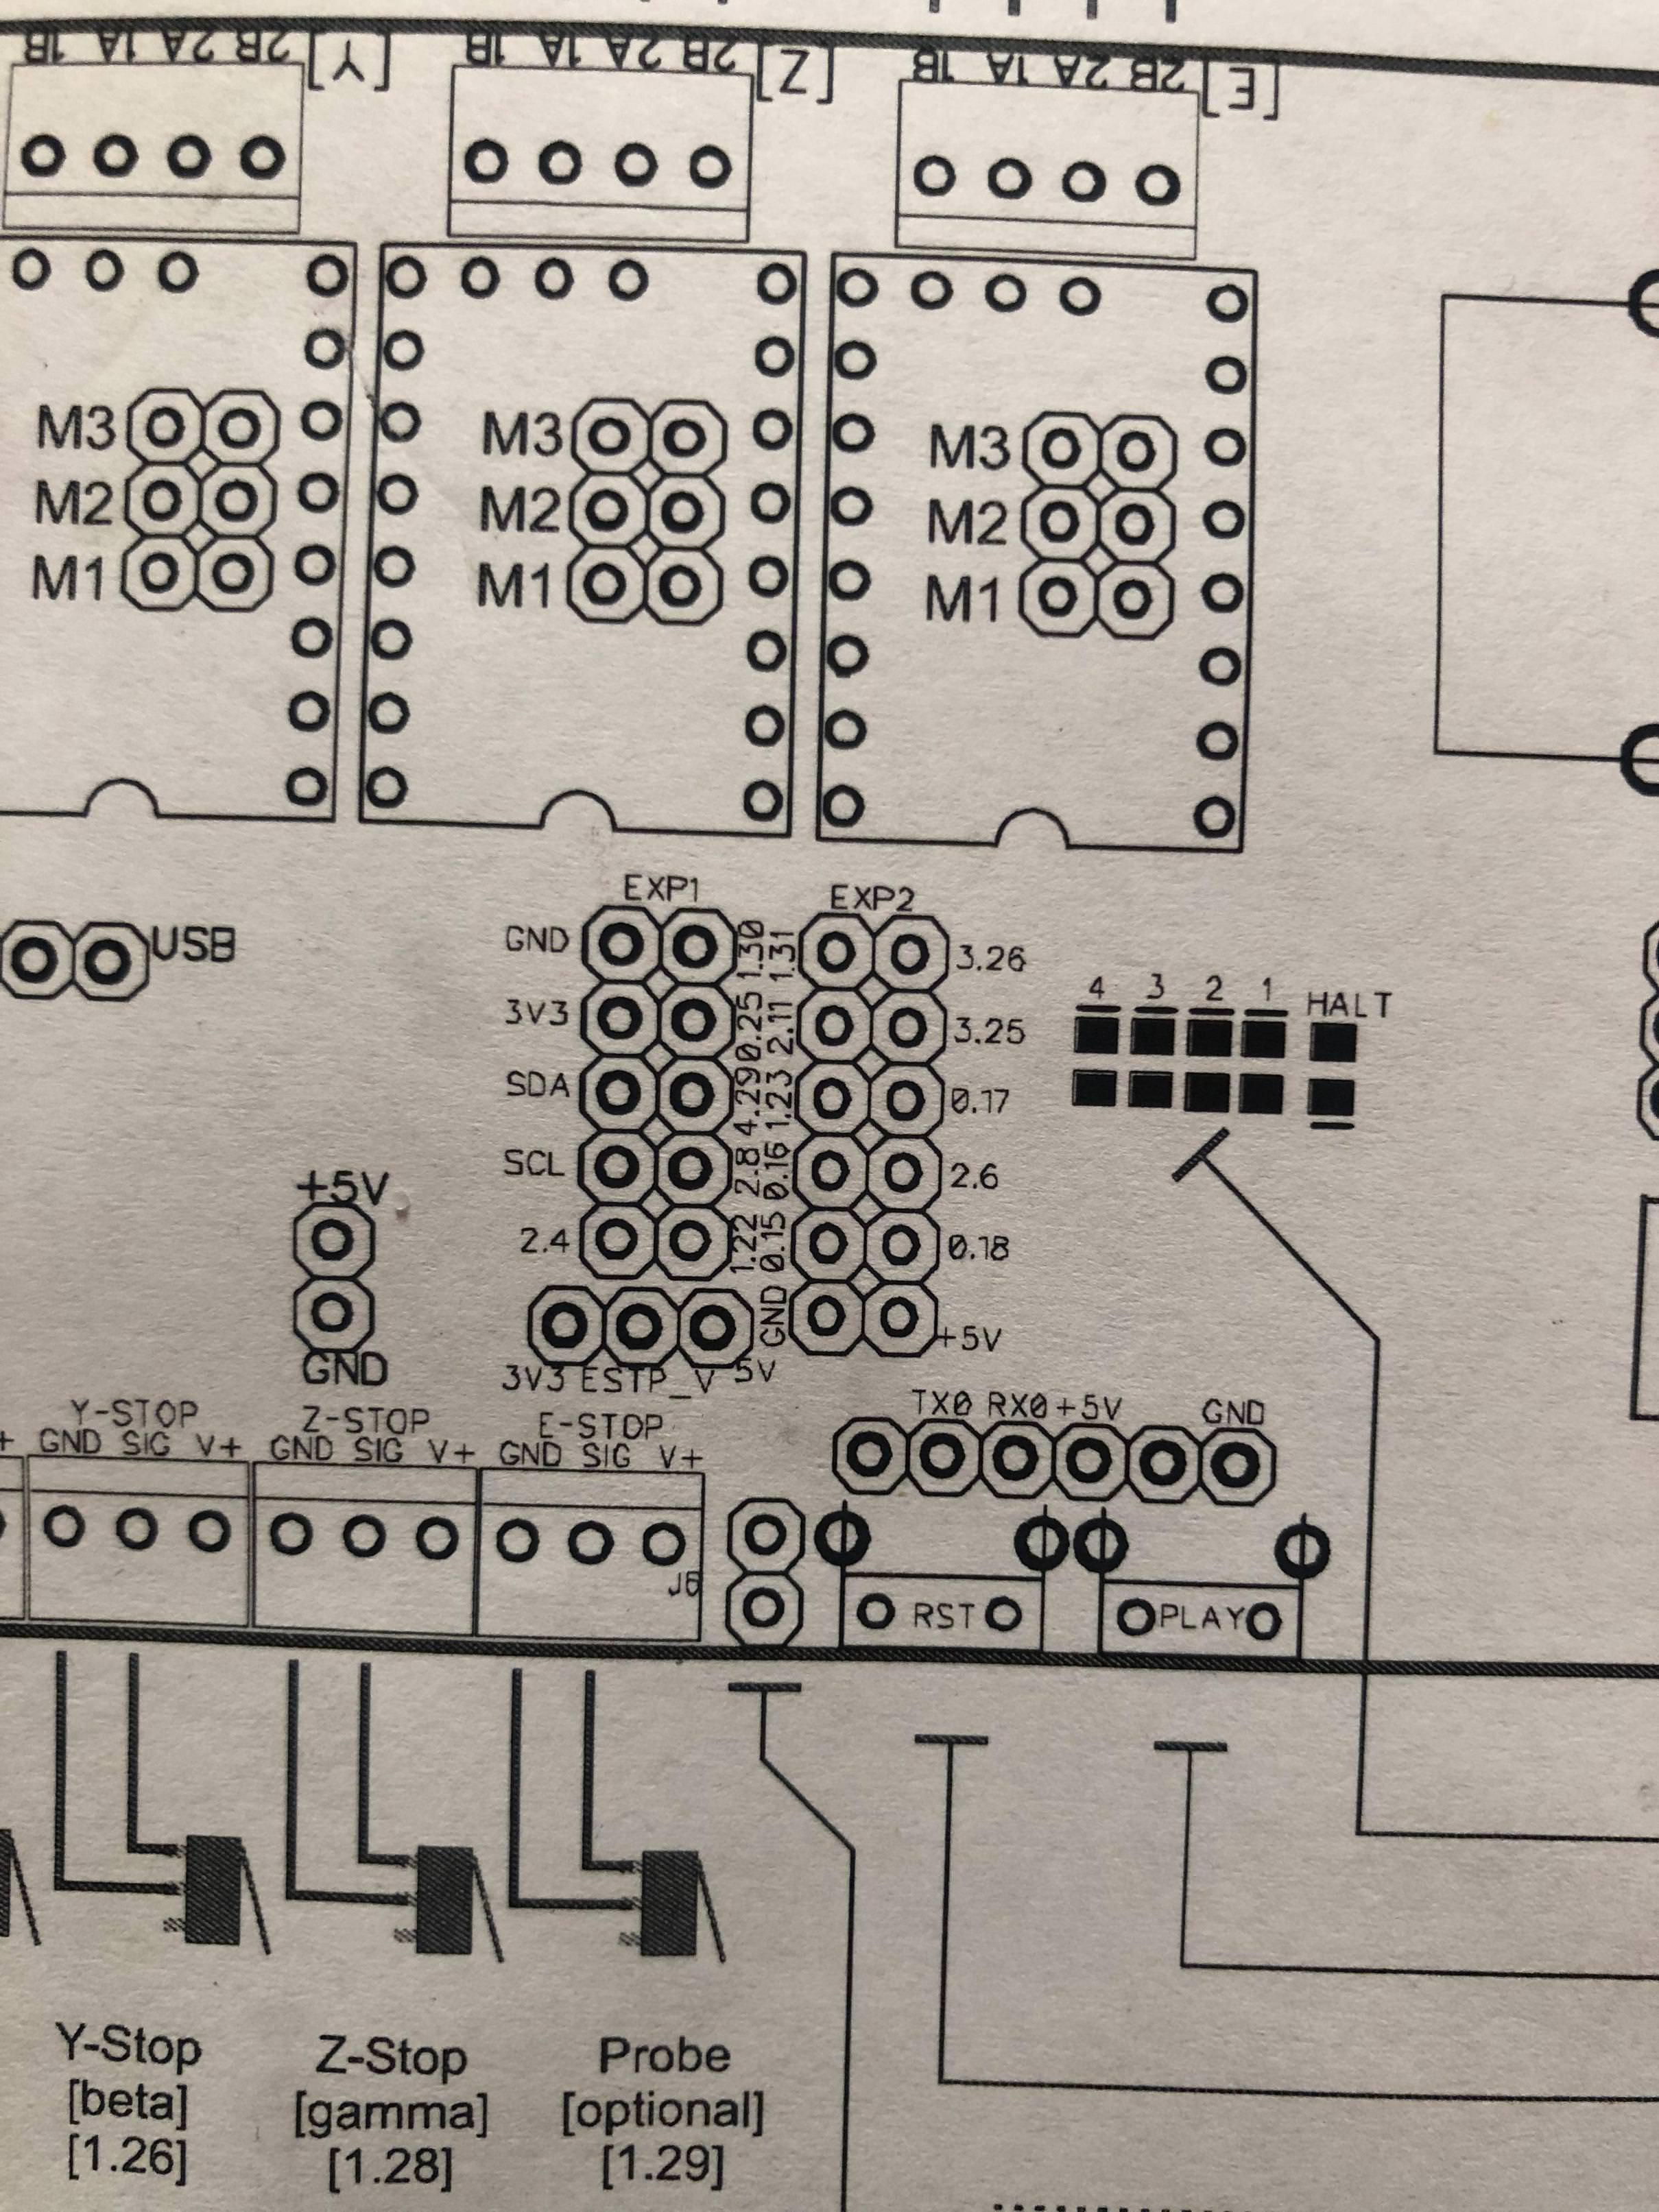
# Panel See http://smoothieware.org/panel
panel.enable false # set to true to enable the panel code
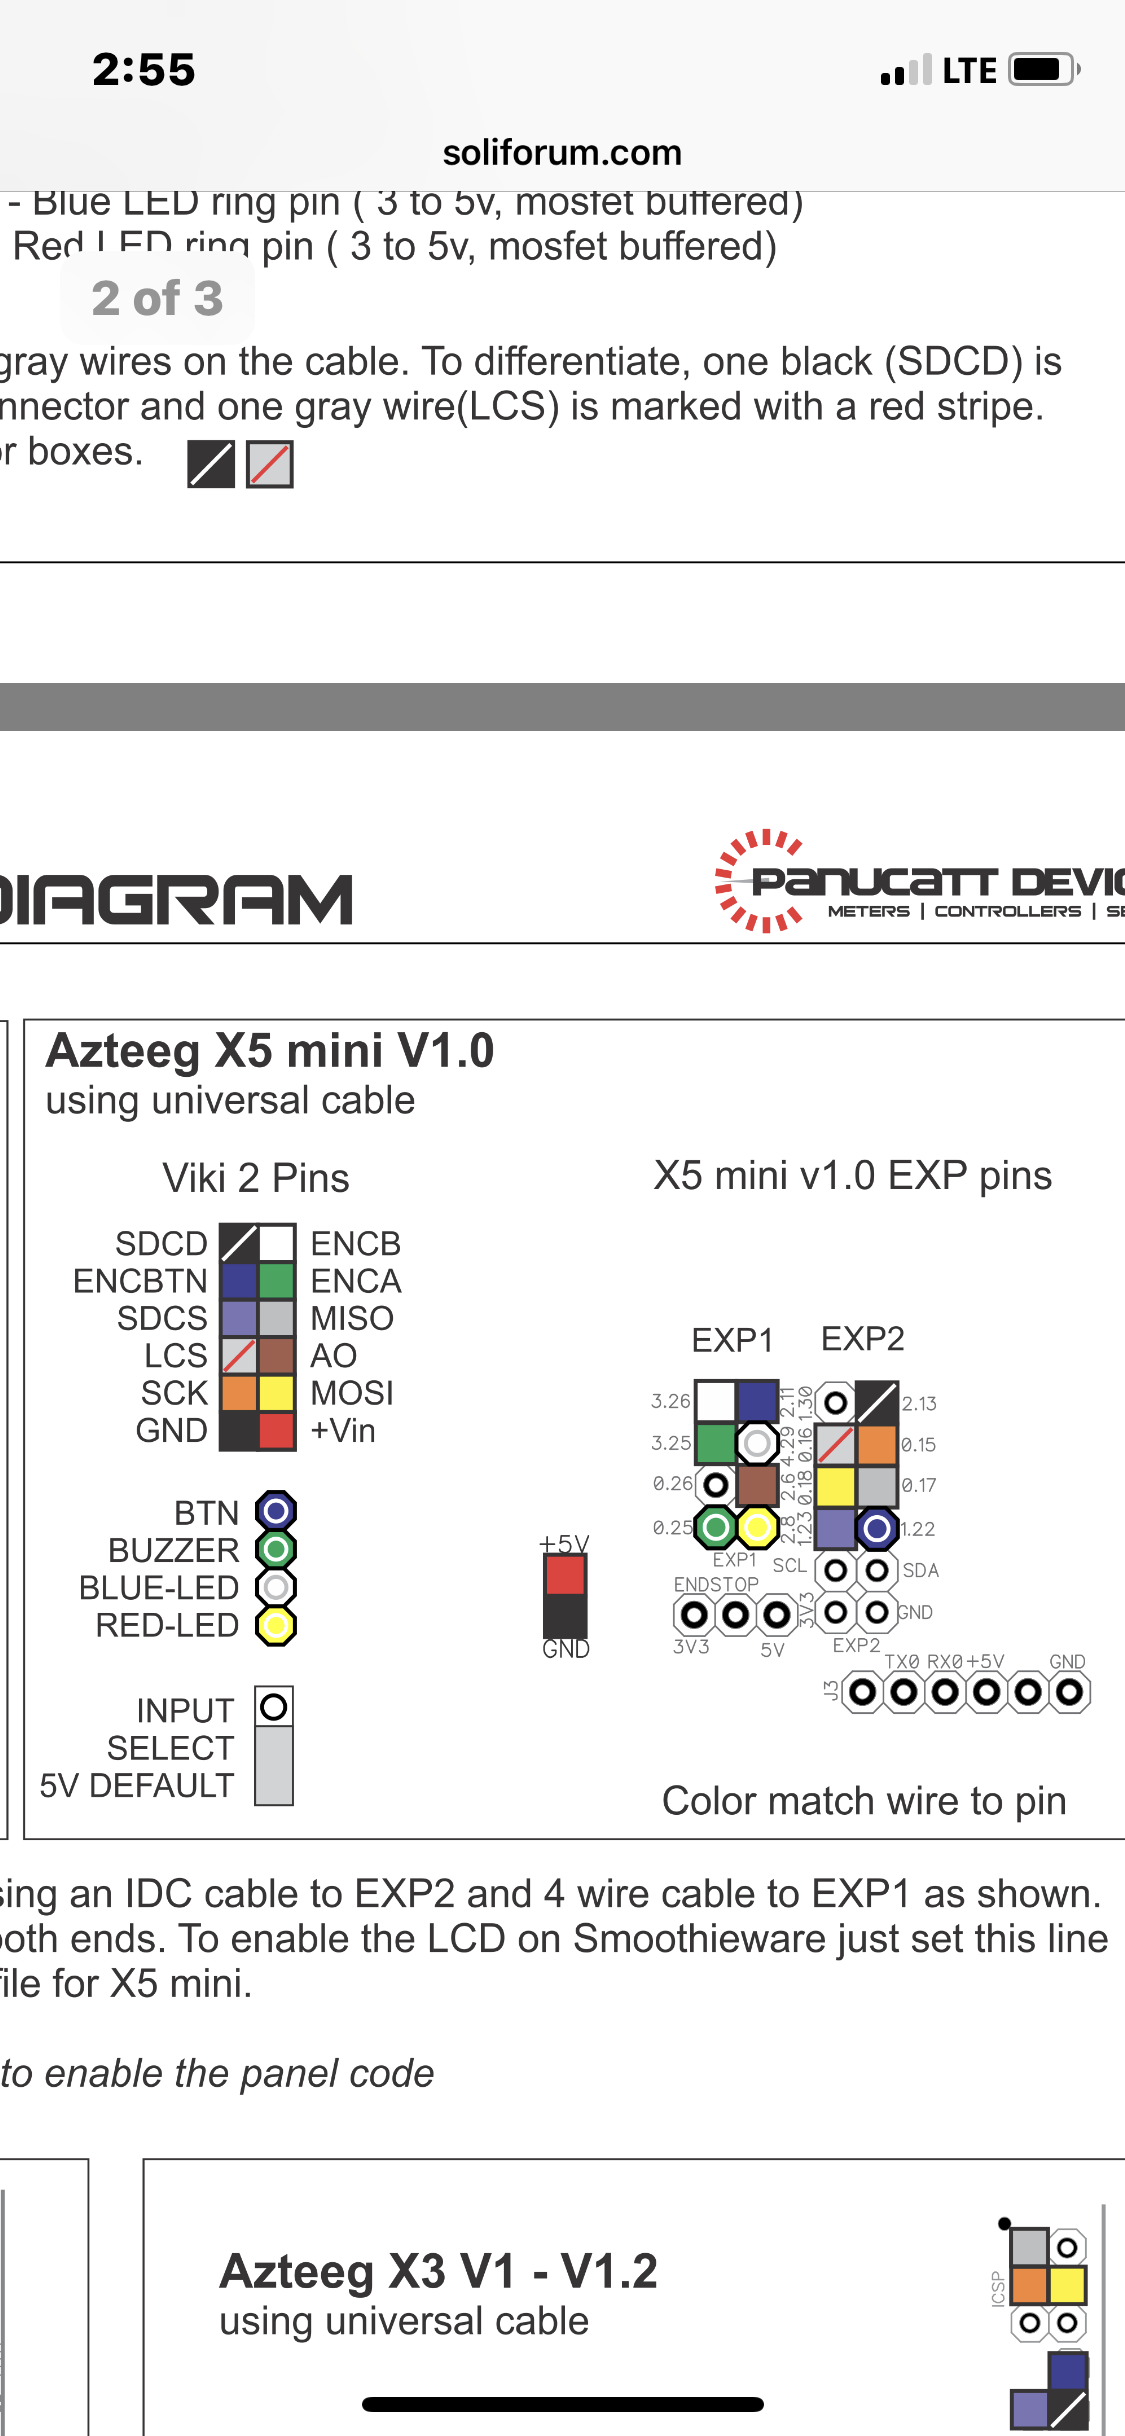
# Example viki2 config for an azteeg mini V2 with IDC cable
panel.lcd viki2 # set type of panel
panel.spi_channel 0 # set spi channel to use P0_18,P0_15 MOSI,SCLK
panel.spi_cs_pin 0.16 # set spi chip select
panel.encoder_a_pin 3.25!^ # encoder pin
panel.encoder_b_pin 3.26!^ # encoder pin
panel.click_button_pin 2.11!^ # click button
panel.a0_pin 2.6 # st7565 needs an a0
panel.contrast 8 # override contrast setting (default is 9) miniViki (4 or lower)
#panel.encoder_resolution 4 # override number of clicks to move 1 item (default is 4)
#panel.button_pause_pin 1.30^ # kill/pause set one of these for the auxilliary button on viki2
#panel.back_button_pin 1.30!^ # back button recommended to use this on EXP1
panel.buzz_pin 0.25 # pin for buzzer on EXP2
panel.red_led_pin 2.8 # pin for red led on viki2 on EXP1
panel.blue_led_pin 4.29 # pin for blue led on viki2 on EXP1
panel.external_sd false # set to true to use external sd WARNING not supported.
panel.external_sd.spi_channel 0 # set spi channel the sdcard is on
panel.external_sd.spi_cs_pin 1.23 # set spi chip select for the sdcard
panel.external_sd.sdcd_pin 1.31!^ # sd detect signal (set to nc if no sdcard detect)
panel.menu_offset 1 # some panels will need 1 here
panel.alpha_jog_feedrate 6000 # x jogging feedrate in mm/min
panel.beta_jog_feedrate 6000 # y jogging feedrate in mm/min
panel.gamma_jog_feedrate 200 # z jogging feedrate in mm/min
panel.hotend_temperature 185 # temp to set hotend when preheat is selected
panel.bed_temperature 60 # temp to set bed when preheat is selected
# Example of a custom menu entry, which will show up in the Custom entry.
# NOTE _ gets converted to space in the menu and commands, | is used to separate multiple commands
custom_menu.power_on.enable true #
custom_menu.power_on.name Power_on #
custom_menu.power_on.command M80 #
custom_menu.power_off.enable true #
custom_menu.power_off.name Power_off #
custom_menu.power_off.command M81 #
# network settings
network.enable false # enable the ethernet network services
network.webserver.enable true # enable the webserver
network.telnet.enable true # enable the telnet server
network.plan9.enable true # enable the plan9 network filesystem
network.ip_address auto # the IP address
#network.ip_mask 255.255.255.0 # the ip mask
#network.ip_gateway 192.168.3.1 # the gateway address
# Azteeg specific settings do not change
currentcontrol_module_enable true #
digipot_max_current 2.0 # max current
digipot_factor 113.5 # factor for converting current to digipot value
Now that you see this file and it's contents it is easier to understand what we mean when we talk about pins and such as they can be re-assigned as long as they are not in use.
Now as for the files and information I use for reference I go to the following links which are directly from the Panucatt website under the respective device.
For files having to do with the Azteeg X5 I go here and at the bottom of the page there are links for the firmware, config.txt, and wiring diagrams..
http://www.panucatt.com/azteeg_X5_mini_ … x5mini.htm
For files having to do with the viki2 I go here and at the bottom of that page there is a link for support files.
http://www.panucatt.com/product_p/vikilcd2.htm
Once you click on support files you are taken to this page which looks like one of the ones you are currently using.
http://panucattdevices.freshdesk.com/su … 1000183232
On this page you would click the link that corresponds to the version of the Viki2 you have. If it's a 1.1 then click on the link for the 1.0 since all 1.X versions will be under the 1.0 page.
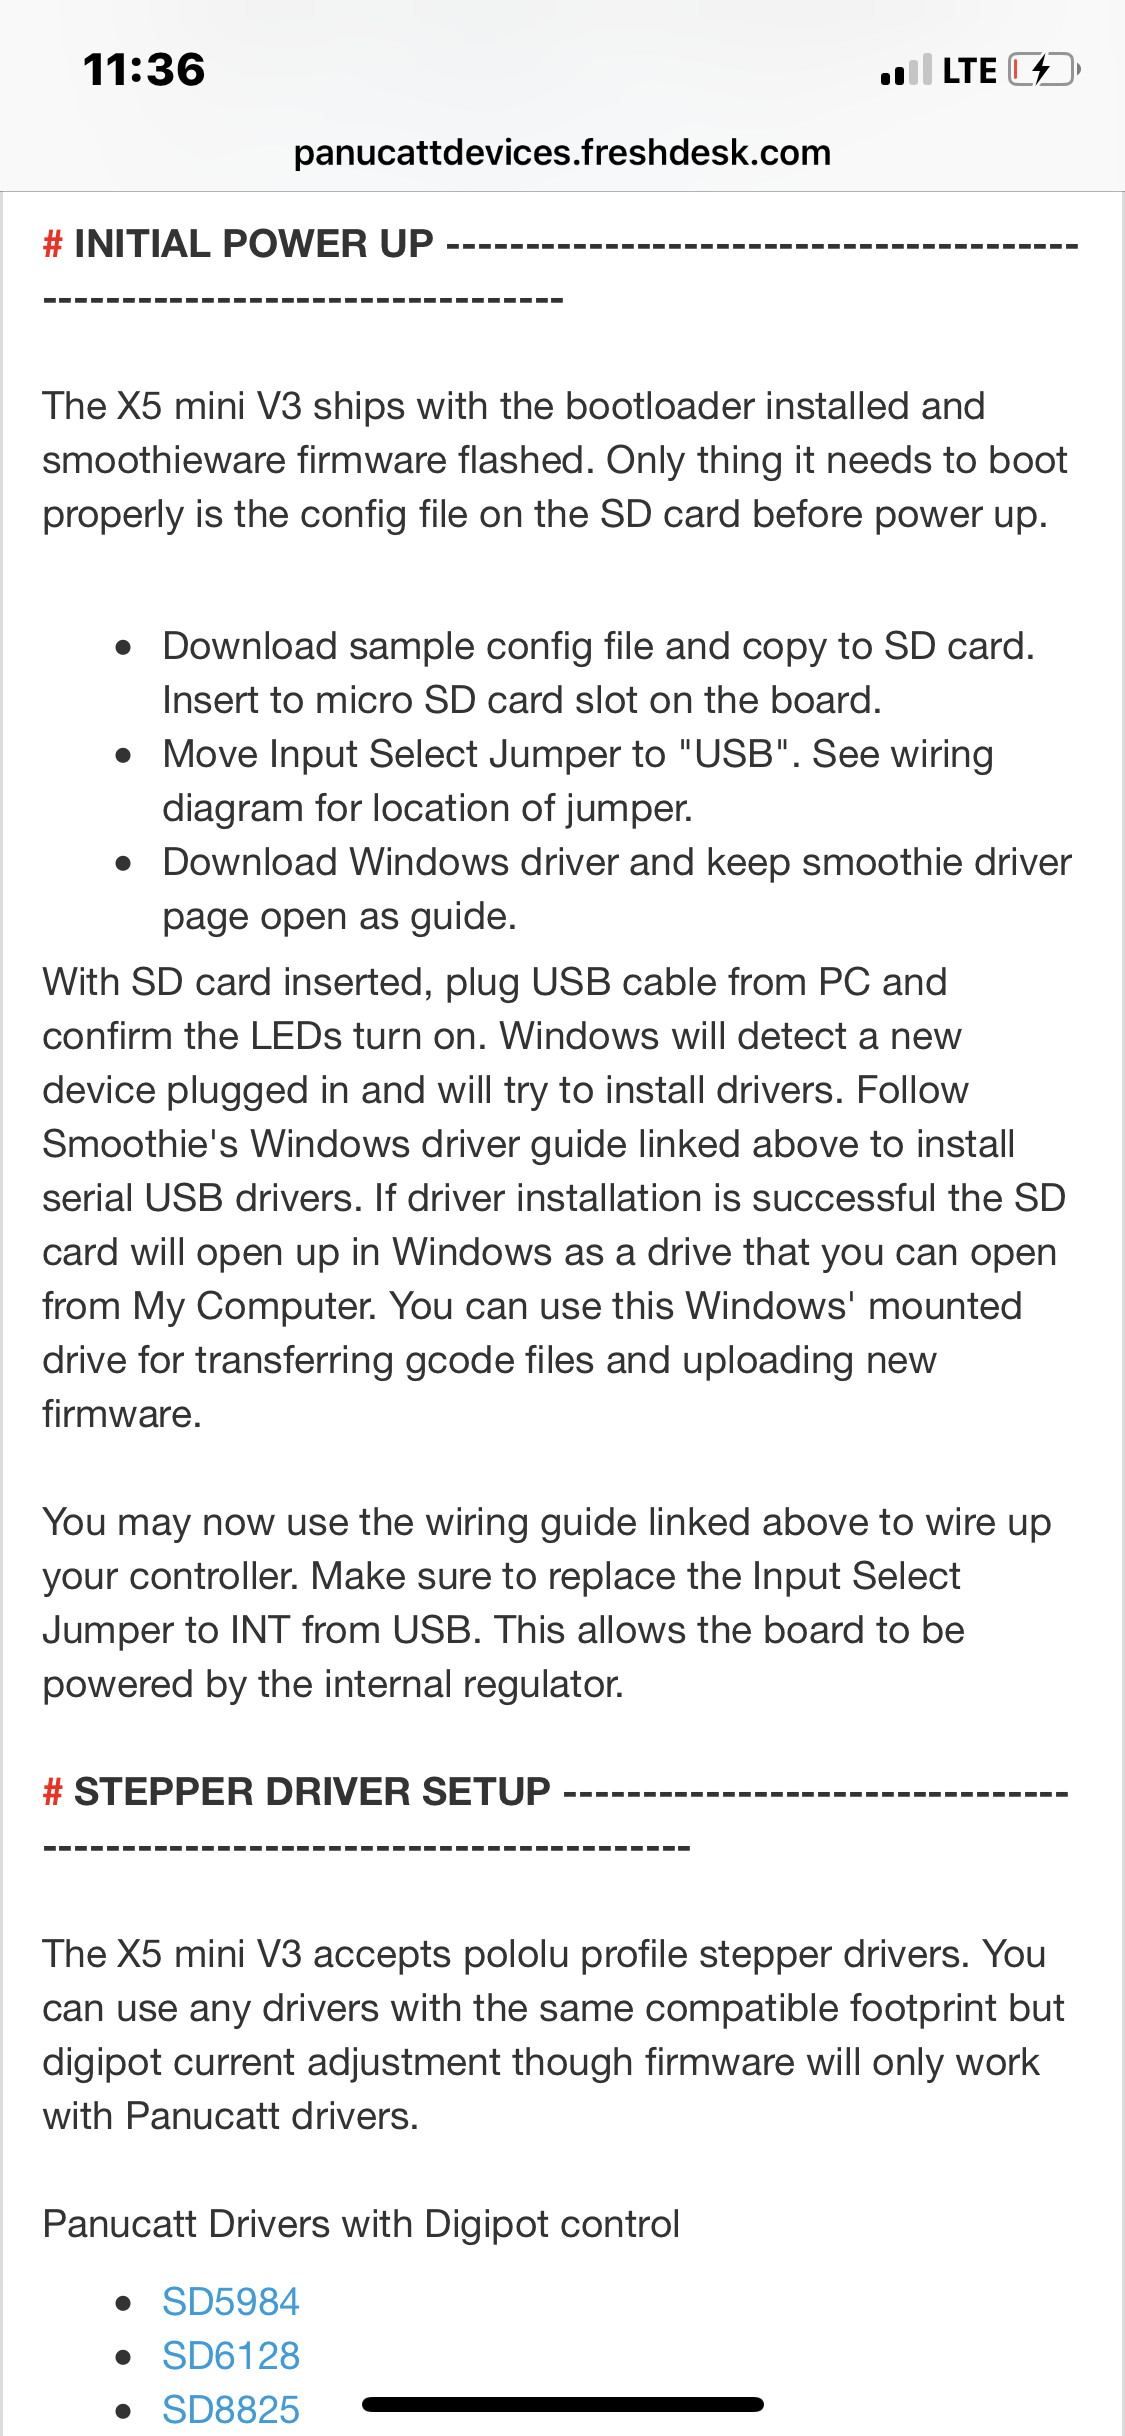
In the firmware code I supplied you should see the clip I posted in the last thread. you can search the original file by downloading it from the link or copy and pasting all of the code I supplied into a notepad page and saving it as txt file. You can then search in notepad by pressing CTRL-F and look for SDCD.
The code I supplied is the entire contents of the config.txt file which as I explained is the same as a configuration.h file in the other firmwares. You will never actually touch the real smoothie firmware that resides inside the processor unless you need to flash it in the event yours is note loaded. There is a link to it and instructions on how to flash it on the Azteeg page.
Anything you need to do to control movement, endstops, temperatures, and so on are done in the config.txt file. For this machine you will need two SD-cards. A small one like 4GB to put the config.txt file on and that one is placed in the board. The other one is for gcode files you want to print and that one will be placed in the controller. The cool thing about this board is that when you plug a PC into the USB port you can access both cards from the PC and move files to the card in the Viki and make edits to the config.txt file on the Azteeg. What I did was kept three config.txt files on my card. One was the actual file being used and it was config.txt of course. The other was the stock copy like the one I posted here. It was called config.master. I also had one that was the original that made the printer run correctly so it was basically a back of the config.txt and it was called config.bak. I also kept copies of these file on the PC in the even the SD-card got damaged or corrupt beyond repair.
I would suggest you go to the smoothieware site and read up on pin assignments and what appending ^ and ! to a pin means. for example if you append ! to a pin it will invert the function of that pin. Appending a ^ to the pin makes it an active high if i remember correctly. You will need to know this stuff to get your endstops and motors movement to act correctly.
Printing since 2009 and still love it!
Anycubic 4MAX best $225 ever invested.
Voxelabs Proxima SLA. 6 inch 2k Mono LCD.
Anycubic Predator, massive Delta machine. 450 x 370 print envelope.