126

Re: Printable x and y carriage replacements (Level 2 - Techie Consumer)

downeym wrote:

I have noticed that there is a night and day difference between cheap and quality linear bearings. The last set I bought from McMaster and although they are significantly more expensive, they are a lot smoother and precise.

Run it for a while and see if it helps. If not, consider upgrading to nicer bearings.

It should be more precise than the bushings now... even if it has a little more friction. there is a lot of slop in the stock bushings.

+1 
I order 10 sets of LM8UU's and out of the 20 pieces I had 12 "DECENT" Bearings.

I also took some real fine sandpaper and chucked the rods in my drill and make a few passes to smooth up the rods a little and now they move like butter with only little oil added.

127 (edited by spapadim 2013-12-11 01:35:41)

Re: Printable x and y carriage replacements (Level 2 - Techie Consumer)

Apologies if this is a silly question, but: how much slack are the bearings supposed to have?  Is the slack intentional and it's supposed to be tensioned away, or not?

More specifically:  Even if I print the brackets at +20% flow rate, the bearings freely move ~1.5-2mm radially and 0.8mm axially (although everything else is very tight, except for the Y-rod setscrew holes, but I don't seem to need those, since the holes are super-tight).  Therefore I jammed the bearings into the brackets with a couple of layers of gaffer's tape.  However, I don't see tape in the Thingiverse makes and I noticed that inserting the X carriage top piece will tension the X bearings, which seemed to mostly eliminate play even without tape (but I still added tape, and I didn't try to operate the printer without it, this was just moving by hand before fully assembling).

Reason I ask is that I seem to have some occasional layer alignment issues along Y, and wondering if I installed improperly (or I should just keep trying to fiddle with belt tension and alignment -- but circles come out fine and X-Y dimensions are correct to within 0.1mm).

128

Re: Printable x and y carriage replacements (Level 2 - Techie Consumer)

Z jerk. .. there be demons in that setting wink try .5 or drop to .3 and compare to .4..... smile

129

Re: Printable x and y carriage replacements (Level 2 - Techie Consumer)

I also wrapped my bearings with several layers of tape before pushing them into the carriages.  Intuition told me that was the right thing to do.  smile

130

Re: Printable x and y carriage replacements (Level 2 - Techie Consumer)

I used U-Mold, which is a plastic that comes in pellets and melts at something like 165F.  You can soften it in boiling water, and then shape it with your hands.  I put a little of that behind the bearings to take up the slack, which put the bearings in a spot that made movement on the rods a bit tight.  I then heated the bearing holders with a heat gun while sliding the carriage back and forth.  As the u-mold softened, the bearings started to align themselves and the movement got smoother.  Once it seemed to be as smooth as it would get I took away the heat so the u-mold would cool and hold the alignment.

131 (edited by spapadim 2013-12-15 15:43:05)

Re: Printable x and y carriage replacements (Level 2 - Techie Consumer)

ne14pez wrote:

I also wrapped my bearings with several layers of tape before pushing them into the carriages.  Intuition told me that was the right thing to do.  smile

Ok, good to know -- that makes at least 3 that have the bearings *inserted* tight (you, another person in this thread that mentions tape, and Adrian who used larger diameter bearings).  I was wondering if play was intentional to allow some flex/rotation to avoid binding, because most photos I saw did not show any tape.  I don't want to hijack this thread with photos of issues I'm having which may be unrelated -- haven't ruled out belt tension, Y-pulley bracket, or stepper issues.  If I'm stumped after a few days, I'll post a separate thread.  Thanks!

Edit 12/15: After fiddling with belts almost an entire afternoon, fiddling with acceleration and jerk parameters, swapping out Y pulley brackets, upgrading PSU, swapping out stepper drivers to DRV8825, and adding cooling to almost everything, it seems that cause was hotend (E3D) not sitting quite tight in the mount (Mk5).  D-OH!!  Reason I didn't think to check earlier is that hotend felt snug by hand and, more importantly, layer shifts always occurred at the *same* spot in the print, so I thought jerks can't cause so regular/repeatable errors. 

The major lesson was that I was apparently wrong on that: an imperceptibly loose hotend can cause repeatable errors.  Oh, well, on the plus side, I guess that means everything else is really precise, and I also have an overkill-upgraded printer. smile

132

Re: Printable x and y carriage replacements (Level 2 - Techie Consumer)

I need to sand down the center carriages because it's putting too much pressure on the x-bridge bars. I can't even move my head to a few inches of the side. My right carriage snapped as well because I didn't put infill to 100%.. and I hit it with a wrench...

Glue and zipties! Pictures to follow.

-SD3, E3Dv5, boz's E3D extruder, ABS from Sainsmart, mirror bed + dried hairspray + ABS slurry
-KevlarGorilla's 8x bearing threadless ball screw, 2n2r5's spring'd bed stabilizer
-fts_ltx's x-carriage, lawsy's v5 y-axis carriages, 2n2r5's beltless drive
-Overhead filament holder on 8mm rod, custom fillament feed, paeltz's simple enclosure, mini heater (opt)

133 (edited by satman49 2014-02-14 00:36:01)

Re: Printable x and y carriage replacements (Level 2 - Techie Consumer)

Is there any way to get the rods out of the ends without destroying the current end carriages? Right now I just need to replace the exrtuder carriage.I read they were glued in.

SD3, E3D hotend,linear bearing on x/y axis',pillow block bearing on y conneting rod, ball bearngs on front y axis, fan on y stepper motor.

134

Re: Printable x and y carriage replacements (Level 2 - Techie Consumer)

That's going to be hard to do.  Either try pressing them out or possibly just the right amount of heat.
Basically they are going to break sad

Printit Industries Model 8.10 fully enclosed CoreXY, Chamber heat
3-SD3's & a Workbench all fully enclosed, RH-Slic3r Win7pro, E3D V6, Volcano & Cyclops Hot End
SSR/500W AC Heated Glass Bed, Linear bearings on SS rods. Direct Drive Y-axis, BulldogXL
Thanks to all for your contributions

135

Re: Printable x and y carriage replacements (Level 2 - Techie Consumer)

I seem to recall seeing STL files for stock carriages on Thingiverse a while back. If your printer is still working it may be worth a search on the Thingiverse site for Solidoodle carriage and see if you can locate them and print a set before you try removing the rods from the factory assembly.

I probably have the files bookmarked on my desktop computer but at the moment I'm 3000 miles away from it so I can't help with a link.

Also there's probably a few folks on here that have factory X carriage assemblies gathering dust in a box so in a worst case you could create a new post to see if anyone has one they would part with if you're unsuccessful in getting yours apart without breaking it.

136

Re: Printable x and y carriage replacements (Level 2 - Techie Consumer)

RTRyder wrote:

I seem to recall seeing STL files for stock carriages on Thingiverse a while back. If your printer is still working it may be worth a search on the Thingiverse site for Solidoodle carriage and see if you can locate them and print a set before you try removing the rods from the factory assembly.

I probably have the files bookmarked on my desktop computer but at the moment I'm 3000 miles away from it so I can't help with a link.

Also there's probably a few folks on here that have factory X carriage assemblies gathering dust in a box so in a worst case you could create a new post to see if anyone has one they would part with if you're unsuccessful in getting yours apart without breaking it.

That would be guys like me... Let me know if you end up in a pinch.

Printit Industries Model 8.10 fully enclosed CoreXY, Chamber heat
3-SD3's & a Workbench all fully enclosed, RH-Slic3r Win7pro, E3D V6, Volcano & Cyclops Hot End
SSR/500W AC Heated Glass Bed, Linear bearings on SS rods. Direct Drive Y-axis, BulldogXL
Thanks to all for your contributions

137

Re: Printable x and y carriage replacements (Level 2 - Techie Consumer)

Well I printed at .4 infill it seems solid enough at least to get up and running. Am I for rude awakening or can I get enough prints out to repair and replace?

I am using the LM8UU and they are loose I tried increase flow but still loose. I will do the tape trick but be good to have the file modified to add some ribs in the walls to hole the bearing then we can sand down as needed to make them snug

The Stock rods and the new bearings felt like sandpaper on wood@!!! OMG it was so rough and hung up in my hand would not even slide more then few incheses without grabbing.

I ordered 2 new linear shafts (NOT RODS) and they slid much smoother the whole length of the rod. They are still loud and are linear bearings not radial-linear like I have seen for more $$. So then slid front to back but rotating them they are stiff since they have only 4 rows of bearings vs others that have 8+

I was hoping the 2 shafts would be enough and reuse y or x but I am hesitant will not be a big improvement so ordered 2 more shafts with carriage apart and that way I retain original carriage.

I also have a spare nema 17 servo I am hoping this will bolt to the original and help eliminate issues and mount a fan too and I already have surestepr driver so I can crank up  the current too.

I will do the same for the Y as well (but that is easy swap.)

between the bearings and improved y rod bearings I will add I hope I can run at 50-100mms perimeters and not 30 and 100mm/s infil and not 55 for quick jobs

and for larger circles prints I get no missteps or or z bumps.

SD2 owner- Surestepr, filament holder,QUBD servo and heaters, glass bed
Print for fun and for parts for my sports cars
current car is 88 IROC

138

Re: Printable x and y carriage replacements (Level 2 - Techie Consumer)

jjcuff1 wrote:

Well I printed at .4 infill it seems solid enough at least to get up and running. Am I for rude awakening or can I get enough prints out to repair and replace?

I am using the LM8UU and they are loose I tried increase flow but still loose. I will do the tape trick but be good to have the file modified to add some ribs in the walls to hole the bearing then we can sand down as needed to make them snug

The Stock rods and the new bearings felt like sandpaper on wood@!!! OMG it was so rough and hung up in my hand would not even slide more then few incheses without grabbing.

I ordered 2 new linear shafts (NOT RODS) and they slid much smoother the whole length of the rod. They are still loud and are linear bearings not radial-linear like I have seen for more $$. So then slid front to back but rotating them they are stiff since they have only 4 rows of bearings vs others that have 8+

I was hoping the 2 shafts would be enough and reuse y or x but I am hesitant will not be a big improvement so ordered 2 more shafts with carriage apart and that way I retain original carriage.

I also have a spare nema 17 servo I am hoping this will bolt to the original and help eliminate issues and mount a fan too and I already have surestepr driver so I can crank up  the current too.

I will do the same for the Y as well (but that is easy swap.)

between the bearings and improved y rod bearings I will add I hope I can run at 50-100mms perimeters and not 30 and 100mm/s infil and not 55 for quick jobs

and for larger circles prints I get no missteps or or z bumps.

Try these printed solid, you won't have any slack in the LM8 bearings and they'll hold up to just about anything you want to do with your SD... http://www.soliforum.com/post/48984/#p48984

139

Re: Printable x and y carriage replacements (Level 2 - Techie Consumer)

adrian wrote:

Thanks heaps for this Lawsy. Whilst I've been working with a few different setups, yours is quite nice.

Not entirely sold on the 3 piece x-carriage still, but this design is probably the best solution so far.

Tips for others: If you use the original limit switch screws, drill out the Limit Switch holes first, as its *very* easy to split the carriage as the threads are perpindicular to the print-layers...

Heres some pics of it installed on my SD3.. And yes I need a new Mk4 mount ... :
http://farm4.staticflickr.com/3695/9056262015_7b72976da5_z.jpg
http://farm4.staticflickr.com/3809/9058487170_15d7d31bf3_z.jpg
http://farm3.staticflickr.com/2829/9058489458_1eef00ab97_z.jpg

I have tried to locate the stl for the fan mount below your nema 17 stepper motor on the X drive.  No luck, have tried several others found on thingiverse, but they didn't fit properly.  Can you direct me to said STL please?  TIA.

140

Re: Printable x and y carriage replacements (Level 2 - Techie Consumer)

Doing the build up and a couple issues/highlights.

1: I printed at .38 seem thin but should hold up until I rebuild and reprint

2: the instructions are good but little more details or pictures for the y explains the pulley thing

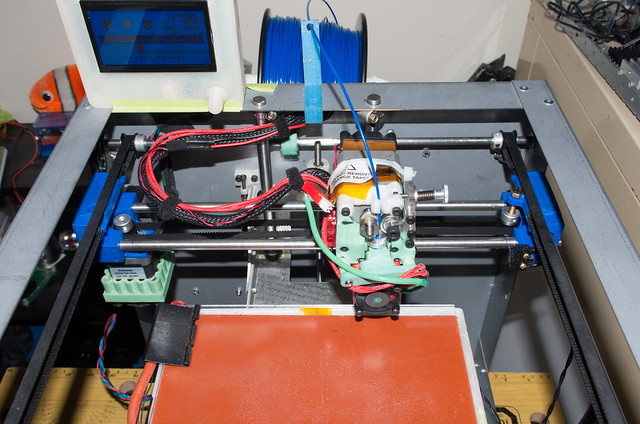
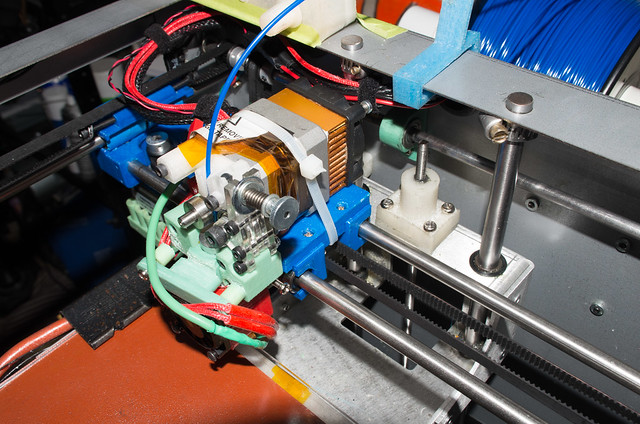
3: the x carriage really is confusion. The front and rear are slightly different but not clear why and how the fit doesn't seem to matter? Can go in upside down etc.

4: the top x piece also not clear which is front to back

5: bolting the x bearings to the top piece is clear as mud. There are no left over screws I can see that can be used to bolt them together exept 2 long ones from the old bushing piece
Also the holes make no sense? There are several captured but holes on front and back and they do not line up with anything on the top piece seem wasted print time

6: I had 20mm long 3mm bolts I just threads them into the front back to to top without nuts and seem to holed fine. But the top price does not sit flat on the bearings good but off no matter how I shuffle things front to back it binds a little. With some torque order on the bolts to the top I can get it to loosen up and stay right.

7: the extruder bolts that go front to back go through nicely. There is a space mid top piece to capture the nuts I assume but have to knive the opening to Jam screw in there and it doesn't capture it well still spins so not sure if  will tighten well Nd no room for jam but just flat nut in will but longer screw to go out back

8: I am about to add the belts on again the screw spaces for the Belts tension screws are so close u can reuse the long sd bolts and not a lot of space they will touch so need to get new ones here too.

Overall the y slides night and day better. The new rods I have were way better then the sd ones that sound like sand except for 1 I will return the bearings on the x still should slide better I feel some is the binding of the pieces but the main culprit is the rods and few of my bearings seem beat up the china lmuu seem to be about 70% good out of 13 of the


I will button up and run it and reprint I think a little more float on the rear x bearing that allows Xy float will eliminate binding and out of square from the 2 rods. And updated BOM showing what screws are needed new versus what u can renew


I am not bashing here awesome build and I am hoping for big improvement since it slides effortless in the Y now!!

SD2 owner- Surestepr, filament holder,QUBD servo and heaters, glass bed
Print for fun and for parts for my sports cars
current car is 88 IROC

141

Re: Printable x and y carriage replacements (Level 2 - Techie Consumer)

RGargus wrote:

I have tried to locate the stl for the fan mount below your nema 17 stepper motor on the X drive.  No luck, have tried several others found on thingiverse, but they didn't fit properly.  Can you direct me to said STL please?  TIA.

Is it a nema 17 or 14? Anyway I want to print something similar also.. Im guessing thingiverse number 32994 or 32923.

142

Re: Printable x and y carriage replacements (Level 2 - Techie Consumer)

I'm making this now but I'm concerned about the weak looking m5 bolt holder.  I used 0.5 (or. 6?) Infill.  Is there a way to strengthen this bit post printing?  Treat with super glue or acetone?

SD2 Sanguinololu 1.3a atmega1284p, wood platform, lawsy's carriages, braided fishing line, pallet wood overhead spool mount, carboard/magnet enclosure, glass bed, E3D v6, bed levelling knobs, extended z-stop, 25A DC-DC SSR for bed heater, everything fixed to the SD2 frame, marlin firmware with some adjustments and extra failsafes enabled.  I'll never give up on you, little printer that could(n't)!

143 (edited by Tomek 2014-04-11 05:25:20)

Re: Printable x and y carriage replacements (Level 2 - Techie Consumer)

I did a preliminary search on this thread, but I can't find any comments on this potential problem I noticed:

I printed out probably V_1 of these parts, a while back. Right now I am reassembling my printer after a big set of upgrades, and I am using these carriages.

But it looks like between the X-motor and the corresponding pulley, there is some Z_axis height difference. Is this...normal? Should I try to fix it? (I could put the X motor pulley upside down and then that would get me a few millimeters closer to even.)


Does anyone need pictures?

My X-axis motor has a pulley where the pulley collar and the pulley flange is in line with the X-rods, and on the other side the X_not-motor_pulley is roughly centered on the X-rods. So there's about 3-4 mm of movement (over approximately 250mm distance, so the effect is probably small. But I am upgrading to fishing line so I hope it will not get tangled by that mild height difference.)


Any help would be appreciated.

Thanks!
-TOmek

144

Re: Printable x and y carriage replacements (Level 2 - Techie Consumer)

Tomek wrote:

I did a preliminary search on this thread, but I can't find any comments on this potential problem I noticed:

I printed out probably V_1 of these parts, a while back. Right now I am reassembling my printer after a big set of upgrades, and I am using these carriages.

But it looks like between the X-motor and the corresponding pulley, there is some Z_axis height difference. Is this...normal? Should I try to fix it? (I could put the X motor pulley upside down and then that would get me a few millimeters closer to even.)


Does anyone need pictures?

My X-axis motor has a pulley where the pulley collar and the pulley flange is in line with the X-rods, and on the other side the X_not-motor_pulley is roughly centered on the X-rods. So there's about 3-4 mm of movement (over approximately 250mm distance, so the effect is probably small. But I am upgrading to fishing line so I hope it will not get tangled by that mild height difference.)


Any help would be appreciated.

Thanks!
-TOmek

I run fishing line and yes you can just flip that pulley over and slide it up the shaft till it is centered.  Remember with fishing line you don't want too many wraps around that pulley (3 maybe 4) and the idler side doesn't need any wraps.

Printit Industries Model 8.10 fully enclosed CoreXY, Chamber heat
3-SD3's & a Workbench all fully enclosed, RH-Slic3r Win7pro, E3D V6, Volcano & Cyclops Hot End
SSR/500W AC Heated Glass Bed, Linear bearings on SS rods. Direct Drive Y-axis, BulldogXL
Thanks to all for your contributions

145

Re: Printable x and y carriage replacements (Level 2 - Techie Consumer)

Thanks Ward!

When I flipped it upside down it made me feel better about the (no longer perceivable) height difference. I thought I would ask before I do something like that and your confirmation made me feel better about doing so.

146 (edited by mdrVB6 2014-04-19 15:45:44)

Re: Printable x and y carriage replacements (Level 2 - Techie Consumer)

Lawsy, thanks again for the great design!

Has anyone else had an issue with installing these carriages with the Mk5 extruder replacement and then not been able to get their Z-stop limit correct when using printed thumb screws under the bed?

I've got these (http://www.thingiverse.com/thing:38064) thumb screws (the version without cones) under my bed and I like to have them most of the way threaded onto the screw.  It seems like the hot end mounts a little higher with these mods and because of this, I can retract (or even remove) the screw and while the thumb screws are on most of the way, the hot end is several mm above the bed.  I can mostly unscrew my thumb screws or install a glass bed to make up the difference but I would prefer to do neither of these.

Basically, I need a raised Z-screw mount.  Does anyone know of one?  I saw Lawsy's lowered Z-screw mount on thingiverse but I have the aluminum bed and from his pictures it looks like he has the older wooded bed. They are not interchangeable because it is too thick and the screws are too short and the heads would hit the aluminum bed.  My sketchup is weak but I might try to make this myself if no one else has made one already.

In the current condition, I have to make all my adjustments with the 3 bed leveling screws, the z-limit screw is useless because it is fully retracted.  So I can print, but the frustration level of leveling my bed is a lot higher until I can get a raised Z-screw mount.

Thanks.

SD4 w/ RUMBA, E3D Volcano, all bearings, glass bed

147

Re: Printable x and y carriage replacements (Level 2 - Techie Consumer)

Could you flip the z-screw mount upside down and gain enough?

Printit Industries Model 8.10 fully enclosed CoreXY, Chamber heat
3-SD3's & a Workbench all fully enclosed, RH-Slic3r Win7pro, E3D V6, Volcano & Cyclops Hot End
SSR/500W AC Heated Glass Bed, Linear bearings on SS rods. Direct Drive Y-axis, BulldogXL
Thanks to all for your contributions

148

Re: Printable x and y carriage replacements (Level 2 - Techie Consumer)

Nope.  It is offset to the left so flipping it upside down just makes it hit the print bed on the right.

SD4 w/ RUMBA, E3D Volcano, all bearings, glass bed

149

Re: Printable x and y carriage replacements (Level 2 - Techie Consumer)

Yep those offset ones are a pain.  Just have to learn Sketch-Up:)

Printit Industries Model 8.10 fully enclosed CoreXY, Chamber heat
3-SD3's & a Workbench all fully enclosed, RH-Slic3r Win7pro, E3D V6, Volcano & Cyclops Hot End
SSR/500W AC Heated Glass Bed, Linear bearings on SS rods. Direct Drive Y-axis, BulldogXL
Thanks to all for your contributions

150

Re: Printable x and y carriage replacements (Level 2 - Techie Consumer)

Are the 'centre front' and 'centre rear' parts the same? It's just there's a part file for each of them. They look the same to me, but I may have missed something and don't want to risk putting them in wrong.

Industrial Designer
Fresh Design Works (UK)
www.freshdesignworks.co.uk