1 (edited by nlancaster 2013-04-26 20:57:05)

Topic: X-axis lost steps.

So been notcing my parts come out leaning away from the x-axis motor in that direction.  Seams most pronuonced on first dozen layers or so, then straightens up.  So I designed and printed an x-axis motor fan mount and the motor is just barely warm to the touch now.  But I am still losing x-axis steps at the beginning of the print still.

I have looked for any sort of x-axis calibration, not sure I need that, because the shift stops after the first few dozen layers. 

Any help would be appreciated.

http://www.pdxmc.com/uploads/SD3/20130326_214011.jpg

Edit:  Solved!  After way to much back and forth with solidoodle support, I recieved replacement Z guide rods and now I no longer have the shift in any direction as the bed moves down.

2

Re: X-axis lost steps.

Still unsolved tried the Y-axis calibration 2 more times at solidoodles isistance.  I don't see how it can possibly be a calibration issue. the problem goes away after the first 5-7mm o print is done.  And this problem happens no matter what size the print is.

3 (edited by nlancaster 2013-03-31 05:18:33)

Re: X-axis lost steps.

Well made it worse tonight. not the idler pulley is clicking while moving and steps are screwed up for the entire print.  I could really use some more help then just support saying redo the x/y calibration that says nothing at all about the X-axis.

Reading other threads people talk about the clicking, and mention set screws in the idler pulley.  But I see none in any of my pulleys except the ones that are driven, is this normal?  If not what Size do I need?

Whats a good tension for x-axis belt?
How do we check tension?
Do I need set screws in the idler pulleys?

4 (edited by ronsii 2013-03-31 06:19:39)

Re: X-axis lost steps.

nlancaster wrote:

Well made it worse tonight. not the idler pulley is clicking while moving and steps are screwed up for the entire print.  I could really use some more help then just support saying redo the x/y calibration that says nothing at all about the X-axis.

Reading other threads people talk about the clicking, and mention set screws in the idler pulley.  But I see none in any of my pulleys except the ones that are driven, is this normal?  If not what Size do I need?

Whats a good tension for x-axis belt?
How do we check tension?
Do I need set screws in the idler pulleys?

The idler pulleys(front pulleys) do NOT require set screws in fact if you put setscrews in them they will not work at all.

Tension for all belts should be just enough to not be loose or barely enough that they do not sag they need to be tight enough that they don't slip a tooth, they do not need to be tensioned anything like a guitar string.

Most of the clicking noises heard by people are just the y rods moving a very small amount inside the frame to check if this is what you are hearing just put a finger on the end of each one while you are printing and the noise will stop, to cure the clicking move the tiny hose clamps that hold the rods in place tighter to the frame. The clicking does not affect anything.

The only pulleys that have setscrews are the pulleys on eack stepper motor and the three pulleys on the back Y shaft
The pulleys that do NOT have setscrews are the two y axis idler pulleys on the front of the frame and the one idler pulley on the carriage opposite the x stepper motor

5 (edited by nlancaster 2013-03-31 07:00:12)

Re: X-axis lost steps.

1, y rods are not lose, push pull on them nothing changes.

2. tried with belts tight and lose, still clickgin on small/slow x-axis changes.

3. groans from the right side y carrage when moving through the middle of its range.

3. good to know on the pulleys its what I thought.

Here is some video of the print.

6

Re: X-axis lost steps.

Hmmmm strange, the groaning sound would more than likely be from the idler pulley, does it slide up and down freely might be worth trying to get more grease on its shaft. The losing steps thing is just peculiar for the x axis... either the carriage is too hard for the motor to move reliably or there is some electronic driver problem or maybe something is loose on the printhead, make sure the peek and nozzle can't be pushed around causing it too shift.

As for the clicking, since it is not the y rods... have you tried to replicate the sound when the printer is off, push the printhead left and right, back and forth, twist it back and forth a little to see if anything shows a little sign of moving... other than that I am not sure where else to look, examine all the plastic pieces for cracks or something that doesn't look right???

7 (edited by nlancaster 2013-04-01 06:07:09)

Re: X-axis lost steps.

So spent most of my spare time today tweaking and retweaking, lubing, readjusting y-axis, x-axis belt tension, and got back to getting prints that are only shifted at the layers with lots of x-axis travel.  Once out of the areas withalot of x travel the part prints fine.  seems to go away after the bottom 2-4mms are done printing on most prints. 

Checked voltage on the x-axis driver was a little low .438, tweaked to .444 and still having same issues. The biggest puzzler is the drift always shifts away from the x-axis stepper, and stops part way thru the print. tomarrow going to add an electronics cover with fans to cool the drivers and see if that does any good at all.

8

Re: X-axis lost steps.

I had same in y and after pulling my hair out and following all these steps. It was the driver board and/or over heating. I am STILL waiting on my Suresteppr I hope I get today then I will update the team with my results from the upgrade.

SD2 owner- Surestepr, filament holder,QUBD servo and heaters, glass bed
Print for fun and for parts for my sports cars
current car is 88 IROC

9

Re: X-axis lost steps.

Well I added my cooling fans and same issue.  Moved the driver boards around between the x-axis and y-axis same issues.  prints start out losing steps in the x-axis direction, they striaghten up after the firs 2-4mm.

Here are some pictures of the fan mount, and the results from moving the driver board.

http://www.pdxmc.com/uploads/SD3/20130401_202353.jpg

And here I highlighted in blue what is going on.

http://www.pdxmc.com/uploads/SD3/20130401_203038.jpg

10

Re: X-axis lost steps.

Well that does not look like heat or bad board and not too extreme. Still could be minor tension tweak since that appears in the x-y region as it makes a circle.

Also some very small banding can be seen. I have seen that when the lower layers get compressed then the upper layers slip out it is usually from speed, cooling and squishing of the lower layers.

Wonder if at lower levels the accel. is changing from the top parts so that it it gets a little short on the X. as it prepares to turn and run down the long X. then as it it gets to the small circle it can maintain the dimensions better since the error is a % of the length.

Try recalibrating the X steps and see if it improves?

SD2 owner- Surestepr, filament holder,QUBD servo and heaters, glass bed
Print for fun and for parts for my sports cars
current car is 88 IROC

11

Re: X-axis lost steps.

how do you calibrate the x-steps?  no one has ever told me or shown me a link to do that.

This happens on all parts weather they be small circles or big sqaures or whatever shape you can think of.

12

Re: X-axis lost steps.

Simple: print a known part length. Calibration angle works well. I like this part
http://www.thingiverse.com/thing:53668

It is 50mm in X,Y and and 10MM wide. So measure each dimensions after printing. ( I print with 1 perimeter and .2 infill. it is a cool part when done.)

So your default steps are probably 88 in x and y. To confirm, go into RH and when you connect to the printer look at the M92 line it will list X88 Y88 Z 2268 E106 or something. each letter is your stepper motor steps.

So measure your actual. Lets say it is 51MM

Then formula is:      (Steps X Theory length)/ Actual = new step value

So 88 x 50 / 51 = 86.3

so now go into RH and type M92 X86.3
Then M500 to save it.

and you have calibrated your X repeat for Y,Z and E

SD2 owner- Surestepr, filament holder,QUBD servo and heaters, glass bed
Print for fun and for parts for my sports cars
current car is 88 IROC

13

Re: X-axis lost steps.

I will give that a shot, but that does not explain why the shifting goes away after the first 4 millimeters.

14

Re: X-axis lost steps.

Well did the calibration as you suggested with the same outcome.  first 4mm or so is still shifting away from the x-axis stepper.

Anyone else have any ideas.  Solidoodle support has been silent since sunday night.

15

Re: X-axis lost steps.

The picture looks like it might be variation in shrinkage that can happen in lower layers near the bed.  Try turning the bed temp as low as you can and still stick, maybe 80.  Be sure you use the same location on the bed and see if it makes any difference.

16 (edited by nlancaster 2013-04-03 06:29:35)

Re: X-axis lost steps.

Ian, The shift happens on both sides in the same direction.  The parts shift away from the x-axis stepper, and the ammount is equal on both sides of the part in the x-axis direction.

I printed 4 copies of the same part in the same way.  load into repetier, drops right in the middle of the bed.  run the same slicer config, and print.  tried one at 70c and same issues same direction.

17

Re: X-axis lost steps.

Well I got my SD2 up and running after tension and replacing both step drivers with SureStepr. and made a huge difference but still had shift but now in the X. Last thing I did which fixed it the most. Was cleaning my nozzle? Not sure why but after still have shifts in Y and X with new drivers and tension I cleared my nozzle, which didn't appear to be clogged. I heard some popping. SO try cleaning nozzle. Of course I went back and leveled bed and cleaned everything again and checked voltages with both POWER and USB plugged in that made a huge difference.

So after all that and calibration I had good runs on larger diameters parts within .1MM at 50mm or 0.001" on 2" parts which was good. But on small diameters I was still .1mm-.2mm off and some with shift.

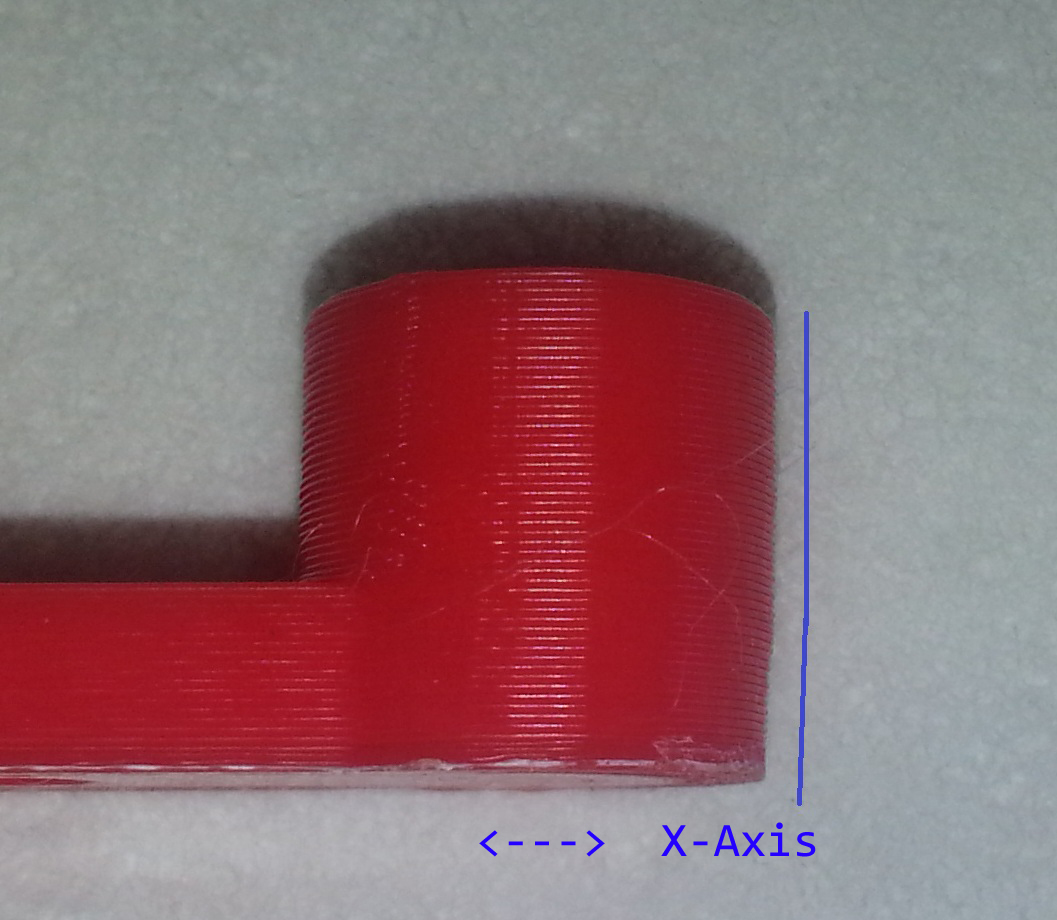
I think it is now backlash, maybe too loose, but hate to play with it more and make it worse. But I also noticed it like you at the top of my prints. Looks good but then shifts near the last few layers. to the right.

I think it could be small diameters and lack of cooling so the head drags a little. I turned off retract on new layer in SLic3r .99(new feature) which helped. But I am thinking that with small parts and my speed/accel I am getting overshoot.

Anyone have good accel numbers? I am running the stock 9000. I am thinking they are too hi and getting overshoot?

SD2 owner- Surestepr, filament holder,QUBD servo and heaters, glass bed
Print for fun and for parts for my sports cars
current car is 88 IROC

18 (edited by nlancaster 2013-04-03 15:20:02)

Re: X-axis lost steps.

This problem happens at the bottom of the prints, at the bed.

While I don't think the acceleration is causing my issue,  could be wrong, it does seem extremly high.  CNC machines should not be banging around so hard that the entire machine moves around on the desk.  I too have been wondering if we can bring some sanity to the acceleration figures and stop the banging.

19

Re: X-axis lost steps.

Well I say the top. But maybe I am looking at it wrong, could be bottom is over and adjust after about 30 layers and then goes straight too? In small circle case the last few layers shifted to the right very obvious. It almost appeared like the plastic was still molten and at the end of the print as the head finished the last layers it deformed and pulled the wall with it a little. no drag marks.?

I noticed this on the Z wobble cal cubes. Thin 1 wall prints at the top on one side after complete I went to big up and it appeared the one wall sagged in deformed. I printed again and it did it on a different wall and I realized it looked like my thumb. Like when I went to ull off my thumb pressed the wall in slightly. Again maybe not cooled yet? Wonder if on small prints I am seeing this because I am printing too fast and or accel?

I have a 2" diameter port I print for test, i can post the stl. On that part it comes out dead nuts with nothing wrong.

SD2 owner- Surestepr, filament holder,QUBD servo and heaters, glass bed
Print for fun and for parts for my sports cars
current car is 88 IROC

20

Re: X-axis lost steps.

The picture marked up in blue is as printed off the printer.  bottom down on the glass bed.

And this problem happened before the glass bed ever got used.

21

Re: X-axis lost steps.

Well if not tension or cooling as you have that covered. Didi you clear the nozzle to be sure then last I would maybe try the USB voltage, Try to go direct off PSU power and see if voltage is fluctuating?

SD2 owner- Surestepr, filament holder,QUBD servo and heaters, glass bed
Print for fun and for parts for my sports cars
current car is 88 IROC

22 (edited by nlancaster 2013-04-03 19:36:37)

Re: X-axis lost steps.

I will atempt clearing the nozzle, though again I would find that strange to only cause only problems at start of print.

What do you mean by direct off PSU power and see if voltage is fluctuating?

23

Re: X-axis lost steps.

rincewind just posted where he had voltage problems using the USB. USB and PSU both share the same 5v rail. So I think if the PSU fluctuates (which form the PC it easily can when it goes to sleep gets busy or taxed with cpu loads) It effects the voltage. The voltage is critical to the stepper outputs. And easily can cause shifts.

SD2 owner- Surestepr, filament holder,QUBD servo and heaters, glass bed
Print for fun and for parts for my sports cars
current car is 88 IROC

24

Re: X-axis lost steps.

I am running off the external PSU.  how esle can I do it?

25

Re: X-axis lost steps.

nlancaster wrote:

I am running off the external PSU.  how esle can I do it?

The circuit board is tied to both the external power supply and to your computer's USB power at the same time.  As I understand, if the voltages differ, the two can "fight" causing extra current to flow where you don't want it to, possibly underpowering or overpowering the Sanginololu or causing the voltage to fluctuate.  IMHO there is no way you could have the same symptom (skipping) caused coincidentally by so many unrelated problems (carriage binding, nozzle, drivers overheating, etc).  Instead, you almost certainly have just one problem: inconsistent/wrong/insufficient power or something (voltage regulator?) flakey on the logic board.

The link in Rincewind's link suggests cutting a trace on the board so that it isn't tied to the computer's USB but only runs on the external PSU.  I've not tried this myself, but it seems well worth the try and not too hard to undo.