1 (edited by ESOCHI 2019-09-24 17:09:41)

Topic: Solidoodle Workbench Overhaul x2

The time has come to squeeze more out of what my Solidoodle Workbench can offer.

I'll be using this post over the next month or so to document and discuss upgrade paths for the SD WB.

My goals:

Upgrade print tolerances as much as possible. My prints can sometimes be off over 1mm in the Y direction and of course the Z banding issue is present. The amount of weight on the Y axis causes some wicked ghosting. I want that gone. I want less noise as well. I'd also appreciate faster warm up times, and the ability to go hotter for more material capability. Maybe 24 volt upgrade is in order?


Board - Duet 2 WiFi likely my go-to. I hear it can reduce noise as well, and I want that.

Z-Axis threaded rod - I'm ordering some M5-0.8 threaded rod to replace what's currently there. I'll be using a 5mm to 5mm clamp style coupler and a few M5-0.8 nuts with a printed attachment bracket.

Extruder/Hotend - I'm looking at going the E3D route with a Titan Aqua. One of my extruder steppers failed which sparked this whole upgrade project. Not to mention I'm constantly getting blockages which are causing my prints to fail. This will be purchased last.


Pending Purchases:

Z-Axis stuff from Amazon:
-Fevas Flexible Clamping Coupler:5mm to 5mm,1pcs/lot.
-Steel Hex Nut, Zinc Plated Finish, Class 6, DIN 934, Metric, M5-0.8 Thread Size, 8 mm Width Across Flats, 4 mm Thick (Pack of 100)
-18-8 Stainless Steel Fully Threaded Rod, Meets DIN 975, M5-0.8 Thread Size, 1 m Length, Right Hand Threads

Duet 2 Wifi- I'm not going the thermocouple route with the Titan Aqua (at least not yet) but I believe I still need the PT100 board add-on, can someone confirm this for me?

E3D Titan Aqua- This will be purchased at a later time as the Duet 2 Wifi hogs my budget.


I'd like to think about 24v power supplies but honestly that's a bit outside my area of expertise.


Regards,
Esochi

2

Re: Solidoodle Workbench Overhaul x2

'd like to think about 24v power supplies but honestly that's a bit outside my area of expertise.


Not that difficult but does take some consideration of components.

Also there are now thermsistors that can handle 500c no need for thermocouple.

Soliddoodle 4 stock w glass bed------Folger Tech Prusa 2020 upgraded to and titan /aero extruder mirror bed
FT5 with titan/ E3D Aero------MP mini select w glass bed
MP Utimate maker pro-W bondtech extruder
Marlin/Repetier Host/ Slic3r and Cura

3 (edited by ESOCHI 2019-09-26 19:44:07)

Re: Solidoodle Workbench Overhaul x2

That's good to know regarding the thermistors!

I got the go-ahead for 24v conversion. I'm looking at two PSU options right now.

The first is this one from amazon. 24v 21a 500w

The second is a cheaper eBay option. 24v 20a 480w

I'm going to have to wire either one, and they both are quite close in rating. I'll likely go the cheaper route as kind-of a proof-of-concept.

If my research is correct, and I get the 24v version of the titan aqua (complete with the V6 hotend), I should be able to plug and play without changing anything else. Can someone confirm that for me? I know sometimes fans can be inconsistent, and I'm not concerned if I have to replace those. The bed, however, is another story.

I currently have no plans of messing with the bed until I need to. I plan to run it through the Duet 2 WiFi. Will I see an increase in top-temp/heating times? I absolutely want to be able to print ABS, and I'm guessing that's about the limit of the stock heat bed.

Regards,
ESOCHI

4 (edited by carl_m1968 2019-09-26 19:59:38)

Re: Solidoodle Workbench Overhaul x2

I would not go with either of those for a printer. There is a reason those go for the price they are. Look at a Meanwell with the same specs and see the price difference. You need to try to avoid little known names as they are usually cheap and rely heavily on constant cooling which in most cases is not adequate and will cause the unit to fail in a few months if not sooner.

Don't go cheap on printers it will only cost you more in the long run. If you can;t afford it now then just wait.

Printing since 2009 and still love it!
Anycubic 4MAX best $225 ever invested.
Voxelabs Proxima SLA. 6 inch 2k Mono LCD.
Anycubic Predator, massive Delta machine. 450 x 370 print envelope.

5

Re: Solidoodle Workbench Overhaul x2

These options from Openbuilds are pretty cool and a good deal:

https://openbuildspartstore.com/power-supplies/

SD2 - Stock - Enclosure - Heated Bed - Glass Plate - Auto Fire Extinguisher
Ord Bot Hadron - RAMPS 1.4 - Bulldog XL - E3D v6 - 10" x 10" PCB Heated Build w/SSR - Glass Plate
Thanks for All of Your Help!

6 (edited by ESOCHI 2019-09-27 12:34:32)

Re: Solidoodle Workbench Overhaul x2

I certainly like the 24v Meanwell PS Bundle. I'll switch to that for my PSU.

Thanks for the input! I suppose if I'm getting top-tier components I should also get a top-tier psu haha.

I also now see that the liquid cooling kit needs 12v DC, so I'll be adding on a 24v to 12v converter for that. I'm looking at
Mean Well PSD-45B-12, and I guess I'd need two...Unless I get janky and just use the old board and power supply to power the 12v liquid coolant pump and 12v fan. Man I'm full of sketchy electronic ideas. Nobody should ever take electronic advice from me.

That puts me just a tad over my $500 budget, sans-shipping.

Regards,
ESOCHI

7

Re: Solidoodle Workbench Overhaul x2

Time for the fun stuff.

We purchased the following:

24v Meanwell Power Supply Bundle

Duet 2 Wifi

E3D Titan Aqua (Extruder and Hotend Combo)

E3D Liquid Cooling Kit

I'm still pushing forward with my "use the old 12v board to power the 12v Liquid Cooling Kit" idea, so I won't be buying a 24v-12v DC-DC adapter.


SO FAR:
I've assembled all parts.
I've disassembled the printer as far as necessary.
I've begun configuring the Duet 2 WiFi

STILL NEED TO:
Engineer a solution to attach the Titan Aqua. I removed everything except the linear bearings and MAN are they BAD! They both slide HORRIBLY and they're LOUD. Not that they're rotating with normal use, but one spins in one direction and not the other, and the other spins in both directions freely. I either need to rip the dust shield off and hit them with brake parts cleaner then a light oil, or get rid of them. If we go the later route I'd have to print carriage parts since it seems like the rods are glued in? I'd love to put some carbon fiber rods in their place if I removed them, as weight is always an issue with direct drive systems.

Not sure what route I'm taking but figured there was enough info for an update.

Regards,
ESOCHI

8 (edited by carl_m1968 2019-10-02 20:49:24)

Re: Solidoodle Workbench Overhaul x2

ESOCHI wrote:

Time for the fun stuff.

We purchased the following:

24v Meanwell Power Supply Bundle

Duet 2 Wifi

E3D Titan Aqua (Extruder and Hotend Combo)

E3D Liquid Cooling Kit

I'm still pushing forward with my "use the old 12v board to power the 12v Liquid Cooling Kit" idea, so I won't be buying a 24v-12v DC-DC adapter.


SO FAR:
I've assembled all parts.
I've disassembled the printer as far as necessary.
I've begun configuring the Duet 2 WiFi

STILL NEED TO:
Engineer a solution to attach the Titan Aqua. I removed everything except the linear bearings and MAN are they BAD! They both slide HORRIBLY and they're LOUD. Not that they're rotating with normal use, but one spins in one direction and not the other, and the other spins in both directions freely. I either need to rip the dust shield off and hit them with brake parts cleaner then a light oil, or get rid of them. If we go the later route I'd have to print carriage parts since it seems like the rods are glued in? I'd love to put some carbon fiber rods in their place if I removed them, as weight is always an issue with direct drive systems.

Not sure what route I'm taking but figured there was enough info for an update.

Regards,
ESOCHI


You do know the CF rods would flex more than steel and flexing is an enemy of all 3D printers. If there are people using CF rods they are most likely using them only on vertical rods where flexing is less damaging and not on horizontal places.

Printing since 2009 and still love it!
Anycubic 4MAX best $225 ever invested.
Voxelabs Proxima SLA. 6 inch 2k Mono LCD.
Anycubic Predator, massive Delta machine. 450 x 370 print envelope.

9

Re: Solidoodle Workbench Overhaul x2

I did not! Well, I assumed there was flex but I didn't expect it to cause worse issues than the ghosting I get from the weight on my gantry. I'm quite curious to see what the trade off would end up being like. I may do this one "for science" while keeping my hopes safely down haha. Maybe there's something more like a linear rail I could use (if not just an actual one). Time to do some research!

With the linear bearings being shot, and the stock weight of the gantry+dual extruders, I was getting awful quality prints. Even at stupid slow speeds with jerk and accel settings quite low.

Regards,
ESOCHI

10

Re: Solidoodle Workbench Overhaul x2

ESOCHI wrote:

I did not! Well, I assumed there was flex but I didn't expect it to cause worse issues than the ghosting I get from the weight on my gantry. I'm quite curious to see what the trade off would end up being like. I may do this one "for science" while keeping my hopes safely down haha. Maybe there's something more like a linear rail I could use (if not just an actual one). Time to do some research!

With the linear bearings being shot, and the stock weight of the gantry+dual extruders, I was getting awful quality prints. Even at stupid slow speeds with jerk and accel settings quite low.

Regards,
ESOCHI


The ghosting is caused by printing too fast and exceeding the physical limits of the machine. The best upgrade would be to switch to 10mm rods and bearings where 8mm are being used.

Printing since 2009 and still love it!
Anycubic 4MAX best $225 ever invested.
Voxelabs Proxima SLA. 6 inch 2k Mono LCD.
Anycubic Predator, massive Delta machine. 450 x 370 print envelope.

11

Re: Solidoodle Workbench Overhaul x2

ESOCHI wrote:

I did not! Well, I assumed there was flex but I didn't expect it to cause worse issues than the ghosting I get from the weight on my gantry. I'm quite curious to see what the trade off would end up being like. I may do this one "for science" while keeping my hopes safely down haha. Maybe there's something more like a linear rail I could use (if not just an actual one). Time to do some research!

With the linear bearings being shot, and the stock weight of the gantry+dual extruders, I was getting awful quality prints. Even at stupid slow speeds with jerk and accel settings quite low.

Regards,
ESOCHI

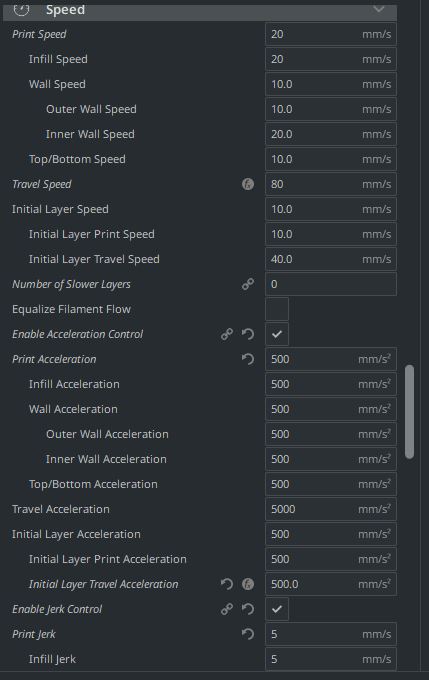
what do you consider stupid slow speeds?

SD4 #1 & #2 - Lawsy carriages, E3D v6, Rumba controller board, mirror bed plate, X motor fan, upgraded PSU & Mica bed heater
SD4 #3 - in the works ~ Folgertech FT-5, rev 1
Printit Industries Beta Tester - Horizon H1

12 (edited by ESOCHI 2019-10-03 11:37:07)

Re: Solidoodle Workbench Overhaul x2

http://soliforum.com/i/?Fzuyhh4.jpg

20mm/s base
500mm/s2 accel
5mm/s jerk

^that's as low as I've tested and the ghosting is seemingly only a bit better than 30-50.

For now, I'm going to rock just one titan aqua once I figure out my linear bearing / carriage issues. I work for a bearing company (Spyraflo, if any of y'all are interested) so I'm sure we can figure something interesting out.

Regards,
ESOCHI

13 (edited by carl_m1968 2019-10-03 11:43:20)

Re: Solidoodle Workbench Overhaul x2

The new hotend/extruder is not going to solve your ghosting. If that is a concern then you should address it first. Again the only way you are going to be able to fix it is by making the machine as a whole more rigid. Use 10mm rods in place of all 8mm rods. The distance between rod ends on that machine is really too much for 8mm rods. But then again you have people like Heartless who is our seasoned SD veteran and she loves her machines. So it is possible to get these machines to work and work well enough to run a business with.

Also for the record the correct term for the issue you are referring to is Ringing, not ghosting. It's caused by the movement structure in the machine resonating at the frequency of the last print head movement after it came off of a corner or edge. Think of it like a chain swinging after it is bumped. It does this because it is moving too fast or the the weight is too much for the rods to support or both. It could also be caused by something that is loose that is allowing this ringing.

Printing since 2009 and still love it!
Anycubic 4MAX best $225 ever invested.
Voxelabs Proxima SLA. 6 inch 2k Mono LCD.
Anycubic Predator, massive Delta machine. 450 x 370 print envelope.

14 (edited by ESOCHI 2019-10-03 12:40:38)

Re: Solidoodle Workbench Overhaul x2

I'm definitely taking your words into account with my research, Carl. I also plan to add some walls for heat retention and structural rigidity. I'll be bolting them to the frame with triangulation in mind. That's going to be kind of a last step thing but it should go hand in hand with bolstering the gantry.


Side Note:
It's interesting how they did the bearings for the X and Y axis on this machine. Forwards and backwards slides on PTFE Bronze plain bearings and left to right has roller element linear bearings (we actually supplied all BUT the linear bearings to Solidoodle, which is how we have this printer in the first place! It was given to us in leu of payment since we all know what happened to them sad That being said, we don't entirely agree with the exact ones they used for various aspects, and really wish we had more communication with them while they were deciding stuff)

I'd really love to see what knowack's prints are looking like. I know he has a similar setup to what I'm aiming for.

I'll get a picture of my current ghosting later today so we can all have a laugh haha

Regards,
ESOCHI

15

Re: Solidoodle Workbench Overhaul x2

carl_m1968 wrote:

The new hotend/extruder is not going to solve your ghosting. If that is a concern then you should address it first. Again the only way you are going to be able to fix it is by making the machine as a whole more rigid. Use 10mm rods in place of all 8mm rods. The distance between rod ends on that machine is really too much for 8mm rods. But then again you have people like Heartless who is our seasoned SD veteran and she loves her machines. So it is possible to get these machines to work and work well enough to run a business with.

Also for the record the correct term for the issue you are referring to is Ringing, not ghosting. It's caused by the movement structure in the machine resonating at the frequency of the last print head movement after it came off of a corner or edge. Think of it like a chain swinging after it is bumped. It does this because it is moving too fast or the the weight is too much for the rods to support or both. It could also be caused by something that is loose that is allowing this ringing.

Ah, but here is the rub.. mine are SD4s.. not workbench, so there is a big difference there in distances.
I would have to agree with upgrading to the 10mm rods for increased stiffness on the X & Y axis.
I do NOT recommend the carbon fiber rods at all (except for use in the thing below) - Hardened steel for X & Y

Also make sure the bed is as rigid as possible - side to side.. does the workbench use the same cantilever bed design as the older machines? if so, there is bound to be a bit of play/slop at the front - put a stop to it. I use this for stabilizing the bed front on my SD4s - you could, in theory, also use it with a longer rod...
https://www.thingiverse.com/thing:195266

Rigidity is the name of the game here. The more rigid you can make the structure, the better your results will be.

as for the print speeds, yes, those are a bit on the "stupid slow" side. I run my SD4s at 40mm/s print speeds for the most part - any more than that and the ringing does get a bit out of hand. you should, in theory, be able to run the same without major issue.

SD4 #1 & #2 - Lawsy carriages, E3D v6, Rumba controller board, mirror bed plate, X motor fan, upgraded PSU & Mica bed heater
SD4 #3 - in the works ~ Folgertech FT-5, rev 1
Printit Industries Beta Tester - Horizon H1

16

Re: Solidoodle Workbench Overhaul x2

If I recall the rods on the WB are already 10mm but of poor quality.  Heartless is spot on though, make everything as rigid as possible.  The cantilever design is a poor choice for a bed this size. SD messed up on the geometry, basically the linear bearings for the platform should have been spaced further apart.  The current design binds rather easily.

Printit Industries Model 8.10 fully enclosed CoreXY, Chamber heat
3-SD3's & a Workbench all fully enclosed, RH-Slic3r Win7pro, E3D V6, Volcano & Cyclops Hot End
SSR/500W AC Heated Glass Bed, Linear bearings on SS rods. Direct Drive Y-axis, BulldogXL
Thanks to all for your contributions

17

Re: Solidoodle Workbench Overhaul x2

Yes, the SD WB has 10mm rods all around except for Z axis, which is 12mm. I'm digging the bed stabilizer, Heartless. I may do that after this first round of upgrades.

I'm configuring the Duet 2 WiFi now, and slowly things are coming together. I'll post my config file after I'm done just so it's available if anyone else does this mod.

Current holdups I still need to figure out:

Heated bed has 4 identical red wires in its plug, but the Duet only has a 2 post connector for heated beds. I'm thinking I should just split off 2 and 2.

Z probe vs Z stop issues. Solidoodle wired the Z probe as if it were a stop switch, and the Duet has an option for both a Z stop and a Z probe, but the probe is wired differently (4 pin instead of 3 pin like the stops). I can re-wire the Solidoodle Z probe to match the Duet Z probe 4 pin connector, but it's worth mentioning that there's a difference there. I think I have to go this route to include the 7.45mm offset in the config files (or whatever it ends up being after the carriage re-design).

That's all for now!

Regards,
ESOCHI

18

Re: Solidoodle Workbench Overhaul x2

Almost done with the carriage solution. Still need to do the fan part but that can probably be sourced from thingiverse.

Youtube link. I'm using Blender 2.8 for this.

Aside from that, I have the board talking to the motors more or less correctly, and my extruder is spitting out 100mm on the dot. I can run at least the water cooling pump from the old 12v Solidoodle board. The 12v fan doesn't want to run off it though so I'll have to deal with that somehow. Maybe just go back to the 24 to 12v converter.

That's all for now!

Regards,
ESOCHI

19 (edited by ESOCHI 2019-11-07 20:25:51)

Re: Solidoodle Workbench Overhaul x2

Alright folks, we're coming to a close on this project!

Imgur Album

Currently I've made the following additions:
Removed the entire hot end/extruder/carriage and replaced it with an E3D Titan Aqua w/ Water Cooling Kit.
Added a 24v Duet 2 Wi-Fi board and 24v Mean Well power supply kit
Added a cable management system I designed/printed.

Other Modifications Made:
The Z stop/probe was relocated to the frame instead of leaving it on the carriage. As the bed rises it hits the button. In other words I don't have the auto bed level function anymore.
The original 12v board is still in use for the 12v fans and LED, the water cooling kit, and the heated bed. I control the bed via Cura right now, completely separate from the actual gcode running through the Duet. I'm open to suggestions on this aspect as Cura times out on its "pre-heat" function after like 10 minutes and I have to hit it again.
I added some start gcode to compensate for the Z axis backlash/elephants foot that is god awful on this machine. It kinda causes a slight head crash but there's more than enough flex for that to be fine for now.

G28 ;Home
G1 Z10.0 F6000 ;Move the platform down 10mm
;Prime the extruder
G92 E0
G1 F200 E3
G92 E0
G1 X30 Y30 Z0 ;moves onto print bed from home and drops Z to 0
G1 Z0.50 ;backlash compensation
G92 Z0 ;reset Z to "0"
M572 D0 S0.1 ;pressure advance value for reprap firmware

If anyone wants any of the files I have no issue uploading them somewhere.
Same goes for the Duet 2 Configuration files.

Imgur Album

20

Re: Solidoodle Workbench Overhaul x2

So what purpose does the preheat function serve on the old board? Just asking as there may be a work around through gcode.

Printing since 2009 and still love it!
Anycubic 4MAX best $225 ever invested.
Voxelabs Proxima SLA. 6 inch 2k Mono LCD.
Anycubic Predator, massive Delta machine. 450 x 370 print envelope.

21 (edited by ESOCHI 2019-11-07 21:27:54)

Re: Solidoodle Workbench Overhaul x2

So basically I'm controlling the old board via USB and Cura, using the "preheat" function in Cura in leu of trying to run an actual gcode file because it's one button to click and to be honest I haven't tested any other route.

I imagine I could make a gcode file that has no extruder heat or motor movements, just a code to heat the bed until I shut down the 12v supply. (I have the power supplies off when I'm not near the machine and they're on wifi plugs so if a print runs late I can shut things down remotely)

I bought a few 100k thermisters so that the old board still "thinks" everything is in order, plus I used one on the Duet so it "thinks" the bed is connected.

22

Re: Solidoodle Workbench Overhaul x2

ESOCHI wrote:

So basically I'm controlling the old board via USB and Cura, using the "preheat" function in Cura in leu of trying to run an actual gcode file because it's one button to click and to be honest I haven't tested any other route.

I imagine I could make a gcode file that has no extruder heat or motor movements, just a code to heat the bed until I shut down the 12v supply. (I have the power supplies off when I'm not near the machine and they're on wifi plugs so if a print runs late I can shut things down remotely)

I bought a few 100k thermisters so that the old board still "thinks" everything is in order, plus I used one on the Duet so it "thinks" the bed is connected.

If you used a Repetier Host it has a machine control panel where you can just turn the heaters on ans set them for a desired value and they will stay on till you turn them off. Unless you just have to use Cura.

Printing since 2009 and still love it!
Anycubic 4MAX best $225 ever invested.
Voxelabs Proxima SLA. 6 inch 2k Mono LCD.
Anycubic Predator, massive Delta machine. 450 x 370 print envelope.

23 (edited by ESOCHI 2019-11-11 18:47:50)

Re: Solidoodle Workbench Overhaul x2

I started with Repetier Host and I have no issues giving that a shot.  Prints are coming out quite nicely with a little glue stick on the glass bed!

My last hurdle is taming the backlash I'm getting. Curves are a bit skewed on one axis. The Y motor has trouble moving everything especially if I tighten any belts (yes, I've also loosened them and tested, which helped more than tightening) so I've bought a pack of timing pulleys that have 16 teeth instead of 26. This should not only add a good bit of torque (I'm already at max amperage) but should add some precision as well, although I may already be past that threshold and it wouldn't be noticeable. They arrive tomorrow!

Interesting side note, I'm almost positive that I have about a .05 to .1mm sag when the Y carriage is in the middle of the supports, and no sag once it gets close to the left or the right side. I thought my bed was off when I started this journey but a weight based sag makes much more sense.

https://i.imgur.com/FoH5LzT.jpg

Regards,
ESOCHI

24

Re: Solidoodle Workbench Overhaul x2

Why is the Benchy so small? It should be almost 60mm from stem to stern and 31mm at it's widest. Your microsteps or steps per mm for set microsteps is wrong. I bet if you measure that Benchy it will be half or a third of the correct size.

Printing since 2009 and still love it!
Anycubic 4MAX best $225 ever invested.
Voxelabs Proxima SLA. 6 inch 2k Mono LCD.
Anycubic Predator, massive Delta machine. 450 x 370 print envelope.

25 (edited by ESOCHI 2019-11-11 21:41:44)

Re: Solidoodle Workbench Overhaul x2

carl_m1968 wrote:

Why is the Benchy so small? It should be almost 60mm from stem to stern and 31mm at it's widest. Your microsteps or steps per mm for set microsteps is wrong. I bet if you measure that Benchy it will be half or a third of the correct size.

Solid guess on the size, I ran it at 50% with a .2 nozzle. I'm trying to max out precision.

As I was writing the last post I decided to mess with the belts some more, and MAN am I glad I did. I was trying to reduce tension on the Y axis drive belt, which I hadn't tried yet. I was able to fully control tension via the two lower bolts that hold it onto the frame. I can now slide the Y axis really well! EDIT: It's a good bit better. I started the print with all belts loose. As it printed I tightened them until I couldn't see any wiggle when they switched direction. They aren't tight but aren't floppy either. So far this has given me the best results.

RH kept my bed at 55c throughout the entire print, so thumbs up for suggesting that instead of Cura.

https://i.imgur.com/8NuhMos.png

Thanks, as always, for the replies! This has been a heck of a learning experience.

Regards,
ESOCHI