1

Topic: New Anycubic Photon User

I recently bought an Anycubic Photon off eBay.  I must say that I am perfectly happy with my two Solidoodles; they print great, and I make a lot of practical-use items with them.  However, I really wanted to be able to print small figures and miniatures in greater detail than FFM would allow.

After reading a lot of online information and watching YouTube, I bought a Photon.  I've had it about a week now, and I have not been disappointed.  Build quality seems very good.  The instructions allowed a quick and easy build plate leveling and calibration.  The slicing software came on an included USB stick, but I downloaded a newer version from their web site.

Print quality has been great right out of the box.  The workflow for resin printing is different from FFM, so you have to be willing to do some post-printing finishing.  There are a few supplies a user needs like alcohol and UV light.  Anycubic includes some consumables like gloves and filter-funnels, so you can get started right away.

The biggest challenge so far has been the odor generated by the resin.  You definitely need a well-ventilated area.  Until it gets warm enough to put this thing in the garage, I've been printing in a bathroom with the exhaust fan running...it's almost enough.

Since the printer already works so well, I'm in exploration mode with regards to UV curing, trying different brands of resin, etc.  I'll post as I make progress.

-Kevin

2

Re: New Anycubic Photon User

This test object is included on the USB stick that comes with the printer.  It does a good job demonstrating some of the capabilities of the Photon.  This was printed without supports.

https://www.dropbox.com/s/jcwqmnzmnu4y0px/Photon.jpg?dl=1

-Kevin

3 (edited by knowack 2019-03-06 03:20:30)

Re: New Anycubic Photon User

Since I have this awesome translucent green resin, I thought a dragon from Thingiverse would be a good test object.  The slicer that comes with the Photon is rather simple...no complications needed, really.  I was playing around to see if I could invoke the need for some supports to be generated.  Still no supports needed.  This print is 51mm tall. You can make out the scales, and even the claw where he's grasping the sphere.

https://www.dropbox.com/s/doeinxzouxqf16w/Dragon%20palantir.jpg?dl=1

-Kevin

4

Re: New Anycubic Photon User

I printed this rook from Thingiverse.  With the translucent resin, you can see the internal staircase.  This print is 19mm diameter base, and 28mm tall.

https://www.dropbox.com/s/zxax9r5vae9w45a/Rook.jpg?dl=1

-Kevin

5

Re: New Anycubic Photon User

Now I'm just burning up green resin, trying to find the edge of the envelope for this printer.  I printed an Eiffel Tower to see how much detail comes through.  This print is 20mm from the base to the bottom of the handrail in the middle.  This is the first photo where you can see the layers of the print (.05mm layers in this case).  You don't even notice the layers with the naked eye.  The manual recommends layer heights of .01mm to .2mm.  .01mm layers would take a lot longer to print.

https://www.dropbox.com/s/r7wypupeblizsnp/Eiffel%20base.jpg?dl=1

-Kevin

6 (edited by n2ri 2019-03-07 06:13:30)

Re: New Anycubic Photon User

looks real nice!

I understand the Resin for these type printers has similar Hazards/toxic as Embalming fluid/formaldehyde which has been a big deal lately with construction materials in Homes as well. and when I was facility engineer for a large multi site  clinic one building was a funeral home and the embalming room cement floor still keeps breaking down and eating rubber tile flooring even years after digging down 10 feet removing contaminated soil from the chemical. so do be extreamly careful not to have similar issues.

Solidoodle 2 with Deluxe kit cover & glass bed with heater. and 2nd board SD2 used not 3rd and alum platform not installed yet still wood. also need cooling fan installed to board. use Repetier Host couple vers. Slic3r also have all free ware STL programs

7 (edited by scobo 2019-03-06 07:56:44)

Re: New Anycubic Photon User

Nice prints !
Regarding the slicer, it is pretty basic but there's a new one by the same developers called Chitubox which has much more advanced settings and features such as hollowing and drainage hole creation.
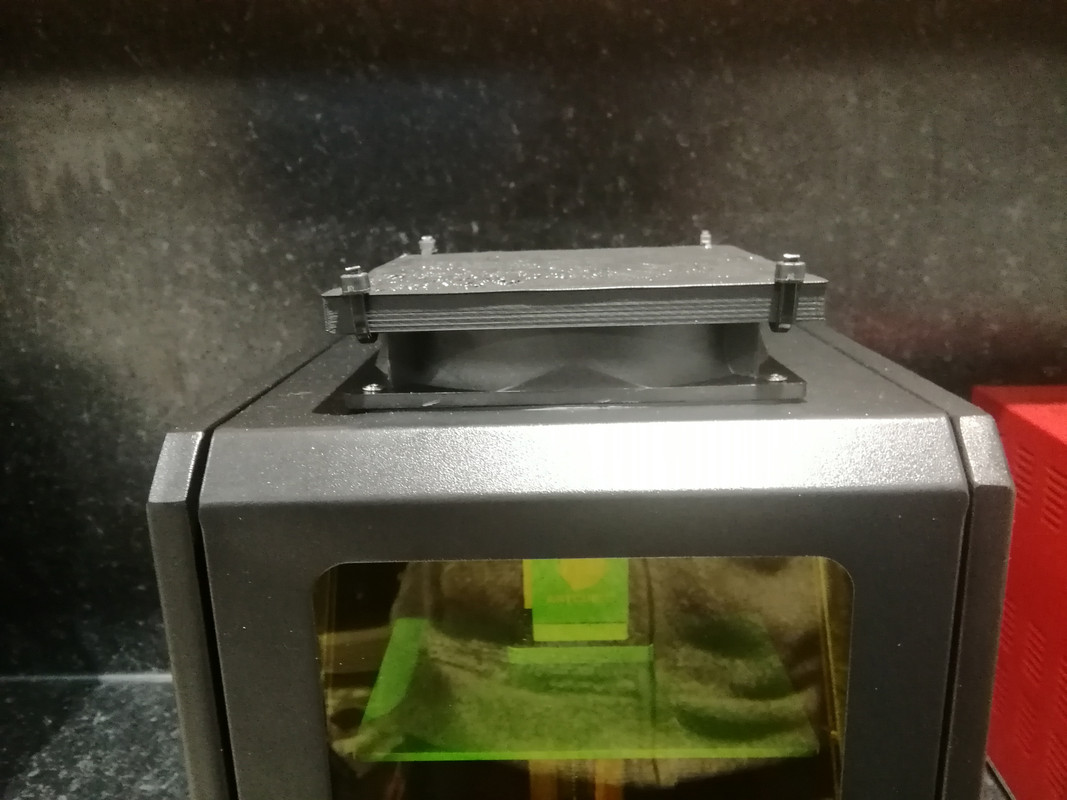
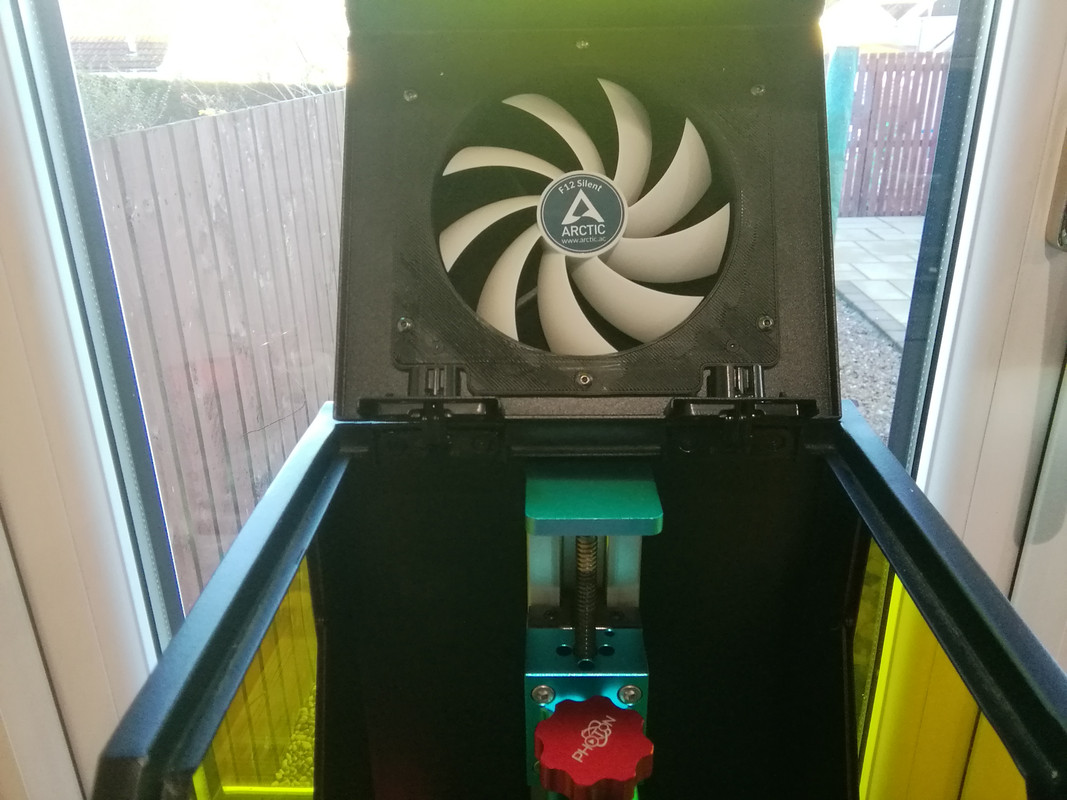
This is my solution to the smell, basically a 120mm fan which draws the fumes into a charcoal filter in an fdm printed case mounted above the lid .......

https://i.postimg.cc/DzH6NgHN/IMG-20181130-155208.jpg


https://i.postimg.cc/Dz1qLLjD/IMG-20181209-094829.jpg

Davinci 1.0 with repetier firmware & E3D V6 Lite
Anycubic Photon DLP printer, Einscan-S 3D scanner
Simplify3d, 123D Design, Meshmixer
http://www.thingiverse.com/scobo/designs

8

Re: New Anycubic Photon User

scobo wrote:

Nice prints !
Regarding the slicer, it is pretty basic but there's a new one by the same developers called Chitubox which has much more advanced settings and features such as hollowing and drainage hole creation.
This is my solution to the smell, basically a 120mm fan which draws the fumes into a charcoal filter in an fdm printed case mounted above the lid .......

I've downloaded ChiTuBox, but haven't looked at it yet.  It sounds like it has some advanced features.

How well did the fan arrangement reduce the resin fumes?  Are you able to use it in an enclosed room?

-Kevin

9

Re: New Anycubic Photon User

knowack wrote:
scobo wrote:

Nice prints !
Regarding the slicer, it is pretty basic but there's a new one by the same developers called Chitubox which has much more advanced settings and features such as hollowing and drainage hole creation.
This is my solution to the smell, basically a 120mm fan which draws the fumes into a charcoal filter in an fdm printed case mounted above the lid .......

I've downloaded ChiTuBox, but haven't looked at it yet.  It sounds like it has some advanced features.

How well did the fan arrangement reduce the resin fumes?  Are you able to use it in an enclosed room?

-Kevin

The smell has much to do with the brand of resin. I use wanhao resin since it is "formulated" for my D7. It has very little smell/fumes. I use it all the time in my enclosed 635 sqft apartment. I have never had any issues. You might try a different brand. In truth all resin formulated for UV led should work.

Printing since 2009 and still love it!
Anycubic 4MAX best $225 ever invested.
Voxelabs Proxima SLA. 6 inch 2k Mono LCD.
Anycubic Predator, massive Delta machine. 450 x 370 print envelope.

10

Re: New Anycubic Photon User

Thanks Carl; I had been wondering about the brands, since some people report their filament makes a smell, and the brand I use doesn't.

I've been using the Anycubic resin that came with the machine.  I have a different brand on order.  I'll try a few until I find one that is less malodorous, while still maintaining print quality.

I still have a lot to learn.

-Kevin

11

Re: New Anycubic Photon User

I've been using Elegoo resin. It's good value and has far less smell than Anycubic resin.
With the fan/filter mod I posted above, I can barely smell anything at all.

Davinci 1.0 with repetier firmware & E3D V6 Lite
Anycubic Photon DLP printer, Einscan-S 3D scanner
Simplify3d, 123D Design, Meshmixer
http://www.thingiverse.com/scobo/designs

12

Re: New Anycubic Photon User

scobo wrote:

I've been using Elegoo resin. It's good value and has far less smell than Anycubic resin.
With the fan/filter mod I posted above, I can barely smell anything at all.

That's exactly what I had ordered from Amazon.  You're right: the smell is much less.

-Kevin

13

Re: New Anycubic Photon User

I printed out an object that needed specific dimensions, and it didn't fit.  The Z height is pretty good at 99.2% compared to the file, but X Y are at 105.08%.  At first I thought I had a modeling error, but the file checked out.  I printed two test cubes one each sliced with Photon slicer and Chitubox...I got the same results.

Setting the machine size from the included defaults to the values in the manual didn't make any difference.  I can't find anything relevant on the internet.  If someone is just printing figs, etc., one probably wouldn't notice nor care.

Obviously, the work-around is to slice objects at 101% Z, and 95% XY.  I'm not sure why this is happening.  I understand that pixels on LCD screens aren't truly square, but if this is the cause, you would think the proper compensation would be handled in firmware.

Has anyone else encountered this?  I freely admit that I might be doing something wrong, but I can't see what.

For now, it's an easy work-around and still an amazing machine.

-Kevin

14

Re: New Anycubic Photon User

The z accuracy is sticking point in both this printer and the Wanhao D7. It has a lot to do with the Chinese screw. But it is adjustable as well in your settings depending on just how much access the manufacturer has allowed.

Another issue depends on your build surface. A cube built directly on the build plate will be much more accurate than one built on supports.

Printing since 2009 and still love it!
Anycubic 4MAX best $225 ever invested.
Voxelabs Proxima SLA. 6 inch 2k Mono LCD.
Anycubic Predator, massive Delta machine. 450 x 370 print envelope.

15

Re: New Anycubic Photon User

carl_m1968 wrote:

Another issue depends on your build surface. A cube built directly on the build plate will be much more accurate than one built on supports.

I hadn't thought of that.  I printed a 25mm cube at 101/95/95%, and it came out at 101/95/95%...I must be doing something wrong.  Time to step back and regroup.

-Kevin

16 (edited by pirvan 2019-03-16 15:31:11)

Re: New Anycubic Photon User

Although I don't have a Photon, I've been using my Form 1+ now for 3 years or so.  I'm now using ApplyLabWork resin exclusively.  I works really well in my printer and it's very reasonably priced.  They now have DLP resins as well, so you might want to give them a try.

Anyway, regarding size inacuracies, there could be 2 problems. 

1.  Resin absorbs alcohol, so if you leave a model in alcohol for a while during the cleanup phase, it will swell, and it will shrink back for a few days.  You should take your model an curit completely before measuring, then you will get a more accurate value.

2. Basically the image  being projected is not accurate, or there is some bleeding of light past the edges of the image.

You should print a test model that has cutout, for example something like a frame.  Measure the outside and the inside opening.  If your model is larger on the outside dimensions but smaller on the inside dimensions, then your issue is with either the optics or the resin being used.  It's the equivalent of over-extrusion on FDM, but it's not easily pinpointed on a resin printer, especially a DLP, or in the case of the Photon a Masked LCD printer. 

I've used photopaper (I mean developers photopaper, not inkjet photopaper) to calibrate my printer, and you can do the same.  Here is a 2d design you can use for testing.  I created a 3D extrusion out of it so you can print it.

http://soliforum.com/i/?7p6BNLk.jpg

http://www.soliforum.com/misc.php?actio … item=11124

The outside of the square is 60mm, the inside is 50mm.  The outside of the circle is 40mm, and the thickness is 1mm.  The crosshairs are .5mm.

Important:  Since you will be using photopaper which is light sensitive, take some precautions, like either very subdued, indirect light or even better, a red dark room bulb (I have Philips Hue in my room, and all I need to do is dial the color to a nice red).

Anyway, take some photopaper, put it pace down on the tray, put something on it like a book, to make sure it's flat against the bottom.  Remove the build platform, and tell the printer to print this model for about 10-20 layers.  This will expose the phototpaper.  Stop the printer, pull the paper out, and start measuring.  You should get some very defined lines/edges.  Since you already know what the measurements are supposed to be, you'll be able to tell how close the printer gets to them.

If you're working in a true dark room environment, you could even develop the image, if not, you should work fairly fast because the ambient light will start to darken the photopaper pretty quickly.

FWIW, I bought a pack of Kodak Polycontrast III RC B&W photopaper on eBay for like $12.00 for 50 sheets, and you'll probably end up using maybe 3-4 sheets depending on how quickly you can calibrate your printer, so don't feel the need to splurge on a large box, you probably won't need it.

Good luck.

Post's attachments

test print.STL 60.24 kb, 2 downloads since 2019-03-16 

You don't have the permssions to download the attachments of this post.
To print or, 3D print, that is the question...
SD3 printer w/too many mods,  Printrbot Simple Maker Ed.,  FormLabs Form 1+
AnyCubic Photon, Shining 3D EinScan-S & Atlas 3D scanners...
...and too much time on my hands.

17

Re: New Anycubic Photon User

On a photon or D7 there are no optics. So the issue will be bleed, over/under exposure, over/under curing, too long in the wash, or mechanics calibration in the z axis. The pulses and steps per mm on the motor do affect dimensions.

Printing since 2009 and still love it!
Anycubic 4MAX best $225 ever invested.
Voxelabs Proxima SLA. 6 inch 2k Mono LCD.
Anycubic Predator, massive Delta machine. 450 x 370 print envelope.

18 (edited by pirvan 2019-03-16 18:17:29)

Re: New Anycubic Photon User

I understand that there are no "optics" per se other than the optical clarity of the vat itself (FEP or PDMS or whatever it's using, and maybe any glass that's on top of the LCD panel itself (if any).

But, as I mentioned in item #2 above,  the test will show you whether or not there is light bleed around the edges, that can contribute to dimensional accuracy.  I'm sure that over exposure will probably affect that too.

Edit:
For those not familiar with how the 2 technologies work, on the Form 1+ or any other Laser based SLA printer, the optics, or optical path, consists of the laser bouncing light through a bunch of mirrors, and up through bottom of the vat onto the resin.  So the dimensional accuracy is usually determined by the path taken by the laser as it draws the image.  That's governed by stepper/galvo controller, which is responsible for deflecting the laser beam.

On the LCD type the image is projected as a negative mask, where the light passes through the LCD panel and exposes the entire layer image in one shot.  Assuming the slicer software is properly calibrated, the exposed layer should be perfect, dimensionally.  The question is how accurate is the resulting image that the slicer produced, and how good is the LCD panel at producing a nearly perfectly opaque mask.  If the edges are not truly opaque, then light bleed will occur and affect the resin exposure, hence dimensional accuracy.

To print or, 3D print, that is the question...
SD3 printer w/too many mods,  Printrbot Simple Maker Ed.,  FormLabs Form 1+
AnyCubic Photon, Shining 3D EinScan-S & Atlas 3D scanners...
...and too much time on my hands.

19

Re: New Anycubic Photon User

pirvan wrote:

I understand that there are no "optics" per se other than the optical clarity of the vat itself (FEP or PDMS or whatever it's using, and maybe any glass that's on top of the LCD panel itself (if any).

But, as I mentioned in item #2 above,  the test will show you whether or not there is light bleed around the edges, that can contribute to dimensional accuracy.  I'm sure that over exposure will probably affect that too.

Edit:
For those not familiar with how the 2 technologies work, on the Form 1+ or any other Laser based SLA printer, the optics, or optical path, consists of the laser bouncing light through a bunch of mirrors, and up through bottom of the vat onto the resin.  So the dimensional accuracy is usually determined by the path taken by the laser as it draws the image.  That's governed by stepper/galvo controller, which is responsible for deflecting the laser beam.

On the LCD type the image is projected as a negative mask, where the light passes through the LCD panel and exposes the entire layer image in one shot.  Assuming the slicer software is properly calibrated, the exposed layer should be perfect, dimensionally.  The question is how accurate is the resulting image that the slicer produced, and how good is the LCD panel at producing a nearly perfectly opaque mask.  If the edges are not truly opaque, then light bleed will occur and affect the resin exposure, hence dimensional accuracy.


The light bleed is also caused by the quality of the resin and the  amount of photo inhibitor in it which is usually not stated. The inhibitor is what limits the depth that the light can penetrated in the vertical and somewhat in the horizontal. It's not so much the mask that is the issue. It is either off or on.

There is no in between due to the nature that it is driven in this application. In a normal display a PWM signal is applied to the pixel to turn it of and on rapidly to control it's brightness. In this application the drive signal is on or off so the pixel is on or off. The bleed is caused because the resin layer acts like a very thin light pipe and directs some of the light onto a horizontal plane between the previous layer and the mask on the current layer.

So the inhibitor is added to control that light pipe effect. You want resin with the highest amount of inhibitor you can find as it will control bleed more but might also increase exposure time. Ideally you want your exposure time to cure the object just enough that it can be removed and handled without damage. The printer is not meant to cure the item to a near finished amount.

When you remove your print it should still be little flexible. Once it is cleaned it is then finished in a UV oven aka light box. It you are curing (exposure time) to the point the object is rigid then that contributes to the light bleed as you are exceeding the limitations of the inhibitor.

But again your build method will have a major impact as well. Try printing a cube on supports and on the build platform directly. I can assure the one build on supports will have an uneven surface on the support side. I even tried arranging the cube so it would print like a diamond with supports and that turned out even worse.

I have come to the conclusion that these DUV machines are just not designed for dimensional accuracy at this time. If you need such accuracy then I would suggest the Forms from Formlabs. There is also the issue with resin durability and I have not seen a durable formula for the DUV process yet. The Formlabs formula does not work in DUV machines due to the fact they use a laser and not a UV array.

So far all the resin for the DUV process forms an acrylic which is very brittle and get even more brittle over time as it is exposed to light. It also yellows over time due to further curing by light exposure. The material never truly cures completly and just continues to cure and get more brittle over time. Again I am talking about resin for the DUV process and not the Laser (SLA) process.

Printing since 2009 and still love it!
Anycubic 4MAX best $225 ever invested.
Voxelabs Proxima SLA. 6 inch 2k Mono LCD.
Anycubic Predator, massive Delta machine. 450 x 370 print envelope.

20 (edited by carl_m1968 2019-03-16 19:34:07)

Re: New Anycubic Photon User

knowack wrote:
carl_m1968 wrote:

Another issue depends on your build surface. A cube built directly on the build plate will be much more accurate than one built on supports.

I hadn't thought of that.  I printed a 25mm cube at 101/95/95%, and it came out at 101/95/95%...I must be doing something wrong.  Time to step back and regroup.

-Kevin


I use NanoDLP to control my D7. This screenshot is of the settings that control my Z accuracy.

http://soliforum.com/i/?7i7ZV9L.jpg

Printing since 2009 and still love it!
Anycubic 4MAX best $225 ever invested.
Voxelabs Proxima SLA. 6 inch 2k Mono LCD.
Anycubic Predator, massive Delta machine. 450 x 370 print envelope.

21

Re: New Anycubic Photon User

Is the image displayed pure Black & white, or is the image anti-aliased on angled lines and curves?

To print or, 3D print, that is the question...
SD3 printer w/too many mods,  Printrbot Simple Maker Ed.,  FormLabs Form 1+
AnyCubic Photon, Shining 3D EinScan-S & Atlas 3D scanners...
...and too much time on my hands.

22 (edited by carl_m1968 2019-03-16 19:55:35)

Re: New Anycubic Photon User

pirvan wrote:

Is the image displayed pure Black & white, or is the image anti-aliased on angled lines and curves?


On NanoDLP it is black and white. You can turn AA on and off but all that does is rounds out the sharp corners on the square pixels and causes a loss of horizontal resolution.  Most users do not have it turned on as it does cause a sharp loss in resolution. The issue here with the OP is not horizontal however.

It is the accuracy of his Z axis and that is controlled the same way it is controlled on an FDM machine but you are dealing with pulses versus steps since the movement is much smaller. So his issue is most likely mechanical as it has been for hundreds of others using this DUV technology.

Printing since 2009 and still love it!
Anycubic 4MAX best $225 ever invested.
Voxelabs Proxima SLA. 6 inch 2k Mono LCD.
Anycubic Predator, massive Delta machine. 450 x 370 print envelope.

23 (edited by pirvan 2019-03-16 20:07:50)

Re: New Anycubic Photon User

carl_m1968 wrote:

The issue here with the OP is not horizontal however.

It is the accuracy of his Z axis and that is controlled the same way it is controlled on an FDM machine but you are dealing with pulses versus steps since the movement is much smaller. So his issue is most likely mechanical as it has been for hundreds of others using this DUV technology.

Actually, it's both:

" printed out an object that needed specific dimensions, and it didn't fit.  The Z height is pretty good at 99.2% compared to the file, but X Y are at 105.08%"

So it's not only the mechanical ("Z") inaccuracy, which is <1%, it's the "X" & "Y" which is >5%.

To print or, 3D print, that is the question...
SD3 printer w/too many mods,  Printrbot Simple Maker Ed.,  FormLabs Form 1+
AnyCubic Photon, Shining 3D EinScan-S & Atlas 3D scanners...
...and too much time on my hands.

24

Re: New Anycubic Photon User

Why do people have to use percent and inches in this hobby? The machines deal with hard cold numbers and mm. Stop converting and post the printed size versus model size. It makes things much easier. If your model is 20mm then your print is 20.6mm then say that.

Part of the problem I use NanoDLP which gives you far more access to the machines display and axis settings. I can even change the color of my mask if needed to possibly control some bleed. But if the option is available for the OP I would advise turning AA off if it is not.

I would also lower the cure time to the lowest possible.

Let your oven do all the curing. The printer is just supposed to get the resin firm enough to remove and handle. In the oven there is no resin the at can be added so there is no issue with bleed. In your printer the longer you cure the more surrounding resin there is exposed to light and added to your print. You also want to make sure the resolution on your screen is set correctly for the proper pitch and size of the finished model.

On NanoDLP I can remove the resin vat and turn on the mask and light. This allows me to actually see and measure that layers width to confirm dimensions that way. If they then vary I know it is cure time and bleed.

And for the record unlike the Lasers, the light from the UV array is the same wavelength as blacklight so it is not that harmful to the eyes. Just don't stare directly into it as it is bright.  Just use calipers and measure from and measure from the side while being careful not to scratch the LCD. You can also put a piece of paper over the LCD and this will even simulate light bleed so you can see just how much could happen.

Printing since 2009 and still love it!
Anycubic 4MAX best $225 ever invested.
Voxelabs Proxima SLA. 6 inch 2k Mono LCD.
Anycubic Predator, massive Delta machine. 450 x 370 print envelope.

25

Re: New Anycubic Photon User

carl_m1968 wrote:

Why do people have to use percent and inches in this hobby? The machines deal with hard cold numbers and mm. Stop converting and post the printed size versus model size. It makes things much easier. If your model is 20mm then your print is 20.6mm then say that.

There's nothing wrong with using percentage, because ultimately, percentages are not scale specific.

If, as you say, you print something that's supposed to be 20mm, and it comes out 20.6mm it doesn't sound that bad, but if you scale that by 5, then your 100mm object is 103mm which is bad.

carl_m1968 wrote:

I would also lower the cure time to the lowest possible.

Let your oven do all the curing.

You do realize that the curing oven can only cure the model as deep as the resin inhibitors will allow, right?  For most resins that's about 1mm.  So the inside of your model will remain only partially cured, leading to an unstable model that can leak, or even crack over time.

carl_m1968 wrote:

The printer is just supposed to get the resin firm enough to remove and handle. In the oven there is no resin the at can be added so there is no issue with bleed. In your printer the longer you cure the more surrounding resin there is exposed to light and added to your print. You also want to make sure the resolution on your screen is set correctly for the proper pitch and size of the finished model.

As I said above, the oven will only cure the outside surface, down to about 1mm depth.  The res of the solid will not be cured, and even over a long period of time will still remain only partially cured, it doesn't cure on it's own, only light can do that.

carl_m1968 wrote:

On NanoDLP I can remove the resin vat and turn on the mask and light. This allows me to actually see and measure that layers width to confirm dimensions that way. If they then vary I know it is cure time and bleed.

2 comments about that:
1.  easy way to add smudges at best and/or scracth the LCD at worst.
2.  Measuring directly on the LCD does not take in consideration any light aberrations that can occur due to the glass substrates, FEP and or/PDMS in the the vat.

carl_m1968 wrote:

And for the record unlike the Lasers, the light from the UV array is the same wavelength as blacklight so it is not that harmful to the eyes.

That is NOT good advise.  UV-A light of any kind and from any source can permanently damage the retina.  Black light bulbs have a black coating on them or an internal filter that removes most of the harmful direct light, leaving a blue glow behind.  UV light, the kind that cures resin, will also damage your retina, regardless of how bright or "strong" it is  Sure a UV laser can do it in a couple of seconds, but UV light from the DLP printer or even from a UV curing oven, can do it if you're exposed long enough to it.

So don't look at it directly if you don't have to, or better yet, buy a pair of UV glasses.

To print or, 3D print, that is the question...
SD3 printer w/too many mods,  Printrbot Simple Maker Ed.,  FormLabs Form 1+
AnyCubic Photon, Shining 3D EinScan-S & Atlas 3D scanners...
...and too much time on my hands.