51

Re: Solidoodle Workbench Overhaul

I've gathered a little more information.  It's not a z-movement issue.

By observing the Print Status area of the browser interface, I can see that the Duet believes it's still on the first layer.  Z-axis is not moving at all, and the Current Layer Time continues to accrue, even though it should be on the third layer.

After playing in the g-code console, I've determined it has something to do with relative versus absolute positioning.  If the Z axis is against the end stop microswitch, it won't respond to position commands in absolute mode. If I send it the G91 command, then it will respond correctly.

52

Re: Solidoodle Workbench Overhaul

knowack wrote:

I've gathered a little more information.  It's not a z-movement issue.

By observing the Print Status area of the browser interface, I can see that the Duet believes it's still on the first layer.  Z-axis is not moving at all, and the Current Layer Time continues to accrue, even though it should be on the third layer.

After playing in the g-code console, I've determined it has something to do with relative versus absolute positioning.  If the Z axis is against the end stop microswitch, it won't respond to position commands in absolute mode. If I send it the G91 command, then it will respond correctly.

I found the problem: a typo in the config.g file where I defined the bed size parameters.  I had essentially placed the print head 'out-of-bounds' when it was z-homed, so it wouldn't respond to absolute position commands.  Fixed!  Now I am printing a calibration cube. 

After I get it calibrated, I'll start playing with slicing for multiple extruders.  It's very gratifying to get this thing breathing fire!  The SD Workbench hardware and DuetWiFi electronics, along with the E3D Titan extruders and v6 hot ends are turning out to be quite a nice combination.

-Kevin

53

Re: Solidoodle Workbench Overhaul

knowack wrote:
knowack wrote:

I've gathered a little more information.  It's not a z-movement issue.

By observing the Print Status area of the browser interface, I can see that the Duet believes it's still on the first layer.  Z-axis is not moving at all, and the Current Layer Time continues to accrue, even though it should be on the third layer.

After playing in the g-code console, I've determined it has something to do with relative versus absolute positioning.  If the Z axis is against the end stop microswitch, it won't respond to position commands in absolute mode. If I send it the G91 command, then it will respond correctly.

I found the problem: a typo in the config.g file where I defined the bed size parameters.  I had essentially placed the print head 'out-of-bounds' when it was z-homed, so it wouldn't respond to absolute position commands.  Fixed!  Now I am printing a calibration cube. 

After I get it calibrated, I'll start playing with slicing for multiple extruders.  It's very gratifying to get this thing breathing fire!  The SD Workbench hardware and DuetWiFi electronics, along with the E3D Titan extruders and v6 hot ends are turning out to be quite a nice combination.

-Kevin

Congrats on getting it going!

SD4 #1 & #2 - Lawsy carriages, E3D v6, Rumba controller board, mirror bed plate, X motor fan, upgraded PSU & Mica bed heater
SD4 #3 - in the works ~ Folgertech FT-5, rev 1
Printit Industries Beta Tester - Horizon H1

54

Re: Solidoodle Workbench Overhaul

I've printed my first dual-extrusion piece...a 25mm calibration cube that's half blue/white ABS.  It came out pretty good, especially for my first try. 

Leveling the two nozzles was not a big deal.  I used a feeler gauge against the bed, and got as close as I could.  I figured I would have to make an adjustment or two once I had printed a few items.  I can't even detect the difference between the two materials' height with my fingernail, so there's no need to make further adjustments to the.

My biggest challenge was figuring out how to slice an object for dual extrusion.  I've settled on Ultimaker Cura 3.6.0 as a slicer.  It's not too steep to learn, but I wish the UI was more configurable.  When it comes to slicing options, you can select either 'dummy' mode with pre-configured selections, or 'full-Einstein' mode with every possible variable in full glory.  Some tasks like saving changes to printer settings or slicing profiles are not intuitive.

One thing I did was to define the zero of my print carriage as the mid-point between the nozzles.  To the slicer, #1 is +9mm and #2 is -9mm on the Y axis.  I don't know if that's right, or if #1 is supposed to be at zero, and #2 -18mm...whatever, it's working for me at the moment.

One thing I found is that the slicers I tried really hate it when you want to print a single-extruder item from #2.  They expect you to print singles from #1, and will fight you every step of the way.  I even went so far as to manually edit the gcode in Notepad++, but in the end, the juice wasn't worth the squeeze.

Another interesting thing I found is that Ultimaker Cura by default wants to do a 6.5mm retraction when switching active nozzles.  There's a clog waiting to happen!  It must be something particular to their hardware.

My main goal with the dual extrusion is to print exotic shapes utilizing water-soluable support material.  I'm going to play with dual ABS for a while to refine my settings and workflow.

-Kevin

55 (edited by knowack 2019-04-11 03:30:14)

Re: Solidoodle Workbench Overhaul

I started having some strange problems a while back:  the printer was over-extruding where the infill meets the perimeters...including the 'approach' and 'departure' paths to that overlap.  This was most noticeable on the solid bottom layers, but would also occur on the brim where the nozzle would tick inward to the next path.  Artifacts from over-extrusion can catch on the opposite nozzle.

Initially, I thought I was chasing a problem with a Cura setting, but I tried Slic3r, and the print results were the same.  That made me reasonably sure that it was the printer itself.

As it turned out, while making adjustments to the Duet config.g file, I inadvertently set the acceleration value for the extruders too low.  It was an odd thing to do, and the weird problem was making me question my sanity!

I like the Duet board, but the settings are almost TOO configurable!

2n2r5 calls his printer a SuperDoodle, and suggested the name of MegaDoodle for my Workbench, and made a logo graphic.  I made a splash screen for the PanelDue7i:
https://www.dropbox.com/s/1n2zunsjv416jzi/MegaDoodle%20Splash.jpg?dl=1

-Kevin

56

Re: Solidoodle Workbench Overhaul

I am so excited to find this.  I am hoping to be able to order my Duet 2 wifi and PanelDue 7i on Friday.  I am so looking forward to getting mine up and running.

@knowack if i have questions can I ask you on what I need to do with it?  I got this unit just before Solidoodle was closing their doors and I was having some issues with it and after they closed I could not get it working at all. So it has sat here for over 3 years just collecting dust.  I have made some upgrades to it before now.  I did spend some money on some Bowden Extruders.  I picked up the BondTech QR Extruder along with the E3D v6 1.75mm (12v) hotends.  But like I said I have not ran anything through them.  Now I am excited to see that you have done it and I need to get mine going.

Solidoodle Workbench (new Duet 2 Wifi & PANELDUE 7I)
                Bondtech QR Bowden Extruders and E3D V6 Hotends
ReprapGuru DIY RepRap I3 V2 (Not working Currently)
                No Upgrades

57

Re: Solidoodle Workbench Overhaul

Glad to hear that you're rebuilding a MegaDoodle too!  I'll try to answer any questions you may have. I need to update the thread a bit with more info and photos.

I'm getting good results from mine.  As you can read in the thread, some of my problems have been self-inflicted, or related to learning a new slicer. 

I need to clean up the wiring to the Duet, and maybe install a cable tray for the carriage, but I've been printing so much and it's working so well, that I don't want to take the wiring apart again!

-Kevin

58

Re: Solidoodle Workbench Overhaul

@knowack  Thank you so much for that.  I have read the whole thread and I am so glad to hear that you have been printing with it and have seen great products coming from it.  It gives me great hope to get mine up and running.  Thank you again.

Solidoodle Workbench (new Duet 2 Wifi & PANELDUE 7I)
                Bondtech QR Bowden Extruders and E3D V6 Hotends
ReprapGuru DIY RepRap I3 V2 (Not working Currently)
                No Upgrades

59

Re: Solidoodle Workbench Overhaul

I can post a Dropbox link to my PanelDue7i firmware file that has the MegaDoodle splash screen, if you'd like.

-Kevin

60

Re: Solidoodle Workbench Overhaul

knowack wrote:

I can post a Dropbox link to my PanelDue7i firmware file that has the MegaDoodle splash screen, if you'd like.

-Kevin

That would be amazing. I got my parts last night and started the install and figured out that my power supply needed a little work so I am going to fix it tonight and try to power it up.

Solidoodle Workbench (new Duet 2 Wifi & PANELDUE 7I)
                Bondtech QR Bowden Extruders and E3D V6 Hotends
ReprapGuru DIY RepRap I3 V2 (Not working Currently)
                No Upgrades

61 (edited by knowack 2019-05-01 04:02:35)

Re: Solidoodle Workbench Overhaul

When I overhauled mine, I went to 24v on everything.  I figured it would be easier to power that huge bed!

Here's a link to the PanelDue7i firmware with the MegaDoodle splash screen: https://www.dropbox.com/s/ab81p4psjmcrp … o.bin?dl=1

-Kevin

62

Re: Solidoodle Workbench Overhaul

Ok I tried opening it but my computer does not like the bin file. Any tips or programs that I should use to open it?

Thank you
Jeff

Solidoodle Workbench (new Duet 2 Wifi & PANELDUE 7I)
                Bondtech QR Bowden Extruders and E3D V6 Hotends
ReprapGuru DIY RepRap I3 V2 (Not working Currently)
                No Upgrades

63 (edited by carl_m1968 2019-05-02 00:47:58)

Re: Solidoodle Workbench Overhaul

badass_thumb wrote:

Ok I tried opening it but my computer does not like the bin file. Any tips or programs that I should use to open it?

Thank you
Jeff


You can't open the BIN file. It has to be flashed to controller using whatever utility suites the processor on the controller.

It appears that Bossac is probably the utility needed..

https://miscsolutions.wordpress.com/paneldue/

Printing since 2009 and still love it!
Anycubic 4MAX best $225 ever invested.
Voxelabs Proxima SLA. 6 inch 2k Mono LCD.
Anycubic Predator, massive Delta machine. 450 x 370 print envelope.

64

Re: Solidoodle Workbench Overhaul

carl_m1968 wrote:
badass_thumb wrote:

Ok I tried opening it but my computer does not like the bin file. Any tips or programs that I should use to open it?

Thank you
Jeff


You can't open the BIN file. It has to be flashed to controller using whatever utility suites the processor on the controller.

It appears that Bossac is probably the utility needed..

https://miscsolutions.wordpress.com/paneldue/

Exactly!  You need to go to the Duet Wiki for the procedure to load the firmware onto the PanelDue.  You need to learn it anyway; they will sometimes need to be flashed before initial operation, and if you accidentally do a hard reset, it will erase the firmware.  Regardless, it's not difficult and the instructions are pretty good.

-Kevin

65

Re: Solidoodle Workbench Overhaul

Thank you both for the information, Sorry I did not respond yesterday.  Been busy.  So I have been thinking about the startup current on my Workbench for the heat bed.  I do not want to burn up the Duet 2 Wifi.  It can handle 18 amps through the Heater bed connector but I was wondering what the stock heat bed on the Workbench pulls?  18 amp at 12 v is only 216 Watts now the Power supply is ratted at 320 watts.  Is it going to be ok?  Or should I convert to a 24v system?  Or should I get a SST Relay for the HeatBed?

Thank you
Jeff

Solidoodle Workbench (new Duet 2 Wifi & PANELDUE 7I)
                Bondtech QR Bowden Extruders and E3D V6 Hotends
ReprapGuru DIY RepRap I3 V2 (Not working Currently)
                No Upgrades

66

Re: Solidoodle Workbench Overhaul

Hello again, I am hoping I did not do this process backwards, I have all my hardware connected to my duet board before I have updated the firmware. Is that ok?

Solidoodle Workbench (new Duet 2 Wifi & PANELDUE 7I)
                Bondtech QR Bowden Extruders and E3D V6 Hotends
ReprapGuru DIY RepRap I3 V2 (Not working Currently)
                No Upgrades

67

Re: Solidoodle Workbench Overhaul

Yes

Printit Industries Model 8.10 fully enclosed CoreXY, Chamber heat
3-SD3's & a Workbench all fully enclosed, RH-Slic3r Win7pro, E3D V6, Volcano & Cyclops Hot End
SSR/500W AC Heated Glass Bed, Linear bearings on SS rods. Direct Drive Y-axis, BulldogXL
Thanks to all for your contributions

68 (edited by knowack 2019-05-06 21:40:42)

Re: Solidoodle Workbench Overhaul

badass_thumb wrote:

Thank you both for the information, Sorry I did not respond yesterday.  Been busy.  So I have been thinking about the startup current on my Workbench for the heat bed.  I do not want to burn up the Duet 2 Wifi.  It can handle 18 amps through the Heater bed connector but I was wondering what the stock heat bed on the Workbench pulls?  18 amp at 12 v is only 216 Watts now the Power supply is ratted at 320 watts.  Is it going to be ok?  Or should I convert to a 24v system?  Or should I get a SST Relay for the HeatBed?

Thank you
Jeff

If your stated numbers are accurate, then your power supply should be okay.  I didn't keep the original heat bed, so I'm no help with what its power draw is at 12v.  I went with a more powerful 24v bed to ensure I could achieve higher temperatures to print some of the more exotic materials.

I personally am not a fan of the SSR method.  There is much discussion online regarding relay life when using PID mode and rapidly 'fluttering' the relay.  If employing bang-bang mode, there are concerns with warping the build plate, temperature fluctuations, and adverse effects on the power supply.  I personally have never tried an SSR.

-Kevin

69

Re: Solidoodle Workbench Overhaul

I have had great long term performance with several SSR setups.  Proper PID tuning is important.

Printit Industries Model 8.10 fully enclosed CoreXY, Chamber heat
3-SD3's & a Workbench all fully enclosed, RH-Slic3r Win7pro, E3D V6, Volcano & Cyclops Hot End
SSR/500W AC Heated Glass Bed, Linear bearings on SS rods. Direct Drive Y-axis, BulldogXL
Thanks to all for your contributions

70

Re: Solidoodle Workbench Overhaul

knowack wrote:
badass_thumb wrote:

Thank you both for the information, Sorry I did not respond yesterday.  Been busy.  So I have been thinking about the startup current on my Workbench for the heat bed.  I do not want to burn up the Duet 2 Wifi.  It can handle 18 amps through the Heater bed connector but I was wondering what the stock heat bed on the Workbench pulls?  18 amp at 12 v is only 216 Watts now the Power supply is ratted at 320 watts.  Is it going to be ok?  Or should I convert to a 24v system?  Or should I get a SST Relay for the HeatBed?

Thank you
Jeff

If your state numbers are accurate, then your power supply should be okay.  I didn't keep the original heat bed, so I'm no help with what its power draw is at 12v.  I went with a more powerful 24v bed to ensure I could achieve higher temperatures to print some of the more exotic materials.

I personally am not a fan of the SSR method.  There is much discussion online regarding relay life when using PID mode and rapidly 'fluttering' the relay.  If employing bang-bang mode, there are concerns with warping the build plate, temperature fluctuations, and adverse effects on the power supply.  I personally have never tried an SSR.

-Kevin

An SSR or Solid State Relay is essentially an optically controlled transistor for DC or Triac for AC. There is no difference between it being turned off and on rapidly through Bang bang or PID control. It won't hurt the SSR any more than it will hurt the MOSFET/Transistor on the controller which is being used the exact same way but with a lower power rating.  With the SSR method you are simply using the controllers MOSFET to control the SSR instead of the bed.

Printing since 2009 and still love it!
Anycubic 4MAX best $225 ever invested.
Voxelabs Proxima SLA. 6 inch 2k Mono LCD.
Anycubic Predator, massive Delta machine. 450 x 370 print envelope.

71

Re: Solidoodle Workbench Overhaul

carl_m1968 wrote:
knowack wrote:
badass_thumb wrote:

Thank you both for the information, Sorry I did not respond yesterday.  Been busy.  So I have been thinking about the startup current on my Workbench for the heat bed.  I do not want to burn up the Duet 2 Wifi.  It can handle 18 amps through the Heater bed connector but I was wondering what the stock heat bed on the Workbench pulls?  18 amp at 12 v is only 216 Watts now the Power supply is ratted at 320 watts.  Is it going to be ok?  Or should I convert to a 24v system?  Or should I get a SST Relay for the HeatBed?

Thank you
Jeff

If your state numbers are accurate, then your power supply should be okay.  I didn't keep the original heat bed, so I'm no help with what its power draw is at 12v.  I went with a more powerful 24v bed to ensure I could achieve higher temperatures to print some of the more exotic materials.

I personally am not a fan of the SSR method.  There is much discussion online regarding relay life when using PID mode and rapidly 'fluttering' the relay.  If employing bang-bang mode, there are concerns with warping the build plate, temperature fluctuations, and adverse effects on the power supply.  I personally have never tried an SSR.

-Kevin

An SSR or Solid State Relay is essentially an optically controlled transistor for DC or Triac for AC. There is no difference between it being turned off and on rapidly through Bang bang or PID control. It won't hurt the SSR any more than it will hurt the MOSFET/Transistor on the controller which is being used the exact same way but with a lower power rating.  With the SSR method you are simply using the controllers MOSFET to control the SSR instead of the bed.

The concern about the SSRs twofold: many are not actually opto-isolated (as determined by viewing their schematics/datasheets) although people assume they all are, and the effect of the repeated abrupt switching of max current on the life of the primary junction.  If the junction design of the cheap chinese components is not correct, it affects current handling and service life.  I also see that there are SSR designs that use bipolar transistors rather than field-effect transistors...not much better than using a 2N3055!

Use whatever works, just don't buy the cheapest ones.

-Kevin

72 (edited by Tin Falcon 2019-05-05 19:35:08)

Re: Solidoodle Workbench Overhaul

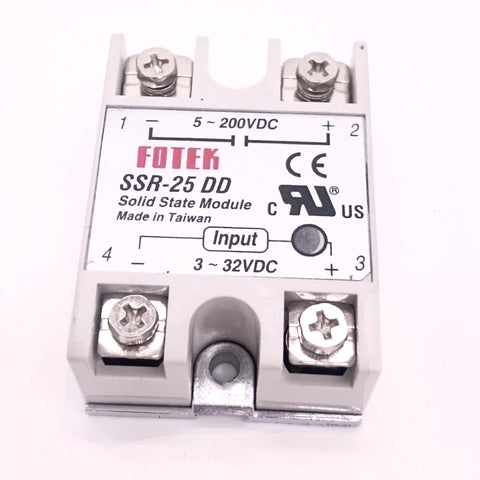
I purchased a couple of these when I built the  FT 5 kit  I hooked them up one at a time and they were hotter faster than the heat bed. . did not end up using them. And I do not remember the below warning.


A heatsink and cooling is needed if using on the upper range of the amperage.
To me they are wasting a fair amount of wattage if one must use a heat sink and cooling fan.

https://cdn.shopify.com/s/files/1/0586/8617/products/DSC_0372_large.JPG?v=1476740194

https://folgertech.com/products/solid-s … v-24v-110v

Soliddoodle 4 stock w glass bed------Folger Tech Prusa 2020 upgraded to and titan /aero extruder mirror bed
FT5 with titan/ E3D Aero------MP mini select w glass bed
MP Utimate maker pro-W bondtech extruder
Marlin/Repetier Host/ Slic3r and Cura

73

Re: Solidoodle Workbench Overhaul

That's why you use a re brand like Crydom and get one rated 30 percent higher then your maximum need. Anytime your are sourcing components that are going to carry or supply current they should be capable of carrying or generating 30 percent more than needed.

Printing since 2009 and still love it!
Anycubic 4MAX best $225 ever invested.
Voxelabs Proxima SLA. 6 inch 2k Mono LCD.
Anycubic Predator, massive Delta machine. 450 x 370 print envelope.

74

Re: Solidoodle Workbench Overhaul

Tin,

I didn't see a spec sheet on those at that link, but I'd bet that those are a) not optically isolated, and b) possibly bipolar transistor rather than field-effect.

It's a shame, because it's a nice looking package and form-factor.  They would still probably work OK for lower current applications, but I would probably stay below 15A.

-Kevin

75

Re: Solidoodle Workbench Overhaul

knowack wrote:

I've done the initial setup on the Duet WiFi.  You're compelled to use the online configurator (https://configurator.reprapfirmware.org if you want to take a look) to generate the initial configuration files.  The web interface is easily navigable once you get used to it, and is reasonably replicated on the Panel Due display.  I even have Repieter-Host talking to the Duet WiFi through the USB port!  This is great for me, because it gives me the option of continuing my present workflow process with R-H, or migrating to a purely browser-based method.

The configurator is easy to navigate and covers a multitude of parameters, but not everything is explained well.  Some sidebar text, hyperlinks, or better use of tooltips would be very helpful.  The Wiki discusses gcode commands and such, but is more suited for direct editing of the .g configuration files (which you can do through the web interface). For me, this resulted in several visits to the configurator as I homed in on the correct settings.  Once I got the configuration close to right, I simply resorted to editing the .g files.  More on that in a minute.

Some examples are:
Motors - do I need them to run forward or backward?  Endstops - at low end or high end?  Are we talking physically, or numerically in a Cartesian sense?  Fans - thermostatic control of fans to monitored heaters...the error checking didn't like what I was proposing, but I think I finally muddled through.  I won't know for certain until I order the hot ends, etc.

After uploading the generated files, I connected one axis at a time, and began testing; making configuration changes as I went.  For example, the X and Y axes run forward, while the Z axis runs backward.  I had to refine my bed dimension settings, and assert that I want home to be the right rear of the printer, not the left rear. 

The configurator gives you endstop options of active high/low (normally closed/open) z-probe, or motor stall current.  After I had tinkered with X and Y to satisfaction, I connected Z.  The Z axis went rogue on me, and bulldozed its way through the Z limit switch before I was able to issue the STOP command. After a little Wiki reading of people with similar problem, it turns out that no matter what Z endstop options you select in the configurator, it is going to configure you for a Z-probe.  I had to manually edit three different .g config files to remove Z-probe behavior.  I have a replacement switch (plus two spares) ordered from PrintItIndustries.
!

Hello again, I just now have time to dive back into this project of mine.  I have one configurator ready to go in a zip file.  I just guessed at some of it.  Do you happen to have your latest configuration file?  If so could you send it to me?  I would really appreciate it.  Thank you so much.

Solidoodle Workbench (new Duet 2 Wifi & PANELDUE 7I)
                Bondtech QR Bowden Extruders and E3D V6 Hotends
ReprapGuru DIY RepRap I3 V2 (Not working Currently)
                No Upgrades