n2ri wrote:...could I have paused the print, clear filament threads and manually adjusted Z back to model with control tabs and continued printing? or is that possible without killing print job and trashing print as I did?
Yes, you can do it. As long as you know at which layer the print failed. The idea is to edit the G-Code in real time, to remove all code up to the layer that failed, and have the printer start again, exactly where it left off.
Let's assume this happens as you look at it. Kill the print job, but re-enable the bed heater so the print doesn't come off. Next go the Preview tab in Repetier, and click the G-Code Editor tab below.
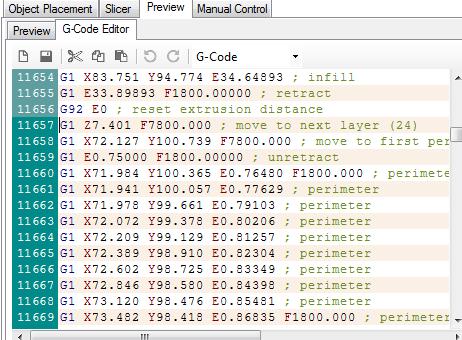
Look a few lines down until you find the line marked ;Layer: 0. This maybe 20-30 lines down, depending on your custom start g-code.
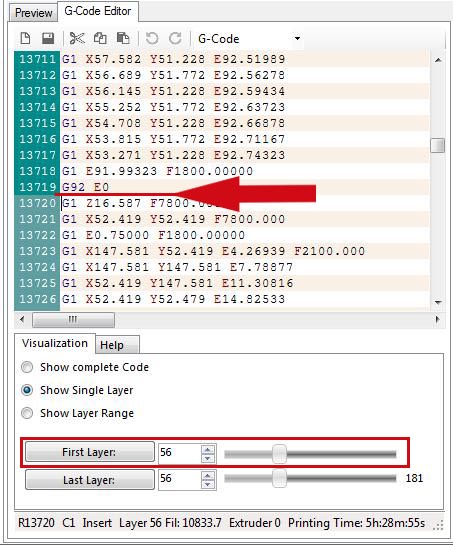
Next you need to find the beginning of the layer you want start at. Let's say your printer failed while printing layer #212. G-Code layers are number starting from 0, so the layer you're looking for is #211. Easiest way is to manually scroll down, and put your cursor on a g-code line. Look at the info line below the visualization tab. It will show you what layer you're on. Keep doing it until have found what you're looking for.

Next, put your cursor at the end of the line above it, then scroll back up to the beginning of ;Layer: 0, and click while holding the SHIFT key. That should select the entire chunk of code between Layer #0 and Layer # 211. Click delete.
If you were to simply click start job, your printer would now go through the custom start code, then raise the print head (or lower the platform) and start printing right on top of your existing print.
NOTE:
Depending on your Start G-Code, your printer may only move the head to the surface of the platform, then move it to the center before it raises it up, which would of course hit your existing print, so you have to manually edit that part out, or better yet, change the code to where it moves the platform far enough to clear the model before starting.
In my case I have a line that looks like this:
G1 Z[first_layer_height] F200 ;move platform close to nozzle
I would change the [first_layer_height] to 22, because it's above the actual printing height of Z21.35 (see first line of code after ;Layer: 211). So that line of code should read:
G1 Z22 F200 ;move platform close to nozzle
Anyway, your print head should now start slightly above your existing print, then move down to meet the top of the existing layer, and printing from there. This works great, and the only possible issue I've come across is layer separation at the splice line. This is due to the top layer of the print getting cold during this editing, but I simply add some acetone after the print is done to strengthen the area.
Post's attachmentsgcode edit.jpg
gcode edit.jpg 176.73 kb, file has never been downloaded.
You don't have the permssions to download the attachments of this post.
To print or, 3D print, that is the question...
SD3 printer w/too many mods, Printrbot Simple Maker Ed., FormLabs Form 1+
AnyCubic Photon, Shining 3D EinScan-S & Atlas 3D scanners...
...and too much time on my hands.