1 (edited by H_Alex 2015-04-07 01:46:23)

Topic: Overhang Curling

I have a problem where the edges of overhangs tend to curl up, which the extruder will then need to push down as it passes over, or, if the curling is severe enough, the extruder misses the edge entirely and tries to print on thin air (where the edge is supposed to be, but it's curled too far up and inward). This creates a very bad surface quality, as you can see on the closest face of the image below.

Has anyone experienced this problem? I've been told that a cooling fan can help, but the Press has no place for a cooling fan.

I'm using ABS, extruder at 230C, 0.2 mm resolution, outer perimeter speed of 38 mm/s, 30% grid infill, with the lid vented but not fully open, and the front door closed.

http://soliforum.com/i/?jlXhXOu.jpg

Here is the STL file of this object: http://www.thingiverse.com/thing:151251

Frustration is part of the process.

2

Re: Overhang Curling

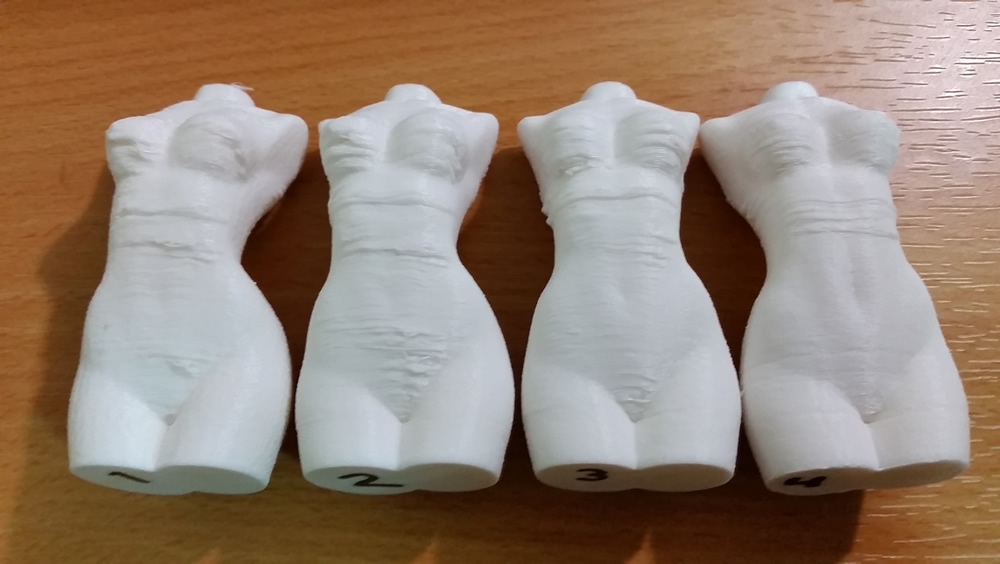
I've had this on some more exagerated overhangs. It was worst with the original SD filament and improved with drying the filament, although still was not great.

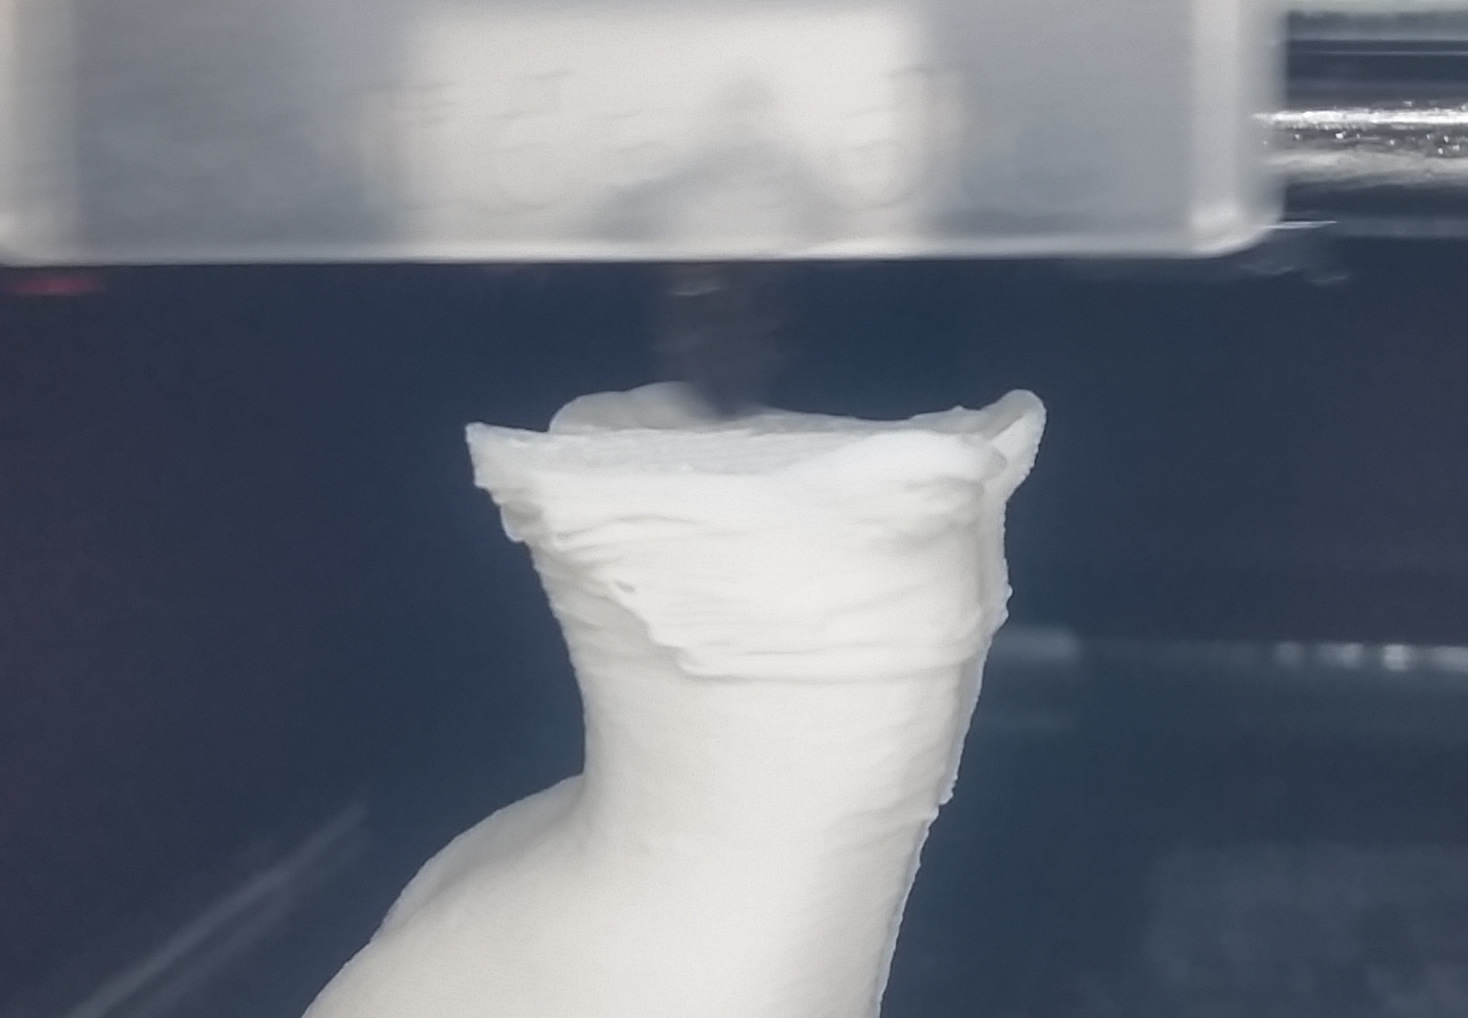
Depending on your slicer & settings, adding supports via the slicer can help keep the lip in place. I've had mixed luck getting slicers to produce supports usable for battling curling. Slic3r has an "enforce support for the first N layers", which helps at the very bottom of the print. Although looks it looks like the "bottom" of your print is more, er, anatomical. Speaking of which, surprising your print didn't bomb out on the overhang there first. (Haven't tried that model though.)

On another model, I manually added a more vertical web to the overhang to keep it down. That worked great in printing, but was tedious to remove.

Slic3r has an "avoid crossing perimeters" flag, and one of the slicers (forget which) has an option to lift when crossing perimeters. Those won't prevent curling, but might help avoid ramming the edge of the print.

I had no luck trying to position an external fan to cool the part - it mostly cooled things enough to pop the part off the bed. Haven't tried a nozzle yet to better direct the air. And I haven't gone the modder route on adding a fan to the extruder. yet.

I've also heard increasing your minimum layer time through the tough section can help, as it lets each layer stiffen more. One trick to do that without taking forever: slice twice, once at the normal layer rate, then once at the slower rate, and manually splicing the g-code files for the layers of interest. At east I've heard of doing such grafting for varying layer heights throughout a print. Sounds like a pain to me. Better, maybe, would be to write a post-process script that adds pauses between layers for the trouble region, or at leasrt splices the files for you. Sounds marginally less painful/error-prone. (Maybe S3D can automate this? I hear it can do near everything else.)

As you can tell, I have yet to master curling, but I've gotten past it on some prints.

3 (edited by Jadonm1 2015-04-05 23:54:07)

Re: Overhang Curling

I'm been having a similar problem but I'm figuring it out. Try printing much slower and give it time to cool down. Also print too of them at once, or a small pillar beside it. Good luck :-)

4

Re: Overhang Curling

I think I found the solution. I did slow down my printing speed a fair amount, but the most influential factor seems to be "infill overlap", which is how much the infill structures overlap with the walls, and this makes sense: the infill holds the walls in place, much like the support structures that trayracing suggested, which is where I got this idea. My data and results are shown below. The best result (#4 on the right) had a 50% infill overlap.

Yes yes, it's a Venus figurine with no clothes; it's just a good part to test with.

http://soliforum.com/i/?tF715Bb.png

http://soliforum.com/i/?XuFU89i.jpg

http://soliforum.com/i/?UHsKeq8.jpg

I think the only thing I can do from here is to simply print it larger so that each 0.2mm layer doesn't have to do so much overhanging. These four figures are only 72 mm (2.8 inches) tall.

Frustration is part of the process.

5

Re: Overhang Curling

You might want to look at calibrating your extruder too using the processes in the two links below. I was having a similar (but not quite as pronounced) issue at one point. In the end, I believe it was partially caused by overextrusion. The extruder was producing too much plastic, so it would bulge upward causing the extruder to drag through it on the next layer, causing it to be reheated and warp. My test print was also a small one so, like yours, it would fill in the interior rather than a visible lattice. so that overextrusion means that there is no gap between infill sections that the excess can squeeze into. Meaning the only place for it to go is upwards. If you had the same overextrusion on a bigger print with a honeycomb or grid infill with gaps between it, the overextruded plastic could at least squish sideways into the spaces, but on a small one you get that solid infill like you have there.

Hope that explanation makes sense. Your issue may be different, but that print looks a lot like my early "weeping angel" prints, and calibrating (using both steps below) fixed it for me.

http://www.instructables.com/id/How-to- … d-Printer/

http://wiki.solidoodle.com/flow-rate

6

Re: Overhang Curling

I believe it was partially caused by overextrusion. The extruder was producing too much plastic, so it would bulge upward causing the extruder to drag through it on the next layer, causing it to be reheated and warp.

Ooooh, that makes a lot of sense. I will try that. Thanks!

Frustration is part of the process.

7

Re: Overhang Curling

H_Alex wrote:

I think the only thing I can do from here is to simply print it larger so that each 0.2mm layer doesn't have to do so much overhanging. These four figures are only 72 mm (2.8 inches) tall.

Increasing the scale will not change the angle of the overhang. Which makes the per-layer overhang the same.  You can decrease the layer height to decrease the overhang per layer. It also slows the the material deposition, aiding cooling.

8

Re: Overhang Curling

H_Alex wrote:

I think the only thing I can do from here is to simply print it larger so that each 0.2mm layer doesn't have to do so much overhanging. These four figures are only 72 mm (2.8 inches) tall.

Increasing the scale will not change the angle of the overhang. Which makes the per-layer overhang the same.  You can decrease the layer height to decrease the overhang per layer. It also slows the the material deposition, aiding cooling.

9

Re: Overhang Curling

A cooling fan is the best solution.

SD2 with E3D, SD Press, Form 1+
Filastruder
NYLON (taulman): http://www.soliforum.com/topic/466/nylon/

10

Re: Overhang Curling

I got it! Alright, NOW you can call it pornographic. It turns out that inadequate cooling was, indeed, the primary culprit. I was able to give each layer enough time to cool by simultaneously printing a small tower next to this model, which wasted the printer's time. This is, of course, a very crude solution, and I'm sure that most slicers have a "minimum layer time" which you can increase for the same effect.

I also set my extrusion factor all the way down to 88%, which definitely helped. Funny enough, when I calibrated my extrusion factor by marking 100 mm and seeing how much it actually extruded, my factor only became 96% (it extruded 104 mm) even though 88% works best for me.

http://soliforum.com/i/?ssSForg.jpg

Frustration is part of the process.

11

Re: Overhang Curling

I hope you still have to reply now that you have a figurine to play with!

How did you calibrate and calculate your extrusion factors?

12

Re: Overhang Curling

To get my initial extrusion factor of 96%, I marked 100 mm on the filament feeding into my extruder, extruded filament until the first mark lined up with the extruder head, then I told the printer to extrude 100 mm. Ideally, the second mark (100 mm down the length of the filament) should then be lined up with the top of the extruder head, like the first mark. However, mine was 4 mm below the head, indicating over-extrusion. That is, the printer thought it pulled in 100 mm, but it actually pulled in 104 mm. So I adjusted my extrusion factor to 100/104 = .9615 or ~96%.

I also found that going as low as 88% still worked, so there might be a range of acceptable values, or the above method may not be perfect. However, down at 80%, I had problems with under-extrusion: the layers didn't stick to each other reliably.

Frustration is part of the process.

13 (edited by PocketBrain 2015-04-07 13:12:42)

Re: Overhang Curling

H_Alex wrote:

etcetcetc...   I also found that going as low as 88% still worked, so there might be a range of acceptable values, or the above method may not be perfect. However, down at 80%, I had problems with under-extrusion: the layers didn't stick to each other reliably.

Also check your filament diameter; make several measurements on the current filament and average them.  If your slicer is set at 1.7mm and you've got 1.8mm, it will overextrude.  It will also overextrude if its extrusion calculations are off for any reason, like the constants they used are general case for that stepper/wheel/nozzle system, and your parts are just on one side or the other of the +/-% tolerances.  I tend to get rippling on the extrusion if I don't push it down a bit.  I went all the way down to 85% with filament diameter set to 1.72mm. 

TL;DR, a little trial and error is required.

I bet I'm not really telling you anything you don't already know; you've got more time on this printer than I do, now.
:-)

14

Re: Overhang Curling

I tend to get rippling on the extrusion if I don't push it down a bit.

I've noticed that myself: some of my older prints with flat, angled surfaces are kind of wavy/wrinkly. I'll keep an eye out for that as I mess with my settings.

Frustration is part of the process.

15

Re: Overhang Curling

This is so very helpful... thanks for the discussion!

The secret of getting ahead is getting started.
- Mark Twain... maybe.