1 (edited by nlancaster 2013-07-15 18:10:53)

Topic: One of my best prints yet, in my new enclosure.

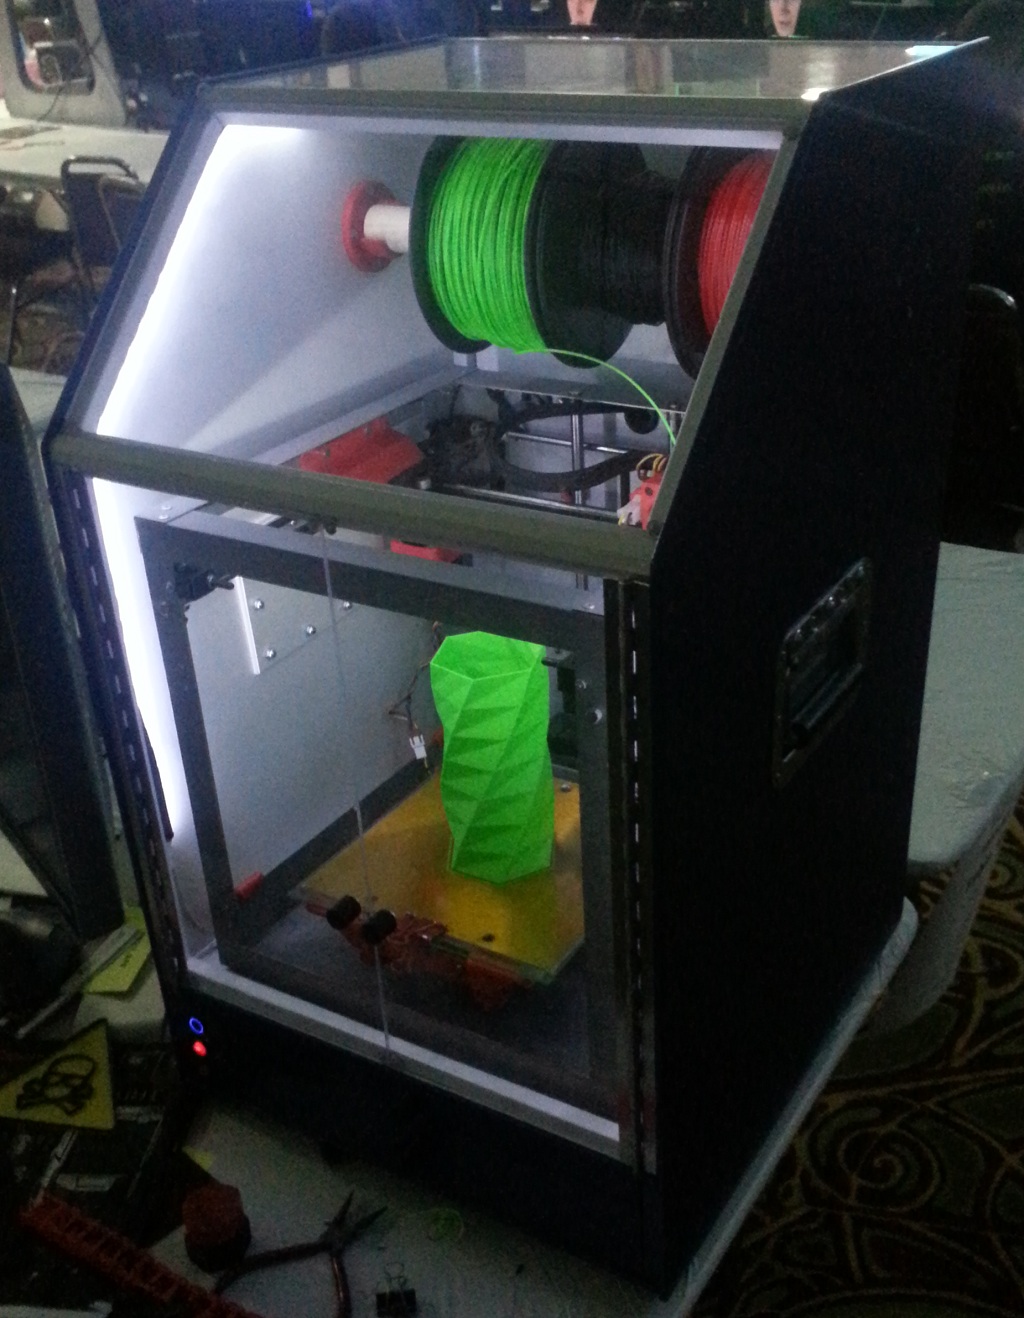
So, I have been building a all in one printing station/enclosure for a few months now. And just got it finished last Friday evening.  So here is the biggest thing I have yet printed with my printer.

It is about 6inches tall.
http://www.pdxmc.com/uploads/SD3/20130715_104735.jpg

And some pictures of the enclosure.  It includes a full computer for design/print control. only thing I need to print on the go is the box, monitor, keyboard, mouse, and filament.  The box itself can hold 3 rolls while actively printing.

http://www.pdxmc.com/uploads/SD3/20130715_102356.jpg
http://www.pdxmc.com/uploads/SD3/20130715_105441.jpg

2

Re: One of my best prints yet, in my new enclosure.

If you mount a Pengpod someplace like on the filament door, you can make it totally self contained.   It's pretty awesome as it is however.

3

Re: One of my best prints yet, in my new enclosure.

Nicely done!

4 (edited by 2n2r5 2013-07-15 19:04:01)

Re: One of my best prints yet, in my new enclosure.

This looks awesome! I wish I didn't mess with my 'doodle so much. I would love to build an enclosure like this! I would be taking it apart every other day to tinker with something else.

Kudos, looks fantastic. +1 to pengpod for fully independent printing.

SD3 w/ mods:
Glass bed with QU-BD heat pad upgrade, threadless ballscrew w/ 8mm smooth rod, spectra line belt replacement, lawsy MK5 extruder, Lawsy replacement carriage, E3D hotend, Ramps 1.4 w/ reprap discount controller, DRV8825 drivers, 12v 30A PS, Acrylic case, Overkill Y-idlers, Filament alarm, Extruder fan + more.

5 (edited by nlancaster 2013-07-15 20:57:44)

Re: One of my best prints yet, in my new enclosure.

the printer comes out with the removal of only 4 screws and 2 cables.

And will be coming out soon for a linear bearing and GT2 belt upgrade.

6

Re: One of my best prints yet, in my new enclosure.

are you planning on uploading the drawing & nomenclature.

Ultimaker S3.

7

Re: One of my best prints yet, in my new enclosure.

I wasn't planning on uploading the plans.  The drawings do not match precisely the finished product.

8

Re: One of my best prints yet, in my new enclosure.

I built an enclosure out of plexiglass and it really helped with sticking down and generally making the print better. Then I ran into a problem with the filament. The filament was powdering and not extruding well. It was driving me nuts. I removed the top of my enclosure so I could closely watch what was happening, and the problem went away. I still have the side and front on the enclosure and getting good prints.

Anyone else found this problem?

9

Re: One of my best prints yet, in my new enclosure.

Stick a thermometer in there and see how hot it gets, especially near the extruder.  It might be working well enough that the filament is softening between the gear and hot end and getting harder to push.  Or the PEEK is getting too warm in the hotter ambient, making the melt zone longer.  Try sticking a fan on the front to blow on the PEEK and see if that helps.  You can replace one of the lower bolts that goes into the stepper with a longer one, and use it to hold the fan on too.

10

Re: One of my best prints yet, in my new enclosure.

mikefree41 wrote:

I built an enclosure out of plexiglass and it really helped with sticking down and generally making the print better. Then I ran into a problem with the filament. The filament was powdering and not extruding well. It was driving me nuts. I removed the top of my enclosure so I could closely watch what was happening, and the problem went away. I still have the side and front on the enclosure and getting good prints.

Anyone else found this problem?

I had a problem if the top is too close to the extruder, the bend radius of the filament was causing it problems. if the top of the enclosure is tall enough, the problem went away for me...

11

Re: One of my best prints yet, in my new enclosure.

new project added to the list, thanks hmm

gotta up my game w/ an enclosure like that.

12

Re: One of my best prints yet, in my new enclosure.

big_smile

Stupid LED strips won't stay. need some better adhesive tape.

13

Re: One of my best prints yet, in my new enclosure.

nlancaster wrote:

Stupid LED strips won't stay. need some better adhesive tape.

Outdoor All Weather Double-Sided Adhesive Strips... uGlu here in Australia sells it anyway at the local hardware, I'm sure theres an equivalent over there...

14

Re: One of my best prints yet, in my new enclosure.

is all the heat from pc case vented into the closure? :-)

Solidoodle2 with Ceramic tile heated bed http://www.soliforum.com/topic/2544/my- … eated-bed/
"1kg should last for an while" is a lie!

15

Re: One of my best prints yet, in my new enclosure.

Stick a thermometer in there and see how hot it gets, especially near the extruder.  It might be working well enough that the filament is softening between the gear and hot end and getting harder to push.  Or the PEEK is getting too warm in the hotter ambient, making the melt zone longer.  Try sticking a fan on the front to blow on the PEEK and see if that helps.  You can replace one of the lower bolts that goes into the stepper with a longer one, and use it to hold the fan on too.


That's exactly whats happening. Ive been needing to get a fan anyway. It's time.

Thanks Ian!!

16

Re: One of my best prints yet, in my new enclosure.

nah, the PC doenst put out hardly any heat, and has its own vent.  Would probably end up cooling the case if I did that.

17

Re: One of my best prints yet, in my new enclosure.

Wow.  This is really nice man.

18

Re: One of my best prints yet, in my new enclosure.

neoblood3d wrote:

Wow.  This is really nice man.

+1

www.designerfred.fr      before: Solidoodle 2 + E3D v6 now: MeCreator II and OLO 3D

19

Re: One of my best prints yet, in my new enclosure.

What material did you use for the Frame and sides? I want to build one of these with some carbon filters and exhaust fans.