Topic: Reflashing the EMUtag
Last week I had some problems with my EMUtag, resulting from letting the batteries run down too low while using it. The first time , with the help of Bozotheclown1970, I was able to recover using a new default file to load. The second time, resulted in a 'dead' ENUtag. I could not get it to read, no matter what I did.
So I wrote to the developer of EMUtag and he gave me some information and files and I was able to reflash it using my raspberry pi.
As I gained permission from the developer to direct post his file links, he asked "it would be nice if you could reserve sections for firmware flashing instructions using all 5 methods (arduino, RPi, FTDI, parport, and a dedicated AVR programmer), so that RPi method will be one of the sections."
I write this post as a set of instructions to use a Raspberry Pi to re-flash the EMUtag. It would be great if the community could post other methods here as a one stop thread for the EMUtag flashing. I know that Mr Clown has a post helping with Arduino / FTDI. Csan that get copied over here? I will do the work if it is ok.
Raspberry Pi
==============================================================
Raspberry Pi side:
Enable SPI interface by opening a terminal:
1- pi@raspberrypi ~ $ sudo raspi-config
2- select option 5 - Interfacing Options
3- select P5 - SPI
4- select Yes to the question "Would you like SPI interface to be enabled"
5- select OK
6- select Finish
Emutag side:
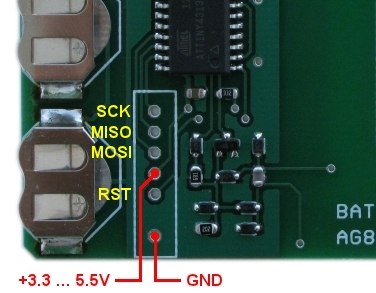
Solder 0.1" pitch pins to the EMTtag board.
See this image as to the location and meaning of each pin http://emutag.com/img/icsp.jpg
****!!!! These pin numbers are physical pins numbers, not GPIO numbers and they are set up to match the programmer section below
see http://pi4j.com/images/j8header-3b-large.png
EMUtag MOSI to pin 19 on RPi
EMUtag MISO to pin 21 on RPi
EMUtag SCK to pin 23 on RPi
EMUtag RESET to pin 07 on RPi
EMUtag GND to GND on RPi
EMUtag 5V to 5V on RPi
Preparing avrdude:
we will be compiling from source
Lifted from <http://ozzmaker.com/program-avr-using-r … y-pi-gpio/>
pi@raspberrypi ~ $ sudo apt-get update
pi@raspberrypi ~ $ sudo apt-get install -y build-essential bison flex automake libelf-dev libusb-1.0-0-dev libusb-dev libftdi-dev libftdi1
pi@raspberrypi ~ $ wget http://download.savannah.gnu.org/releases/avrdude/avrdude-6.2.tar.gz
pi@raspberrypi ~ $ tar xfv avrdude-6.2.tar.gz
pi@raspberrypi ~ $ cd avrdude-6.2/
pi@raspberrypi avrdude-6.2/~ $ ./configure – -enable-linuxgpio
pi@raspberrypi avrdude-6.2/~ $ make
pi@raspberrypi avrdude-6.2/~ $ sudo make install
Changing avrdude settings
pi@raspberrypi avrdude-6.2/~ $ sudo nano /usr/local/etc/avrdude.conf Linux GPIO configuration for avrdude.
Change the lines below to the GPIO pins (GPIO04 as an example) I did this sucessfully connected to the AVR.
programmer
    id = "linuxgpio";
    desc = "Use the Linux sysfs interface to bitbang GPIO lines";
    type = "linuxgpio";
    reset = 4;
    sck = 11;
    mosi = 10;
    miso = 9;
;
Loading and writing firmware files:
wget http://emutag.com/firmware/ntag213-sniff.bin
wget http://emutag.com/firmware/common.eep

sudo avrdude -c linuxgpio -p t4313 -U flash:w:ntag213-sniff.bin:r -U eeprom:w:common.eep:r -U efuse:w:0xfe:m -U hfuse:w:0xdf:m -U lfuse:w:0xdf:m
==============================================================