1 (edited by dineshwong 2015-09-29 15:41:32)

Topic: HICTOP prusa i3 - Assembly questions

Hello All,

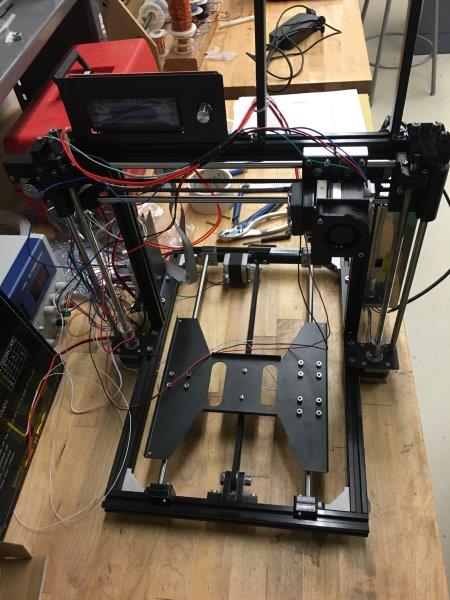
I just bought a HICTOP prusa i3 black aluminum kit. I have completed the assembly but the wires are all over the place, Can someone post pictures of the assembled kit showing how you have tried to keep the wiring intact without interfering the operation.

Also, my y-endstop is not meeting anything, as in I believe it should come in contact with the y-stepper but mine is not meeting. any suggestions ?

Post's attachments

IMG_1280.JPG
IMG_1280.JPG 1.82 mb, file has never been downloaded. 

IMG_1281.JPG
IMG_1281.JPG 1.76 mb, file has never been downloaded. 

You don't have the permssions to download the attachments of this post.

2

Re: HICTOP prusa i3 - Assembly questions

I recommend this stuff for wire control. You can also get heatshrink of a similar diameter to close off the ends and prevent it from unwinding: http://www.amazon.com/gp/product/B004UH … irect=true

3

Re: HICTOP prusa i3 - Assembly questions

jagowilson wrote:

I recommend this stuff for wire control. You can also get heatshrink of a similar diameter to close off the ends and prevent it from unwinding: http://www.amazon.com/gp/product/B004UH … irect=true

Thanks for the suggestion.

Any input on the end-stops ? I am kind of stuck as I can adjust the stepper mount or bearing mount as it may misalign with the belt clamps on the carriage.

4

Re: HICTOP prusa i3 - Assembly questions

dineshwong wrote:
jagowilson wrote:

I recommend this stuff for wire control. You can also get heatshrink of a similar diameter to close off the ends and prevent it from unwinding: http://www.amazon.com/gp/product/B004UH … irect=true

Thanks for the suggestion.

Any input on the end-stops ? I am kind of stuck as I can adjust the stepper mount or bearing mount as it may misalign with the belt clamps on the carriage.


You could just add a block of some sort to the side of the motor to hit the endstop. Without seeing a close but full image of the printer and the endstop locations it would be hard to tell if it is correct or not now. I assume this is the low limit or home endstop for that axis.

Printing since 2009 and still love it!
Anycubic 4MAX best $225 ever invested.
Voxelabs Proxima SLA. 6 inch 2k Mono LCD.
Anycubic Predator, massive Delta machine. 450 x 370 print envelope.

5

Re: HICTOP prusa i3 - Assembly questions

Carl, thanks for the response, PFA some images of the set up

http://soliforum.com/i/?FWlwKBr.jpg

http://soliforum.com/i/?49UDeYD.jpg

http://soliforum.com/i/?fnXmesG.jpg


So, initially it was touching the stepper motor on the rear end of the printer, so I flipped the end-stop mount on carriage, and then it is still missing any contact. Here is a close-up of the end stop missing

http://soliforum.com/i/?2vFU8Sy.jpg

6

Re: HICTOP prusa i3 - Assembly questions

Are you sure that is where it goes? You normally don't want wires other than wires made to flex connected to the moving axis. Most designs put the endstops on the frame and have the moving parts hit them. That just seems really odd for an endstop to be on the bed like that.

Printing since 2009 and still love it!
Anycubic 4MAX best $225 ever invested.
Voxelabs Proxima SLA. 6 inch 2k Mono LCD.
Anycubic Predator, massive Delta machine. 450 x 370 print envelope.

7

Re: HICTOP prusa i3 - Assembly questions

Carl, I am sure, thats where it mounts to, look at the assembly instructions in the following link (open New assembly instructions Pg 22-25)

https://drive.google.com/folderview?id= … 1lBa3lQTUU

8

Re: HICTOP prusa i3 - Assembly questions

dineshwong wrote:

Carl, I am sure, thats where it mounts to, look at the assembly instructions in the following link (open New assembly instructions Pg 22-25)

https://drive.google.com/folderview?id= … 1lBa3lQTUU


I see what you mean, not real detailed are they? If you flipped the bearing screw around so the head was on the switch side would the switch hit the head? That is really an odd design and I would really be worried about those wires breaking since that bed will constantly move back and fourth. I would really consider trying to relocate that switch myslef so the it was on the frame and the bed would hit it when in the home position. That's just me and experience with wires on moving axis speaking.

Printing since 2009 and still love it!
Anycubic 4MAX best $225 ever invested.
Voxelabs Proxima SLA. 6 inch 2k Mono LCD.
Anycubic Predator, massive Delta machine. 450 x 370 print envelope.

9 (edited by AOYOU3D 2015-09-30 16:07:11)

Re: HICTOP prusa i3 - Assembly questions

I had assembled HICTOP, had same problem a month ago, so you have to
1) Check Y limit switch if works using a multimeter, my one's soldering spot was
Brocken, if so fix it using a tape to avoid the wires moving.
2) Face to the front of the printer, two bearing blocks on y carriage should be at left hand side,
    one bearing block should be at right hand, the Y end stop should touch the surface of
     Y drive motor, not frame or something else.

If you still have problem, let me know.
After you assembled it, you can go to www.trinpy.com, and download my useful objects (free donwload) to test
your printer, see the filament guider below:

http://soliforum.com/i/?xu5EJGh.jpg

10

Re: HICTOP prusa i3 - Assembly questions

AOYOU3D wrote:

I had assembled HICTOP, had some problem, so you have to
1) Check Y limit switch if works using a multimeter, my one's soldering spot was
Brocken, if so fix it using a tape to avoid the wires moving.
2) Face to the front of the printer, two bearing blocks on y carriage should be at left hand side,
    one bearing block should be at right hand, the Y end stop should touch the surface of
     Y drive motor, not frame or something else.

Hey, you are right about point 2. I just noticed. But how does that affect the assembly, the carriage is symmetric in dimensions, except for the holes. Flipping it over is not going to affect the positions of the end-stop mounts and belt.

11 (edited by AOYOU3D 2015-09-30 22:22:25)

Re: HICTOP prusa i3 - Assembly questions

The belt is built in the center of Y carriage, but the mounting holes of Y end stop  should close to the left hand side to
hit Y drive motor.
How about your assembly work, done?
If you have checked 3 limit witches and 3 thermocouples, and connected all wires right, I think your printer should
work well.

12

Re: HICTOP prusa i3 - Assembly questions

carl_m1968 wrote:

I see what you mean, not real detailed are they? If you flipped the bearing screw around so the head was on the switch side would the switch hit the head? That is really an odd design and I would really be worried about those wires breaking since that bed will constantly move back and fourth. I would really consider trying to relocate that switch myslef so the it was on the frame and the bed would hit it when in the home position. That's just me and experience with wires on moving axis speaking.

Carl, Thanks a lot for the input, that really helped. I finally moved the y-stepper closer and flipped the pulley so that it still stays in path.
They are a chinese company, none of their videos have a voice over and even the documentation lacks wordings.

http://soliforum.com/i/?2VoSbz0.jpg

I still haven't started printing. I home'd axes, checked thermistors. While jogging, both the x & y seems to have a lot of jerky motion. Is this cause of the belt tightness ?

13

Re: HICTOP prusa i3 - Assembly questions

I think you should check those things:
1) Don't let 4 small adjusting spring on the heating bed too loose.
2) Align pulleys of X and Y axes up, your y pulley is set in the right direction??? see my pictures.
3) Adjust the belt tightness, not too loose.
4) Try to place the wire of Y endstop to the front side, see my pictures.

http://soliforum.com/i/?vwRqtDf.jpg

http://soliforum.com/i/?bkrxkUv.jpg

http://soliforum.com/i/?piQjCL0.jpg

http://soliforum.com/i/?OIhW67C.jpg

http://soliforum.com/i/?z3HkQGL.jpg

14

Re: HICTOP prusa i3 - Assembly questions

AOYOU3D wrote:

The belt is built in the center of Y carriage, but the mounting holes of Y end stop  should close to the left hand side to
hit Y drive motor.
How about your assembly work, done?
If you have checked 3 limit witches and 3 thermocouples, and connected all wires right, I think your printer should
work well.

AOYOU, Thanks for all the pictures. I finally got my printer to work. Due to the wiring mania, the y-endstop connections snapped during my first print, So, i replaced them with a spare I got form HICTOP kit.

Where are the 3 thermocouple, There is one for the bed and one for the extruder right ?

About the wiring i need to rethink the whole thing and also find an enclosure for electronics with Fan mount. I am going to print the filament guide from your website. Do you also have other mods that I can use ?

Also, have you tried printing with Ninjaflex and Nylon ?. I read somewhere people were discussing about the hot end issues

15

Re: HICTOP prusa i3 - Assembly questions

Dineshwong,

I am sorry, should be two thermocouples.
The filament guide I made is used for Prusa i3 acrylic frame,
its acrylic sheet thickness is 8mm, but your one is alum. kit, right?
If its slot is too big, let me know dimension you need, I can make
for you.
I didn't try another material, I don't make any research work,
I just provide 3D printable models for 3D printer users, so I think
this Prusa i3 printer and PLA filament are good enough to me,
I didn't make any mods, and I made a lot of models on WWW.TRINPY.COM.
This hot end is all metal, I don't think it has problem for high temp.
filament, but I am not sure that if the heat bed is OK. for a high temp.(power & bent)?
If you need some parts or 3D model, send a sketch with dimensions to
[email protected], we can make it for you, and post on
WWW.TRINPY.COM.

16

Re: HICTOP prusa i3 - Assembly questions

AOYOU3D wrote:

Dineshwong,

I am sorry, should be two thermocouples.
The filament guide I made is used for Prusa i3 acrylic frame,
its acrylic sheet thickness is 8mm, but your one is alum. kit, right?

If you need some parts or 3D model, send a sketch with dimensions to
[email protected], we can make it for you, and post on
WWW.TRINPY.COM.

Yes, the acrylic sheet thickness is 8mm. I think I can design one myself. I ll be more than willing to share if it works well.
Thanks for all the input though