1

Topic: Replacement Thermistor

So i snapped the thermistor right off my da vinci 1.0 when trying to clean it. I bought some replacement thermistors, only I dont fully understand how to get it to connect with the circuit board fully, so could anyone provide an explanation as to how to reinstall a custom thermistor on it? (I already have high temp silicone and such)

2

Re: Replacement Thermistor

-Remove the filament from the extruder.
-Remove the whole extruder.
-Remove the screw that hold the thermistor. "right next to the nozzle head"
http://img.photobucket.com/albums/v358/ … rm1umm.jpg
-Remove the thermistor, replace it with a new one "100k thermistor"
-Resistors are mainly used to resist the flow of current. They do not act as diodes, so, it doesn't matter how you connect it or to which side of it is the positive terminal connected.
-use rtv to seal it back in "make sure you get one with that can stand the temp.

i think this should be it. carl_m1968 is the expert, you can wait for him to confirm this.

3

Re: Replacement Thermistor

Thermistors for printers especially Chinese or Taiwanese like these are just the common 100k you find all over ebay. Just loosen the set screw and it should come out. The new one can be a glass body or a metal body. If it is glass I would not use the set screw as it is easy to break the body. Just secure into the hole with RTV. Try to make sure the Teflon tubing on the leads also get into the RTV. Make sure the wires at the heat block are not exposed, touching each other, or exposed and touching the heat block. After that just connect the leads of the new thermistor to the points the old one was. May need to use solder and shrink tubing as well. I honestly have not had to deal with this since I know what it looks like and to be careful around it. So I assume it is connected to wires that then plug into the PCB on the extruder. Otherwise they leads are soldered to the PCB in which case someone would need to supply a picture to show you where they solder to. I am not ready just yet to do my head upgrade so I have no intention to take my head apart for several more days. My apologies if this is not enough info but as I said I have not had to deal with this problem and the Da Vinci is the first of three printers for me to have a PCB like this on the head. All my others just had a harness that ran straight to the main controller board.

Printing since 2009 and still love it!
Anycubic 4MAX best $225 ever invested.
Voxelabs Proxima SLA. 6 inch 2k Mono LCD.
Anycubic Predator, massive Delta machine. 450 x 370 print envelope.

4

Re: Replacement Thermistor

First off im including pictures, is this the right screw youre talking about (image 0027)? and if it us how do you get it out because the large silver part that makes the head screw in is blocking it(image 0028)? and do i just thread the remaining wired through the white connector (image 0030) into the circuit (image 0029)?

Post's attachments

DSC_0027.JPG
DSC_0027.JPG 1.67 mb, 3 downloads since 2015-02-11 

DSC_0028.JPG
DSC_0028.JPG 1.72 mb, 1 downloads since 2015-02-11 

DSC_0029.JPG
DSC_0029.JPG 1.83 mb, 2 downloads since 2015-02-11 

DSC_0030.JPG
DSC_0030.JPG 1.96 mb, 1 downloads since 2015-02-11 

You don't have the permssions to download the attachments of this post.

5

Re: Replacement Thermistor

In order to get the screw out, you would need to get a clam and twist off the silver part from the extruder.

6

Re: Replacement Thermistor

here is what i got.
http://img.photobucket.com/albums/v358/ … aayx8s.jpg
but now i need to go look for teflon tubing.

7

Re: Replacement Thermistor

From the looks of the last picture the wires have been ripped out of the connector as well. This is going to take a wall of text to talk you through now and really beyond somebody without technical skills and can solder and remove pins from connectors. If somebody wsnts to take on that job fine. I dont have the patience tonight thanks to work. My suggestion to you simply based on your questions, yes I am judging here so sorry. My suggestion is to go online to the XYZPRINTING parts store and just buy a new head for $99 bucks. It would be much easier in the long run. Keep the old one for spare parts.

As for that screw I believe the auto adjust sensor nub is just below it on the nozzle side. Can't tell from the pics. If it is then that screw hols in the spring the allows the autoadjust nub to have some give.

Honestly I have yet to had any isdues with this head other not being able to print with other materials.  So I have not had to pay yhst much attention to it or take it appart. It is possible the thermistor is held in strictly by the RTV only. Most glass bodies dont use set screws.

Printing since 2009 and still love it!
Anycubic 4MAX best $225 ever invested.
Voxelabs Proxima SLA. 6 inch 2k Mono LCD.
Anycubic Predator, massive Delta machine. 450 x 370 print envelope.

8

Re: Replacement Thermistor

In all honesty I tried going for the replacement nozzle but they are out of stock on their store and I do not know if they restock those spare parts or not.

9

Re: Replacement Thermistor

khoabui05 wrote:

here is what i got.
http://img.photobucket.com/albums/v358/ … aayx8s.jpg
but now i need to go look for teflon tubing.

The thermistor is only half of his problem based on the pictures. The wires for the thetmistor have been rippid from the connector that plugs into the pcb. Those are wires are normally crimped to pins that are inserted and locked into the connector. He needs to be able to get the pins out without damaging the connector housing.  Then see if he can slip the new thermistor wire into the pins and maybe use just a tiny bit of solder to secure it sonce he most likely will not have a proper crimping tool. I mean one made for these types of pins. Not the generic one you get with terminal kits from walmart. Also be sure there is teflon tubing covering allexposed thermistor wires before attaching the pins.

Printing since 2009 and still love it!
Anycubic 4MAX best $225 ever invested.
Voxelabs Proxima SLA. 6 inch 2k Mono LCD.
Anycubic Predator, massive Delta machine. 450 x 370 print envelope.

10 (edited by khoabui05 2015-02-11 05:27:40)

Re: Replacement Thermistor

carl_m1968 wrote:
khoabui05 wrote:

here is what i got.
http://img.photobucket.com/albums/v358/ … aayx8s.jpg
but now i need to go look for teflon tubing.

The thermistor is only half of his problem based on the pictures. The wires for the thetmistor have been rippid from the connector that plugs into the pcb. Those are wires are normally crimped to pins that are inserted and locked into the connector. He needs to be able to get the pins out without damaging the connector housing.  Then see if he can slip the new thermistor wire into the pins and maybe use just a tiny bit of solder to secure it sonce he most likely will not have a proper crimping tool. I mean one made for these types of pins. Not the generic one you get with terminal kits from walmart. Also be sure there is teflon tubing covering allexposed thermistor wires before attaching the pins.


oh yea i saw.

Ninja3797, do you really want that female connector? If not you can just precisely solder 2 wire to where the "female connector" broke off, and directly connect it to the thermistor.
http://www.ebay.com/itm/New-10-Pairs-2- … 4d1e5a1090

one end to PCB, and one end to thermisor, OR you can look for he 90 degree pin connector, but you would need a desolder to get a clean job.

11

Re: Replacement Thermistor

so desolder the connector thats on the circuit and solder down that connector and just hook the thermistor up to the wires on that new connector?

12 (edited by graciaj 2015-03-03 20:52:44)

Re: Replacement Thermistor

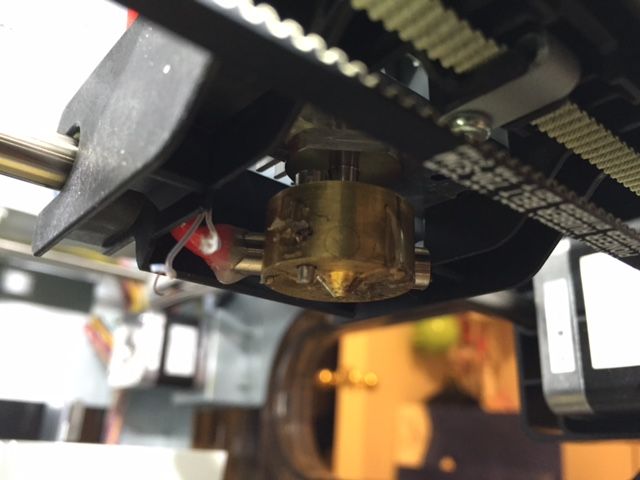
So I had the same problem.

I'm a noob in regard to 3D printing... After the first 2 hours of printing I tried cleaning the head and ripped the cables out of the thermistor.

Bought this thermistor, which is not even same size as the Da Vinci but same rating.
http://www.ebay.com/itm/320972105023?_t … EBIDX%3AIT

"100K High Stability NTC Thermistor 1.25mm with lead-covered tubings"

I'm 50 hours into printing now with no issues.
I got some RTV as well but didn't even got to use it, the screw holding the thermistor was enough to hold it in place.

Thermistors as any resistor doesn't care for polarity, so there is nothing to worry when wiring to the connector.

My Da Vinci is 1.0A with stock firmware but with Simpify 3D software. Have never used XYZ software.

13

Re: Replacement Thermistor

ninja3797 if you need a connector I have one

Da Vinci  AiO with firmware 1.1.1 using xyzscan 1.1.18
E3Dv6 hotend with custom carriage with Borosilicate glass bed
123D Design and Simplify3D, Replaced PS with a Solidgear Flex320
Zerokart resetter,  Installed a Extruder Controller for higher temps