Re: Jigsaw Replacement mk2
Weird I used netfabb on it as well...lol; it is possible I did not save out the "repair" as I use the offline version of the tool.
You are not logged in. Please login or register.
SoliForum - 3D Printing Community → Hacks & Mods → Jigsaw Replacement mk2
Weird I used netfabb on it as well...lol; it is possible I did not save out the "repair" as I use the offline version of the tool.
I have used the offline tool and the online version and I can say the online definably does a better job. I tried repairing numerous times on the offline one and it wouldn't slice correctly. I ran it once through the web based one and it fixed it right up.
So far, the offline tool has been very helpful: I've not needed anything beyond that. The UI takes a little getting used to, but once you have that figured out, it is a useful tool.
Offline works most of the time for me. As a free version, it lacks some capabilities that are in the pro version. I suspect the online service is closer to the pro version so sometimes if the offline can't fix something, the online will. I was printing the upper filament guide by itself, and kept getting a ! in Netfabb even after fixing. That would have been a good candidate for upload, but I just sliced it anyway and it was mostly ok aside from an odd bit that I had to trim off.
UPDATE: 12-22-2012 **ADDED**
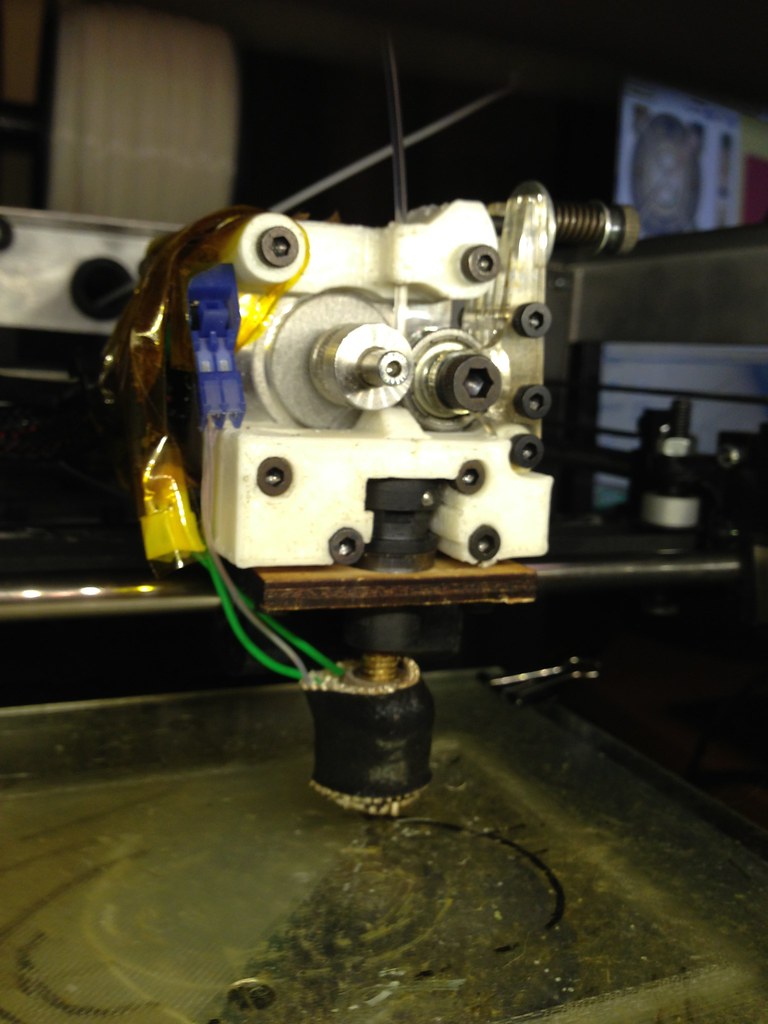
Did you ever upload a photograph of the finished assembly?
I've just updated my thingiverse thing after playing with jeffery's tensioner file. I've changed the size of some of the holes to make them closer to what is needed, as well as beefing up a couple of areas where there was room. Part is fitted and working on my printer.
This means no acrylic parts are still required. Kudos to Jeffery Sanders.
I just replaced one of my jigsaws with a combination of the Lawsy and Jeffrey replacement parts, and it works quite well. I would recommend that everyone print up a set of these parts, because it is virtually inevitable that you will have to replace your hot end, and wrestling with the Solidoodle jigsaw is needlessly complex and frustrating.
Big thanks Lawsy and Jeffery! Saved the day. After my most recent hot end melt out, and thank goodness I had a replacement hot end sitting in wait, I disassembled the jigsaw. What started as pieces A-N or whatever turned into A-ZZ. Must have been a million pieces. Luckily I had printed out the replacement parts and they took only a little touch up buffing, but have worked great for quite a few prints now. Had a few clogs and it was able to be cleared on the fly, mid print nonetheless. I wasn't sure what you meant by spanners weren't needed and to put the nuts in the front, so I put all the screws as they were before and worked great. Definitely a recommended solution. May even send off to Shapeways for a ceramic or gold version.
Glad to hear it worked out well for you. As for the nuts at the front, your setup is different to mine. Not sure who has the more up to date version, but the lower two fixings are nuts for me and hex bolts for you.
I guess mine is older since I have #13. Does that mean yours has threaded rods coming out of the extruder carriage?
I've been thinking if ordering a new XY assembly just so To make sure mine is compatible with whatever mods might come out for it, and so whatever I design will work for most people. Also I want a backup so I can try out making new carriages.
I am having problems figuring out how to disassemble the new jigsaw replacement in the circumstance where the heater has failed and I cannot remove the filament. With the filament gone, it would be easy to pull the PEEK forward (much easier than with the jigsaw puzzle), but with the filament there, everything seems locked. I suppose I could try to reach in with an XActo knife and cut just above the PEEK, or try to use a soldering iron to heat up the hot end. Any thoughts?
Edit: I was able to cut the filament with an XActo blade, although with some difficulty. I wonder if the Jigsaw Replacement design could be improved with a slot that would allow dis-assembly in this situation without so much work.
Happy to see you up and printing again. Shortly after I installed this replacement, I had the same thing happened and used a pair of pliers to yank out the peek barrel. I think the dilemma is that the hole for the filament in the mount need to be right next to the hole for the peek. Mine actually broke down inside the filament guide section of the bottom mount since the holes weren't perfectly lined up it sheared off. One thing I bought that has been super useful is a modeling knife accessory and pin for my soldering iron. It is great for working with abs. It heats up in no time and cuts through or melts the abs like butter.
If the heater failed; why not just replace the heat source, heat it up and remove the filament at that point. Just pull it off otherwise, I don't think it will break easily...I stress tested the part I made by hitting with a hammer and trying to squeeze it with pliers...I still need to use the online netfabb and re-upload...(the parts are not printing right even though they look right on the display)...I am starting to build parts in SW2012 and not with TinkerCAD so my part quality will dramatically improve.
If the heater failed; why not just replace the heat source, heat it up and remove the filament at that point. Just pull it off otherwise, I don't think it will break easily...I stress tested the part I made by hitting with a hammer and trying to squeeze it with pliers...I still need to use the online netfabb and re-upload...(the parts are not printing right even though they look right on the display)...I am starting to build parts in SW2012 and not with TinkerCAD so my part quality will dramatically improve.
The XActo knife cut was annoying, but it worked OK. I did not have another heater or resistor to try to use instead.
Jeffery posted some jigsaw replacement parts on 12 Dec. I found a number of problems with the tensioner. For one thing, the hole that supports the bearing was too small for the original SD bearing that I was trying to use, and attempts to drill the hole out usually ended up destroying the part. For another, some parts of the part (!) were needlessly small, making the part needlessly weak. When I took the STL, converted it to OBJ, and imported that into Sketchup, I discovered that there were some subtle problems with the model (planes that were not really planar).
I have redesigned the part entirely using Sketchup. The following are preliminary, and probably should not be printed. I will update this when they are in better shape.
No doubt lol, I have zero mechanical engineering background/education and it was made with TinkerCAD which is really crappy for designing parts... That is why I am moving to SW12 right now, I don't really like the interface of Sketchup, but I would love to be learn to use it regardless!!! Any suggestions for improving the workflow in sketchup?
I'm no expert at Sketchup, but the Tutorials are a must for anyone who tries to use it. You need to understand the "hints" that you get when you "point" to things, and also the ways that you can constrain a point or line to lie on a point or plane. Then you need to understand the tools, one by one. The great thing about Sketchup is that there is a huge user community and if you Google something ("Make sphere in Sketchup") you are quite likely to find exactly what you need in just a moment or two. There are moments of extreme frustration, too. When working on a serious model, I usually do a series of saves (save as Fred1, then Fred2, then Fred3, etc) so that I can get back to an earlier point when it turns out I went down a horrible road. The YouTube videos are also very helpful.
I'd be happy to try to answer specific questions if you have them.
I went ahead a printed your part iteration for testing, might I suggest you thicken the section that gradates into the bed plane and cut it straight down while the end has more thickness (.5 mm or so and a couple mm from the end) The tips broke and distorted with just a small amount of force, it will make that section of the part greatly more rigid and print a bit better.
Yes. I posted the part prematurely. I'm still fiddling with it. I will repost an improved version soon
I have a mk-III which takes the best of everything and refines them which I'll post tomorrow. Includes tensioner and clip on system for mounting fans, dial indicators, etc.
Very Nice!
I have taken your 'double-boss' idea and made a screw on second part that attachments clip onto without magnets. I think it's a really neat solution, and was nowhere near that solution until you posted your parts.
hehe, thanks.
New one is up:
SoliForum - 3D Printing Community → Hacks & Mods → Jigsaw Replacement mk2
Powered by PunBB, supported by Informer Technologies, Inc.