1

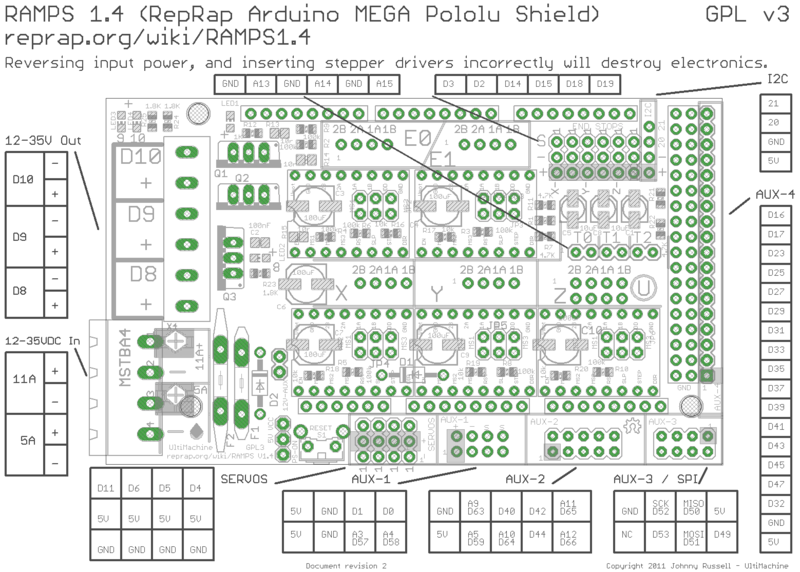
Topic: RepRapDiscount Graphics LCD adjustments

Today I got my RAMPS kit, which also included a Graphics LCD (RepRapDiscount Smart Controller).  So far, I only connected the Arduino board to my USB to upload the firmware, and so far everything looks OK, except the LCD panel is very washed out.

Everything looks OK, it displays all the options correctly, the encoder appears to work OK, but the display is barely visible, it as if the contrast is set to minimum.  I can't find any options to adjust the brightness/contrast.

Can anyone suggest a solution?  Is it because the controller is not yet connected to 12V?

Do I need to make some additional changes to the configuration.h (or any other file) before I compile it?

http://www.soliforum.com/misc.php?action=pun_attachment&item=4671

Post's attachments

LCD panel.jpg
LCD panel.jpg 47.08 kb, file has never been downloaded. 

You don't have the permssions to download the attachments of this post.
To print or, 3D print, that is the question...
SD3 printer w/too many mods,  Printrbot Simple Maker Ed.,  FormLabs Form 1+
AnyCubic Photon, Shining 3D EinScan-S & Atlas 3D scanners...
...and too much time on my hands.

2 (edited by adrian 2014-02-19 10:03:52)

Re: RepRapDiscount Graphics LCD adjustments

If you enable it that should be all you need. There is a contrast setting in the firmware but don't think it's supported. It could be low usb power or just cable seating. If after it has full power it's the same check the little trimpot on the lcd .. will have to check but pretty sure there is
a trimmer for contrast.

Oh, make sure to use latest u8glib library... url is in configuration.h. ..

3

Re: RepRapDiscount Graphics LCD adjustments

may have to get this ive been wanting to make my sd2 a standalone machine

4

Re: RepRapDiscount Graphics LCD adjustments

SOLVED

I figured it out.  It was indeed an issue of low power.

When I connected power to the RAMPS board 12V connector block, I noticed that the unit did not power up until I also connected the USB.  It was then I realized that the Arduino board must also be connected to 12V power on the barrel connector, especially if you want the device to be standalone without a USB connection.

As soon as I did that, the LCD came to life. 

It's interesting that none of the instructions I found on line re:RAMPS, ever mentioned connecting the Arduino board to power as well.  It almost made it seem that connecting the RAMPS board to power was ll that was necessary, and the Arduino would get its power from the RAMPS.  Now I know better.

To print or, 3D print, that is the question...
SD3 printer w/too many mods,  Printrbot Simple Maker Ed.,  FormLabs Form 1+
AnyCubic Photon, Shining 3D EinScan-S & Atlas 3D scanners...
...and too much time on my hands.

5

Re: RepRapDiscount Graphics LCD adjustments

I'm glad you ran across that.  I'm getting my Hadron kit with RAMPS wired up and haven't gotten to that point yet.  I had the same question, and made the same assumption about only the RAMPS needing power.

6

Re: RepRapDiscount Graphics LCD adjustments

Strange. I am only powering the RAMPS shield and not the arduino MEGA separately. I also have a 20x4 LCD which is a different scenario. Where did you get your kit from?

Chuck Bittner is a quadriplegic gamer who is petitioning the major console developers to include internal button remapping in all console games. You can help.
Sign Chuck Bittners petition

7

Re: RepRapDiscount Graphics LCD adjustments

Hazer wrote:

Strange. I am only powering the RAMPS shield and not the arduino MEGA separately. I also have a 20x4 LCD which is a different scenario. Where did you get your kit from?

eBay.

Does your RAMPS, Arduino Mega and LCD assembly stay powered when you pull the USB cable out?

At the moment, I don't have any of this connected to my Solidodle, or any of the motors.  I had only connected it to the USB so I can flash the firmware.  Then when I experienced the faded LCD, I connected 12V to the 11A poles of the RAMS.  With the 12V supply connected there, it didn't power up the Arduino or the LCD.  Only when I plugged the USB cable back in did the whole thing power up, but the LCD was still faded.

On a hunch, I plugged a 12V adapter into the Arduino power jack and then everything came alive, including the LCD. 

That's what I found so far on my RAMPS kit.

As far as the kit itself, this is what I got, except for the LCD controller which is a graphics version

http://www.soliforum.com/misc.php?action=pun_attachment&item=4686

Post's attachments

RAMPS kit.jpg
RAMPS kit.jpg 402.63 kb, file has never been downloaded. 

You don't have the permssions to download the attachments of this post.
To print or, 3D print, that is the question...
SD3 printer w/too many mods,  Printrbot Simple Maker Ed.,  FormLabs Form 1+
AnyCubic Photon, Shining 3D EinScan-S & Atlas 3D scanners...
...and too much time on my hands.

8

Re: RepRapDiscount Graphics LCD adjustments

I can power mine with just the RAMPS. You do know there are two power connectors. One is for powering the arduino, motors, extruder, fans, and LCD. The second connector is for powering the heat bed alone.

http://www.reprap.org/mediawiki/images/thumb/c/ca/Arduinomega1-4connectors.png/800px-Arduinomega1-4connectors.png

The 11 AMP is supply for bed, the 5 AMP is for everything else. If you used the wrong plug, I can see why you saw what you had.

Chuck Bittner is a quadriplegic gamer who is petitioning the major console developers to include internal button remapping in all console games. You can help.
Sign Chuck Bittners petition

9

Re: RepRapDiscount Graphics LCD adjustments

You're right!  I stand corrected.  When I connected the 12V to 5A terminals, the unit powered up perfectly. 

The RAMPS Wiki has this to say about the power connectors, and it was confusing to me about what the 5A terminals actually power:

The bottom pair of connectors marked 5A power the stepper drivers and Extruder heater/fan (D9, D10). The source should be rated a minimum of 5A.

The pair of connectors above marked 11A power a Heated Bed, or other output (D8). The source should be rated a minimum 11A (if both power rails are connected to the same supply it should have a minimum rating of 16A).

The barrel connector, on the Arduino MEGA, will NOT power RAMPS and will not provide power to the stepper motors, heated bed, etc.

The power connector plug may not be obviously labeled, looking at the power connection the positive is on the left and the negative is on the right of the plug.

Anyway, all's good for now.  I'm not yet ready to install the RAMPS, perhaps this weekend, but for now I know it appears to be functional.  Next up, I need to adjust the stepper trim pots.  I know Adrian posted something about that, so I have some reading to do.  I also got some DRV8825 steppers so one of them is going to be driving the extruder.

To print or, 3D print, that is the question...
SD3 printer w/too many mods,  Printrbot Simple Maker Ed.,  FormLabs Form 1+
AnyCubic Photon, Shining 3D EinScan-S & Atlas 3D scanners...
...and too much time on my hands.

10 (edited by IronMan 2014-09-09 11:24:55)

Re: RepRapDiscount Graphics LCD adjustments

Hello All,

I mistakenly posted this same issue in another topic, which I will remove...guess I got the search terms wrong ;-(

I am having the exact same issue of LCD Controller not powering up without the USB attached.  I checked that my 5A terminals were getting power, but it still does not fire up.

Any other suggestions?

Thanks!

SD2 - Stock - Enclosure - Heated Bed - Glass Plate - Auto Fire Extinguisher
Ord Bot Hadron - RAMPS 1.4 - Bulldog XL - E3D v6 - 10" x 10" PCB Heated Build w/SSR - Glass Plate
Thanks for All of Your Help!