1 (edited by 2n2r5 2019-03-04 03:14:09)

Topic: SuperDoodle - Design Progress

http://soliforum.com/i/?IF6PMzb.jpg

I hate putting stuff up before it's finished but I figured there might be some helpful criticism out there. I have been pinging ideas off the guys in chat but they are going to be well sick of me before this project gets done.

Here is the Fusion 360 Project Link

The goal for this build:

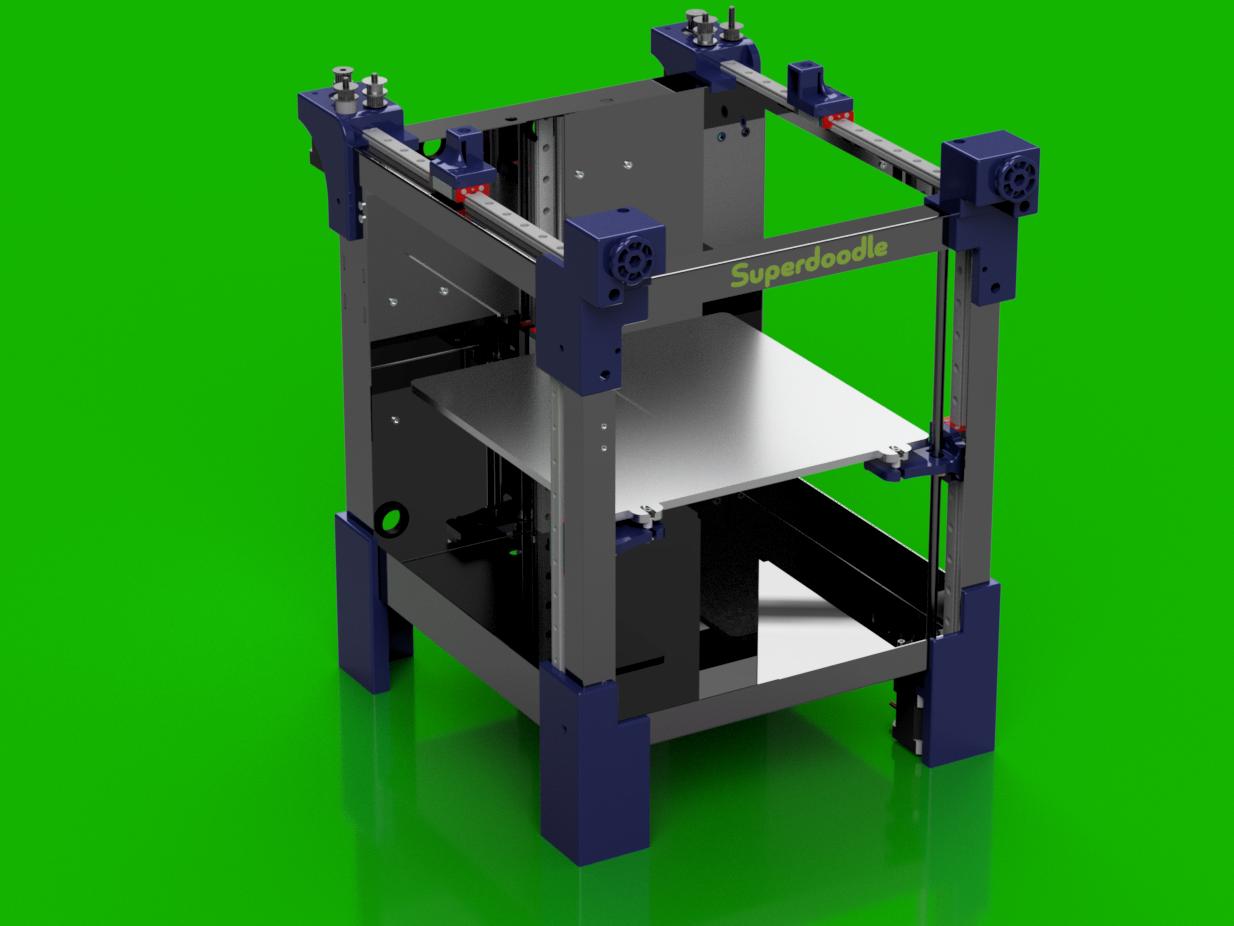
  • Use the SD3 frame to construct a high performance printer

  • Create the largest build volume possible inside of the SD3 frame (currently looking like 250x250x300

  • Try to keep parts around $800 - $1000

  • All parts should be off the shelf commercially available (some modification to parts okay)

  • Make sure that the build will be future proofed

  • In the spirit of the Solidoodle, make it easily moddable

  • Include the following features:

    • Capable of printing to temps of 400C

    • Bed capable of 150C

    • Auto bed leveling (or mesh bed leveling)

    • Multi-extruder capable

    • 200 mm + print speeds

    • .25mm layer heights

    • Hotends should be quick swappable (think ultimaker)


My progress to date: (2019-03-03)

  • Reverse-engineered SD3 sheet metal frame and cutouts

  • Basic layout of Z Axis and feet

  • Most motion parts selected

  • Bed mounts created

  • Feet finished

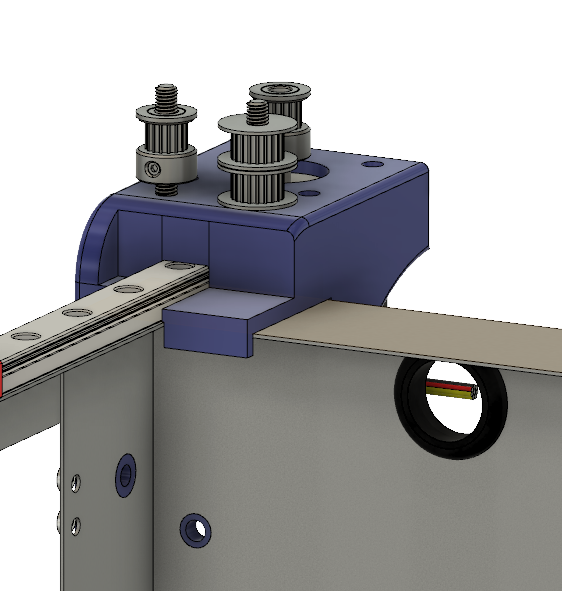
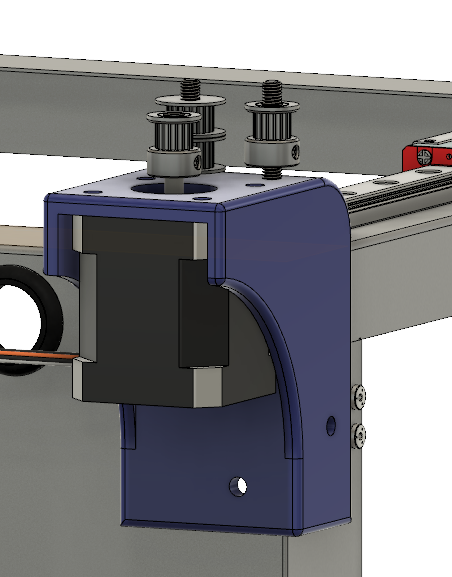
  • Core XY motor mounts created

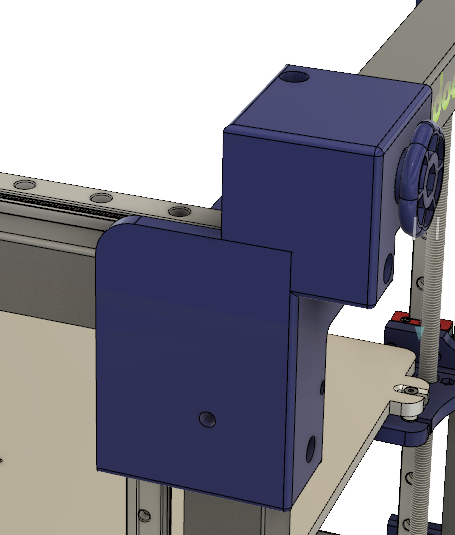
  • Added first revision of tensioner pulleys

To Do: (r/restofthefuckingowl)

  • Mount MGN12 rail for Z -Axis (need to decide on size first, see issues below)*

  • Add mounting points for future HDPE Side, front and bottom panels

  • Create mounts for bowden steppers

  • Make XY carriage assembly

  • Make mount for hotend(s), probe and fans

  • Design hotend interface PCB(maybe Rev.2)

  • Make final BOM and source parts

I have a couple issues that I am looking to solve.
First, the bed I want to use is really close on space so I had to remove a small piece of the mount in the rear. I think that is going to translate into my having to get the grinder out to finish it.

Second, along those same lines, is the mgn12 z axis rails. They are 330 mm long but I can't find those. The max length that will fit is 347mm for the SD3. The closest I found is 350 mm. I have access to a mill so that might not be impossible to shave 3-4 mm off. Might use the grinder again?

Lastly, for now, tolerances are too tight everywhere. Need to generally relax the tolerances to make up for the metric and imperial conversions that they used on the frame. Seems like everything is off just enough that everything is just past snug

Update: 2019/02/24

I think that I managed a decent pair of motor mounts without drilling more holes. Test fitting may change my thoughts on that. Here are some screen grabs. I updated the link to the latest version for anyone that wants to download the files.
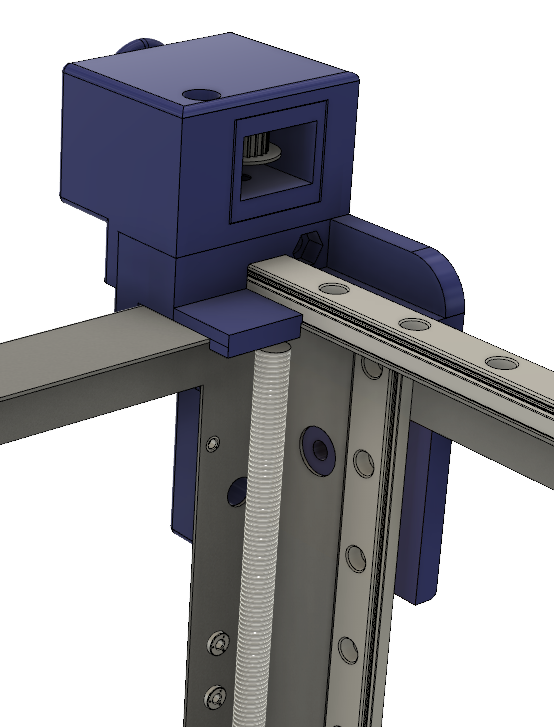
http://soliforum.com/i/?JUVADsv.png
http://soliforum.com/i/?OAV77Ls.png

Update: 2019/03/03

Slow progress this weekend. Added a set of from pulley tensioners. Ends up being a 3 part system. Not really happy with the solution but it's a starting point. Current issue is the XY carriages. I am having trouble figuring out how to affix the mgn rail. I think this might have to go to 10 mm rod instead.

Per usual, I have updated the fusion 360 link and added a couple progress pics below.

http://soliforum.com/i/?8KoLPgE.png
http://soliforum.com/i/?s8SjzBC.png

SD3 w/ mods:
Glass bed with QU-BD heat pad upgrade, threadless ballscrew w/ 8mm smooth rod, spectra line belt replacement, lawsy MK5 extruder, Lawsy replacement carriage, E3D hotend, Ramps 1.4 w/ reprap discount controller, DRV8825 drivers, 12v 30A PS, Acrylic case, Overkill Y-idlers, Filament alarm, Extruder fan + more.

2

Re: SuperDoodle - Design Progress

That 200mm + print speed may be a hard target to reach on a machine that size. You may need some much bigger motors as running a machine that size at those speeds is going to require tremendous torque to stop and start almost instantly on corners and open places in your print.

Printing since 2009 and still love it!
Anycubic 4MAX best $225 ever invested.
Voxelabs Proxima SLA. 6 inch 2k Mono LCD.
Anycubic Predator, massive Delta machine. 450 x 370 print envelope.

3

Re: SuperDoodle - Design Progress

carl_m1968 wrote:

That 200mm + print speed may be a hard target to reach on a machine that size. You may need some much bigger motors as running a machine that size at those speeds is going to require tremendous torque to stop and start almost instantly on corners and open places in your print.

I figured if Prusa I3 MK3s can claim 200mm/s the I can do it with a stationary bed and Bowden extruder.

SD3 w/ mods:
Glass bed with QU-BD heat pad upgrade, threadless ballscrew w/ 8mm smooth rod, spectra line belt replacement, lawsy MK5 extruder, Lawsy replacement carriage, E3D hotend, Ramps 1.4 w/ reprap discount controller, DRV8825 drivers, 12v 30A PS, Acrylic case, Overkill Y-idlers, Filament alarm, Extruder fan + more.

4

Re: SuperDoodle - Design Progress

2n2r5 wrote:
carl_m1968 wrote:

That 200mm + print speed may be a hard target to reach on a machine that size. You may need some much bigger motors as running a machine that size at those speeds is going to require tremendous torque to stop and start almost instantly on corners and open places in your print.

I figured if Prusa I3 MK3s can claim 200mm/s the I can do it with a stationary bed and Bowden extruder.


I can make my printer do more than 200mm/s and claim it does that. However the print will look like garbage. What they claim and what the results are at those claims or two different and never shown things. There is no agency that governs or confirms the claims of printer manufacturers so some of the claims are out there and simply sells hype. There is a reason most of us even with a well tuned machine still print on average between 60 and 100 mm/s. In some case you have to print even slower. If you use PETG you must print at 35mm/s or less to avoid strings and other problems.

Printing since 2009 and still love it!
Anycubic 4MAX best $225 ever invested.
Voxelabs Proxima SLA. 6 inch 2k Mono LCD.
Anycubic Predator, massive Delta machine. 450 x 370 print envelope.

5

Re: SuperDoodle - Design Progress

Your SuperDoodle deserves its own logo!

-Kevin

6 (edited by 2n2r5 2019-02-23 18:55:56)

Re: SuperDoodle - Design Progress

knowack wrote:

Your SuperDoodle deserves its own logo!

-Kevin

I was thinking about doing something like this to match the original solidoodle design. (as best I could)

http://soliforum.com/i/?rfbEn9R.png

VS

http://soliforum.com/i/?A6uHFNU.png

Here it is in the with white lettering and green bg

http://soliforum.com/i/?7jGlkJn.png

SD3 w/ mods:
Glass bed with QU-BD heat pad upgrade, threadless ballscrew w/ 8mm smooth rod, spectra line belt replacement, lawsy MK5 extruder, Lawsy replacement carriage, E3D hotend, Ramps 1.4 w/ reprap discount controller, DRV8825 drivers, 12v 30A PS, Acrylic case, Overkill Y-idlers, Filament alarm, Extruder fan + more.

7

Re: SuperDoodle - Design Progress

I like!

My only regret is that you thought of Superdoodle first.  Now I have to think of something to call my Workbench...

-Kevin

8 (edited by heartless 2019-02-24 02:17:30)

Re: SuperDoodle - Design Progress

still not really convinced of the need of 3  Z motors, but will wait and see how things progress.

in the original logo, the "Soli" part of Solidoodle is a completely different font... so in keeping with that...

http://soliforum.com/i/?2m6tZBO.png

and knowack.. since the workbench is so much larger, what about "Megadoodle"?
LOL

http://soliforum.com/i/?NL3adSZ.png

SD4 #1 & #2 - Lawsy carriages, E3D v6, Rumba controller board, mirror bed plate, X motor fan, upgraded PSU & Mica bed heater
SD4 #3 - in the works ~ Folgertech FT-5, rev 1
Printit Industries Beta Tester - Horizon H1

9

Re: SuperDoodle - Design Progress

heartless wrote:

still not really convinced of the need of 3  Z motors, but will wait and see how things progress.

in the original logo, the "Soli" part of Solidoodle is a completely different font... so in keeping with that...

http://soliforum.com/i/?2m6tZBO.png

and knowack.. since the workbench is so much larger, what about "Megadoodle"?
LOL

http://soliforum.com/i/?NL3adSZ.png


Sounds like an 80's porn star....

Printing since 2009 and still love it!
Anycubic 4MAX best $225 ever invested.
Voxelabs Proxima SLA. 6 inch 2k Mono LCD.
Anycubic Predator, massive Delta machine. 450 x 370 print envelope.

10

Re: SuperDoodle - Design Progress

lol lol lol

SD4 #1 & #2 - Lawsy carriages, E3D v6, Rumba controller board, mirror bed plate, X motor fan, upgraded PSU & Mica bed heater
SD4 #3 - in the works ~ Folgertech FT-5, rev 1
Printit Industries Beta Tester - Horizon H1

11 (edited by 2n2r5 2019-02-24 03:09:20)

Re: SuperDoodle - Design Progress

carl_m1968 wrote:
heartless wrote:

still not really convinced of the need of 3  Z motors, but will wait and see how things progress.

in the original logo, the "Soli" part of Solidoodle is a completely different font... so in keeping with that...

http://soliforum.com/i/?2m6tZBO.png

and knowack.. since the workbench is so much larger, what about "Megadoodle"?
LOL

http://soliforum.com/i/?NL3adSZ.png


Sounds like an 80's porn star....


I meant to report for harassment but since you were so mean I guess I'm going to have to retaliate. It's obviously not about the size, it's about how you abuse it. No one can abuse it like I do!

https://i.imgflip.com/1m7lrr.jpg


so, take that you heartless something something. (wow that was weak)


In all seriousness, well done Knowack! I know how hard the upgrades are. When you get to the point that the machine is no longer recognizable as what it use to be. That is an impressive/exhausting feat. Cheers all around. Now Heartless, tell me what I can do to improve my design. I know you have issues, but I want to know how to over come those issues!

Edit: I want to make it clear that I am not the person in the above photo! In "real life", I appear to give more shits while simultaneous;y caring less. JK, every comment that is negative take 3 years off my life. Be kind, rewind!

SD3 w/ mods:
Glass bed with QU-BD heat pad upgrade, threadless ballscrew w/ 8mm smooth rod, spectra line belt replacement, lawsy MK5 extruder, Lawsy replacement carriage, E3D hotend, Ramps 1.4 w/ reprap discount controller, DRV8825 drivers, 12v 30A PS, Acrylic case, Overkill Y-idlers, Filament alarm, Extruder fan + more.

12

Re: SuperDoodle - Design Progress

so, take that you heartless something something. (wow that was weak)

LOL, not sure if I should be offended, or LMAO at this point. =P

but back to the main topic...

not convinced on the need of 3 motors for Z axis..
three Z screws, yeah, maybe... but 3 motors?

keeping 2 motors in sync can be a struggle - 3 could become a nightmare.

But, hey, i am open to new ideas.. convince me!

SD4 #1 & #2 - Lawsy carriages, E3D v6, Rumba controller board, mirror bed plate, X motor fan, upgraded PSU & Mica bed heater
SD4 #3 - in the works ~ Folgertech FT-5, rev 1
Printit Industries Beta Tester - Horizon H1

13 (edited by 2n2r5 2019-02-24 03:25:59)

Re: SuperDoodle - Design Progress

heartless wrote:

so, take that you heartless something something. (wow that was weak)

LOL, not sure if I should be offended, or LMAO at this point. =P

but back to the main topic...

not convinced on the need of 3 motors for Z axis..
three Z screws, yeah, maybe... but 3 motors?

keeping 2 motors in sync can be a struggle - 3 could become a nightmare.

But, hey, i am open to new ideas.. convince me!

Look, I don't set out to convince anyone. What I do want is to redefine what is possible and what is acceptable. BUT! if that is wrong, why waste my time or yours? I just want to know why so I don't do it again.

I feel like that is a fair trade of progress for process. I will do my best to report what/why things aren't working. I just want people to rack their magnificent brains to figure out how to make things work.

SD3 w/ mods:
Glass bed with QU-BD heat pad upgrade, threadless ballscrew w/ 8mm smooth rod, spectra line belt replacement, lawsy MK5 extruder, Lawsy replacement carriage, E3D hotend, Ramps 1.4 w/ reprap discount controller, DRV8825 drivers, 12v 30A PS, Acrylic case, Overkill Y-idlers, Filament alarm, Extruder fan + more.

14

Re: SuperDoodle - Design Progress

2n2r5 wrote:
carl_m1968 wrote:
heartless wrote:

still not really convinced of the need of 3  Z motors, but will wait and see how things progress.

in the original logo, the "Soli" part of Solidoodle is a completely different font... so in keeping with that...

http://soliforum.com/i/?2m6tZBO.png

and knowack.. since the workbench is so much larger, what about "Megadoodle"?
LOL

http://soliforum.com/i/?NL3adSZ.png


Sounds like an 80's porn star....


I meant to report for harassment but since you were so mean I guess I'm going to have to retaliate. It's obviously not about the size, it's about how you abuse it. No one can abuse it like I do!

https://i.imgflip.com/1m7lrr.jpg


so, take that you heartless something something. (wow that was weak)


In all seriousness, well done Knowack! I know how hard the upgrades are. When you get to the point that the machine is no longer recognizable as what it use to be. That is an impressive/exhausting feat. Cheers all around. Now Heartless, tell me what I can do to improve my design. I know you have issues, but I want to know how to over come those issues!

Edit: I want to make it clear that I am not the person in the above photo! In "real life", I appear to give more shits while simultaneous;y caring less. JK, every comment that is negative take 3 years off my life. Be kind, rewind!


Not sure if you are joking or serious, but I was joking. Guess I just have a toilet sense of humor and others are less. To me everything is a dirty joke or can be made into one.. Life is just more fun and humorous that way.

Back on topic, I like to build and experiment as much as the next guy, but I prefer using already tried an true methods and I don't feel a need to reinvent the wheel. I will use what has been proven to work. In fact I use only one motor and screw but very heavy 10mm guide rods and an all aluminum build platform with a magnetic glass bed.

Printing since 2009 and still love it!
Anycubic 4MAX best $225 ever invested.
Voxelabs Proxima SLA. 6 inch 2k Mono LCD.
Anycubic Predator, massive Delta machine. 450 x 370 print envelope.

15

Re: SuperDoodle - Design Progress

nothing wrong with using 'tried & true", but there is generally little to no innovation to be found there.

I think 2n2r5 is trying to do a little innovating - looking at things from a different perspective, which is a good thing.
Whether or not it actually works remains to be seen, but my curiosity has been raised.

In fact I use only one motor and screw but very heavy 10mm guide rods and an all aluminum build platform....

LOL, the SD4 uses this configuration.. yes, the Z guide rods are 10mm on it... so yeah.. not much new there.

The FT-5 uses 4 guide rods and 2 lead screws for its 12"x12" bed platform.. the 1st generation used 2 motors - one for each side but there were issues with one motor being slightly out of sync with the other, even tho both were run from the same stepper driver..
In a relatively short time, they switched to a single motor driving both screws.
Even the massive new FT-6 uses a single motor for the bed assembly..

SD4 #1 & #2 - Lawsy carriages, E3D v6, Rumba controller board, mirror bed plate, X motor fan, upgraded PSU & Mica bed heater
SD4 #3 - in the works ~ Folgertech FT-5, rev 1
Printit Industries Beta Tester - Horizon H1

16 (edited by 2n2r5 2019-02-24 17:42:19)

Re: SuperDoodle - Design Progress

carl_m1968 wrote:

I like to build and experiment as much as the next guy, but I prefer using already tried an true methods and I don't feel a need to reinvent the wheel.

This is the Hacks & Mods section of the forum ...

SD3 w/ mods:
Glass bed with QU-BD heat pad upgrade, threadless ballscrew w/ 8mm smooth rod, spectra line belt replacement, lawsy MK5 extruder, Lawsy replacement carriage, E3D hotend, Ramps 1.4 w/ reprap discount controller, DRV8825 drivers, 12v 30A PS, Acrylic case, Overkill Y-idlers, Filament alarm, Extruder fan + more.

17 (edited by carl_m1968 2019-02-24 19:05:34)

Re: SuperDoodle - Design Progress

2n2r5 wrote:
carl_m1968 wrote:

I like to build and experiment as much as the next guy, but I prefer using already tried an true methods and I don't feel a need to reinvent the wheel.

This is the Hacks & Mods section of the forum ...


Hacks and mods usually consist of add ons that modify the current purpose or performance. Adding three steppers to the Z platform adds no performance boost nor does it change it's purpose since you are simply doing what one or two motors can already do.

Understand  I am not knocking your idea. I am simply pointing out in my opinion it is a useless effort and waste of time and resources that could be better spent on another part of the printer that could actually use improvement. You did say you wanted to bump ideas and not all ideas will agree with yours.

Things like the print head could be improved. If you want to use flexible filament you will not be able to use effectively a bowden set up. So you might want to consider a print head that allows swapping between a bowden and direct drive setup.

Another issue is power. I am not sure that even a 24 volt supply would be able to get a hotend to your required 400 degrees and maintain it over the time of an entire print. You may need to look into a 48 volt system which is going to then require DC to DC converters to step down the voltage for the steppers and logic.

Printing since 2009 and still love it!
Anycubic 4MAX best $225 ever invested.
Voxelabs Proxima SLA. 6 inch 2k Mono LCD.
Anycubic Predator, massive Delta machine. 450 x 370 print envelope.

18

Re: SuperDoodle - Design Progress

I assumed the three motor idea was to have the motors independently controlled so he could have true auto bed leveling. Because what they call auto-levelling in firmware these days is really assistance with manual levelling or compensation for out of level is it not?. There is no mechanism to actually level the bed.

With three independently driven motors and a probe, it could literally level itself. An actual physical self-leveling system would be innovative would it not?

Personally I still think it's the wrong direction. Aim to build a printer that can be manually levelled and then stays level is how I would go.

However, I'm always interested to see what 2n2r5 gets up to. His threadless ballscrew design drives two of my printers z-axis
to this day though people would swear up and down at the time that it was not a good method.

19

Re: SuperDoodle - Design Progress

justsomeguy wrote:

However, I'm always interested to see what 2n2r5 gets up to. His threadless ballscrew design drives two of my printers z-axis
to this day though people would swear up and down at the time that it was not a good method.

Thanks, and I just pulled my old bed apart and the threadless ballscrew is still solid. I though that it would have yielded over time. Neat to hear someone still enjoying success with it.

SD3 w/ mods:
Glass bed with QU-BD heat pad upgrade, threadless ballscrew w/ 8mm smooth rod, spectra line belt replacement, lawsy MK5 extruder, Lawsy replacement carriage, E3D hotend, Ramps 1.4 w/ reprap discount controller, DRV8825 drivers, 12v 30A PS, Acrylic case, Overkill Y-idlers, Filament alarm, Extruder fan + more.

20

Re: SuperDoodle - Design Progress

justsomeguy wrote:

I assumed the three motor idea was to have the motors independently controlled so he could have true auto bed leveling. Because what they call auto-levelling in firmware these days is really assistance with manual levelling or compensation for out of level is it not?. There is no mechanism to actually level the bed.

There is actually. At least with Smoothieware there is. It is a form of active real time leveling during printing.

Smoothie will use a probe either RF, touch, or proximity to map the bed  before each print. It does this by dividing the bed up into 16, 24, or 36 sections depending on the bed size. It will then probe the center of each of the points and store the height of that position in regards to the known zero height which is usually the center height for ease of reference.

Then during printing it will actually raise or lower the print height the needed height to compensate for the plus or minus in bed height for that zone of the bed the head is currently in. This means for one layer there will be many micro adjustments in Z height as the print head moves through the various mapped zones of the bed.

This leveling scheme only works with true 32Bit processors such as what smoothieboards have and I believe the duet has as well. It requires to much math and fast calculations for a RAMPS or similar board to pull off.

Printing since 2009 and still love it!
Anycubic 4MAX best $225 ever invested.
Voxelabs Proxima SLA. 6 inch 2k Mono LCD.
Anycubic Predator, massive Delta machine. 450 x 370 print envelope.

21

Re: SuperDoodle - Design Progress

carl_m1968 wrote:
justsomeguy wrote:

I assumed the three motor idea was to have the motors independently controlled so he could have true auto bed leveling. Because what they call auto-levelling in firmware these days is really assistance with manual levelling or compensation for out of level is it not?. There is no mechanism to actually level the bed.

There is actually. At least with Smoothieware there is. It is a form of active real time leveling during printing.

Smoothie will use a probe either RF, touch, or proximity to map the bed  before each print. It does this by dividing the bed up into 16, 24, or 36 sections depending on the bed size. It will then probe the center of each of the points and store the height of that position in regards to the known zero height which is usually the center height for ease of reference.

Then during printing it will actually raise or lower the print height the needed height to compensate for the plus or minus in bed height for that zone of the bed the head is currently in. This means for one layer there will be many micro adjustments in Z height as the print head moves through the various mapped zones of the bed.

This leveling scheme only works with true 32Bit processors such as what smoothieboards have and I believe the duet has as well. It requires to much math and fast calculations for a RAMPS or similar board to pull off.

The feature you describe is what I was referring to as out of level compensation. It's compensating for an out of level bed, not changing the level of the bed. Still, it's a very cool feature.

22

Re: SuperDoodle - Design Progress

Added progress updates.

SD3 w/ mods:
Glass bed with QU-BD heat pad upgrade, threadless ballscrew w/ 8mm smooth rod, spectra line belt replacement, lawsy MK5 extruder, Lawsy replacement carriage, E3D hotend, Ramps 1.4 w/ reprap discount controller, DRV8825 drivers, 12v 30A PS, Acrylic case, Overkill Y-idlers, Filament alarm, Extruder fan + more.

23

Re: SuperDoodle - Design Progress

Did you abandon this project 2n2r5?

24

Re: SuperDoodle - Design Progress

It appears post # 23 of this thread was his most recent post on this forum. HMM

Soliddoodle 4 stock w glass bed------Folger Tech Prusa 2020 upgraded to and titan /aero extruder mirror bed
FT5 with titan/ E3D Aero------MP mini select w glass bed
MP Utimate maker pro-W bondtech extruder
Marlin/Repetier Host/ Slic3r and Cura

25

Re: SuperDoodle - Design Progress

I haven't abandon this. I have put the final touches on hold as I get through a large project at work. The current status is that I need to find a better xy carriage assembly. I think I totally messed up that whole process and I am going to start that over. I will happily accept other peoples revisions to the project if someone wants to join in. Send me a DM and I will add you as a contributor if you want to pull the most recent copy.

SD3 w/ mods:
Glass bed with QU-BD heat pad upgrade, threadless ballscrew w/ 8mm smooth rod, spectra line belt replacement, lawsy MK5 extruder, Lawsy replacement carriage, E3D hotend, Ramps 1.4 w/ reprap discount controller, DRV8825 drivers, 12v 30A PS, Acrylic case, Overkill Y-idlers, Filament alarm, Extruder fan + more.