1 (edited by david.tucker 2018-11-23 21:03:21)

Topic: print gcode files to miniMaker

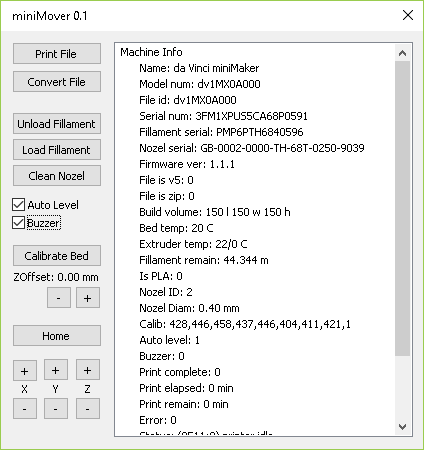
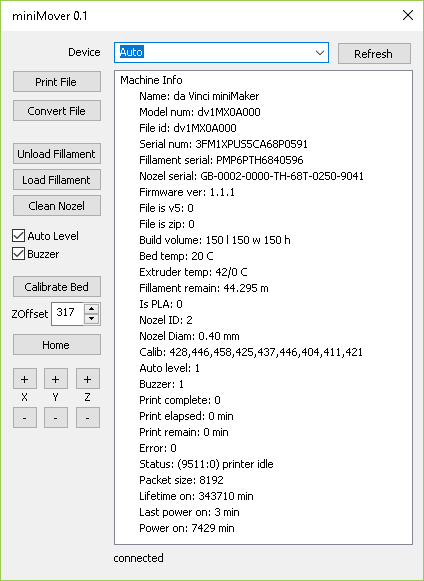
I made a new utility called miniMover that lets you send gcode files to a miniMaker, or any other XYZ 3D printer that uses the V3 serial protocol.  This includes the Jr line, the new Pro line and the wireless mini and unreleased micro.  This is inspired by the various threedub projects but is based on a fresh reverse engineering of the protocol.

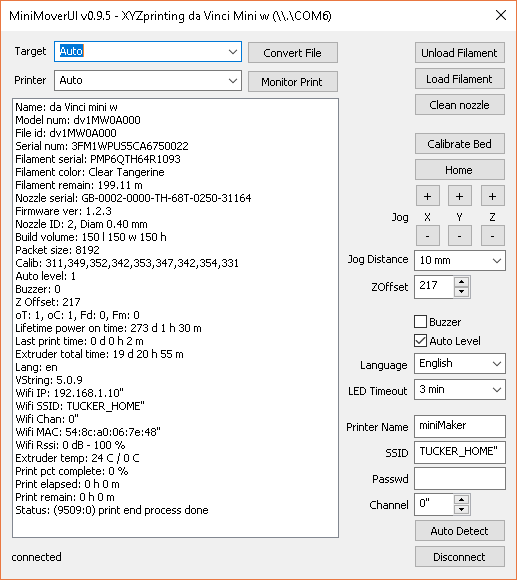
This comes in both a command line and UI variant.

You can download the utility and source code from here https://github.com/reality-boy/miniMover.  The exe is also attached below.

To use just pass a file to minimover or apply one of these arguments for more advanced control.

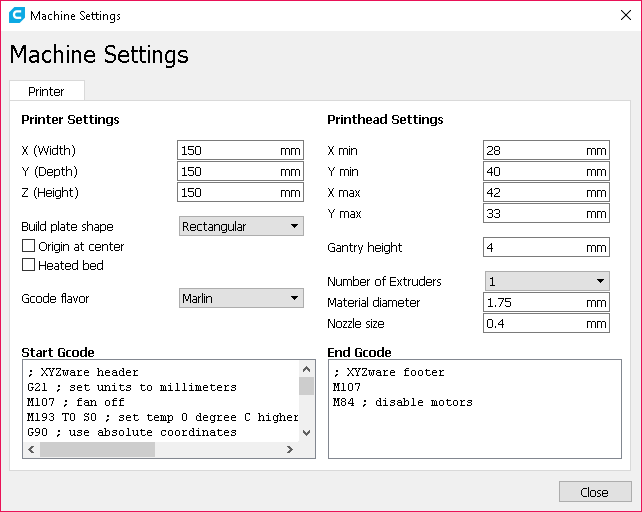
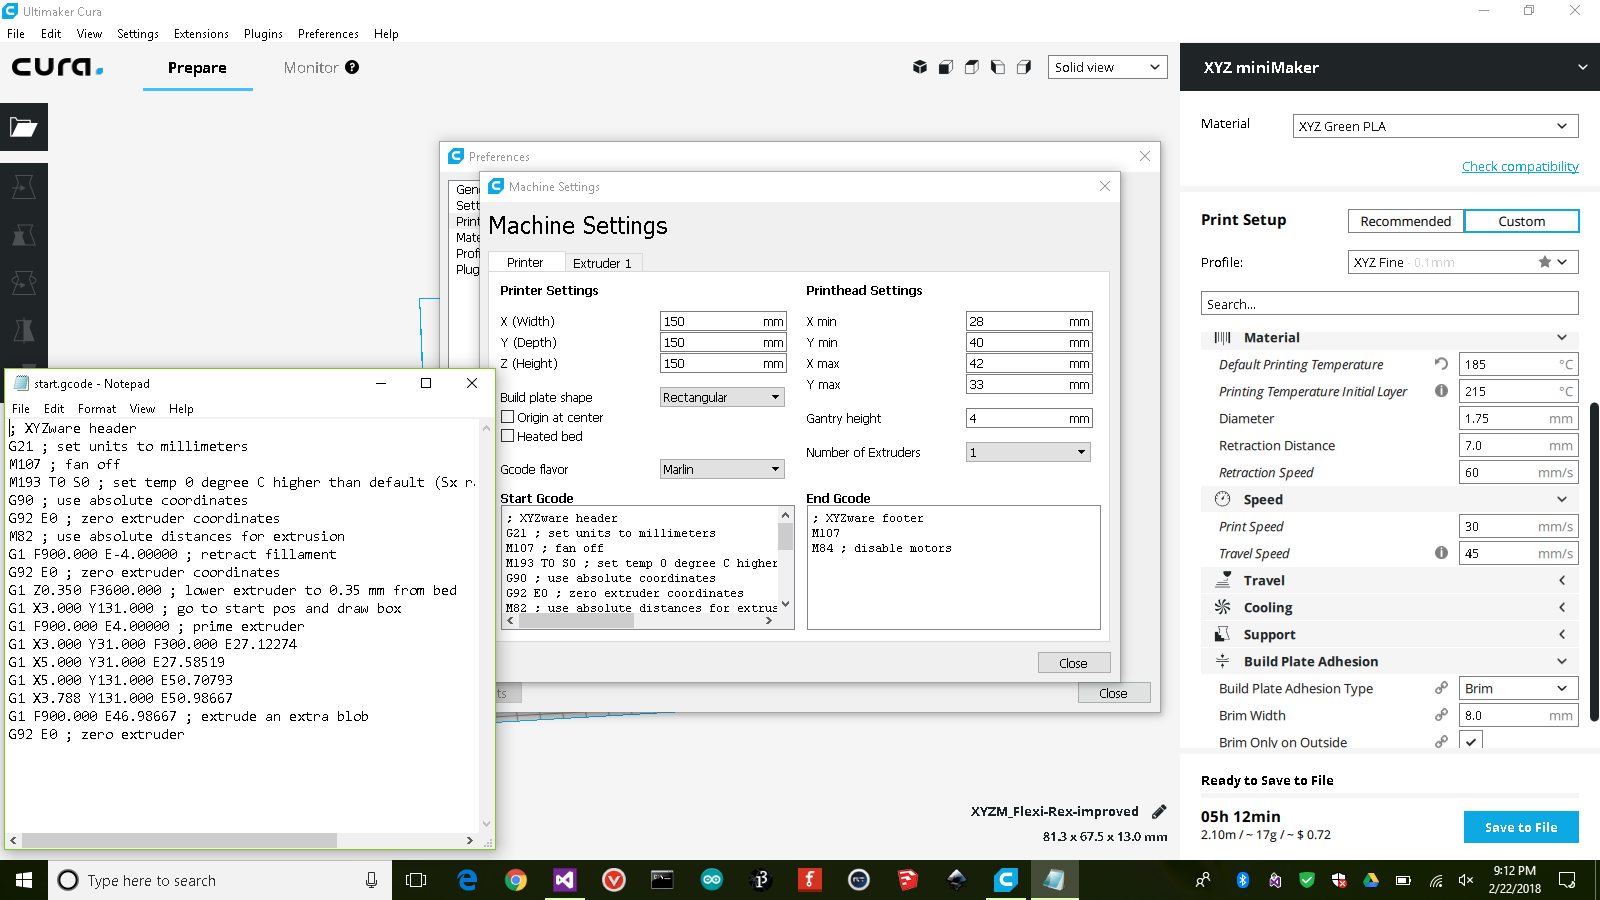
  file - print file if .gcode, otherwise convert to gcode if .3w
  -d devName - set serial port device name or wifi ip address, -1 auto detects port
  -po devName - set serial port device name, -1 auto detects port
  -c file - convert file
  -p file - print file
  -f file - upload firmware, experimental!
  -r - print raw status
  -s - print status
  -? - print help message

* The following only work on machines that lack an LCD *

  -a+ - enable auto level
  -a- - disable auto level
  -b+ - enable buzzer
  -b- - disable buzzer
  -cl - clean nozzle
  -ca - calibrate bed
  -h - home printer
  -l - load filament
  -o num - increment/decrement z offset by num
  -u - unload filament
  -x num - jog x axis by num, or 10 if num not provided
  -y num - jog y axis by num, or 10 if num not provided
  -z num - jog z axis by num, or 10 if num not provided

This works with the following printers over a USB connection (no wireless support yet).

da Vinci nano
da Vinci nano w
da Vinci mini w
da Vinci mini wA
da Vinci mini w+
da Vinci miniMaker
da Vinci Jr. 1.0
da Vinci Jr. 1.0 Wireless
da Vinci Jr. 1.0A
da Vinci Jr. 1.0 Pro
da Vinci Jr. 1.0w Pro
da Vinci Jr. 1.0 3in1
da Vinci Jr. 1.0 3in1 (Open filament)
da Vinci Jr. 2.0 Mix
da Vinci 1.0 Pro
da Vinci 1.0A Pro
da Vinci 1.0 Pro 3in1
da Vinci Super

These printers use an older communication protocol so can't communicate with them but we can still convert gcode to 3w files and use XYZWare to send it to the printer.

da Vinci 1.0
da Vinci 1.0A
da Vinci 1.0 AIO
da Vinci 1.1 Plus *** May partially work over usb
da Vinci 2.0 Duo
da Vinci 2.0A Duo

The da Vinci Color uses a different file format and communication protocol and is also not supported.

Updates:
1/12/18 - fix crash in release build
1/15/18 - add support for pause/resume/cancel of print job, attempt to set print length properly in 3w file
2/19/18 - Initial support for windows UI, needs work.
2/24/18 - Cleanup to UI, it is much better behaved now.
3/07/18 - Better handling of status string, fixed zoffset issue
3/11/18 - Improved serial handling
3/18/18 - Support older zip based .3w file format
3/25/18 - Fix print bug, better debug logging
5/19/18 - Released 0.9, many bug fixes, set new parameters
10/05/18 - Released 0.9.5, initial wifi support and linux/mac

http://soliforum.com/i/?lCv3Sh3.png

Post's attachments

miniMover 0.9.5.zip 256.11 kb, 925 downloads since 2018-11-23 

You don't have the permssions to download the attachments of this post.

2

Re: print gcode files to miniMaker

I just found a nasty bug in my code that causes this to crash when run outside of the debugger.  I will put up a new version later tonight that fixes the issue.

3

Re: print gcode files to miniMaker

Ok, I fixed the issue, I had a typo that caused me to write off the end of an array.  This should all work now.

4

Re: print gcode files to miniMaker

Good job! Thanks for sharing

5

Re: print gcode files to miniMaker

Thank you very much for this :-)

Could you also share your slicer program profile? (I also own the MiniMaker)

6 (edited by david.tucker 2018-01-16 01:49:37)

Re: print gcode files to miniMaker

touliloup wrote:

Thank you very much for this :-)

Could you also share your slicer program profile? (I also own the MiniMaker)

I'm still working on that myself.  I am trying to use Cura 2.7, since it is relatively intuitive to use and still has lots of power.  Last night I had my first successful print.  Everything looks good but I think the nozzle is running a bit hot, I printed a rabbit and the ears were a bit melted on the underside.

I will give you my settings for you to start with, but these could use some more tweaking.

First I had to raise my z-offset in XYZWare to make everything work, I found that Cura does not let you adjust the brim thickness and so you can only control it via the z-offset adjustment.  I leveled the bed and did general maintenance (cleaned the nozzle etc).  Then I adjusted the z-offset as instructed by XYZ using a business card as a feeler gauge. 

I then ran a test print from cura and got a lot of clicking from the printer and very little plastic on the bed so I used an iterative approach to work out the optimal height.  I raised the z-height by 1mm and nothing stuck so I lowered it by 0.5 and things stuck quite nicely.  At some later date I may try going up and down by 0.25 mm to see if it works better.  Anyway on my machine I ended up with a z-offset of 3.17 mm, if that helps at all.  Using a pair of calipers my brim was coming out at a thickness of just over 3 mm and the first layer was also 3mm as requested by Cura. 

As near as I can figure the z-offset sets the minimum first layer height, so if the printer request a 1 mm first layer but the z-offset is 3 you get 3mm, but if the printer requests a 4 mm first layer you get 4mm.

In cura I setup a custom printer with a 150x150x150 mm build volume, a 0.4 mm nozzle and 1.75 mm diameter filament.  My filament actually measures at 1.76 mm but for now I'm keeping it at 1.75, that is an experiment for another day.

I swapped out the start gcode with this one from the xyzware gcode:

; XYZware header
G21 ; set units to millimeters
M107 ; fan off
M193 T0 S0 ; set temp 0 degree C higher than default (Sx ranges from S-10 to S10)
G90 ; use absolute coordinates
G92 E0 ; zero extruder coordinates
M82 ; use absolute distances for extrusion
G1 F900.000 E-4.00000 ; retract fillament
G92 E0 ; zero extruder coordinates
G1 Z0.350 F3600.000 ; lower extruder to 0.35 mm from bed
G1 X3.000 Y131.000 ; go to start pos and draw box
G1 F900.000 E4.00000 ; prime extruder
G1 X3.000 Y31.000 F300.000 E27.12274
G1 X5.000 Y31.000 E27.58519
G1 X5.000 Y131.000 E50.70793
G1 X3.788 Y131.000 E50.98667
G1 F900.000 E46.98667 ; extrude an extra blob
G92 E0 ; zero extruder

And the end gcode is this:

; XYZware footer
M107
M84 ; disable motors

All other settings remain the same

I used the default fine profile in cura but lowered the print speed from 60 to 15 and lowered the travel speed from 150 to 60.  At higher speeds I was getting shifting on my x axis.  I can probably bump these speeds up some, and I need to double check that my x axis belt is properly tensioned.  I also enabled the brim, I have the worst time getting prints to stick without it.

Finally I just hit the 'save to file' button in the lower right corner and then dropped the resulting gcode file onto my miniMover exe.

http://soliforum.com/i/?83tIDF2.png

Post's attachments

miniMaker print profile.curaprofile 2.92 kb, 283 downloads since 2018-01-15 

You don't have the permssions to download the attachments of this post.

7

Re: print gcode files to miniMaker

I'm working on cleaning up my code some more.  I have added in the option to pause/resume a print and cancel a print immediately.  I'm also going to work on setting the z-offset using absolute coordinates as well.  And I am slowly prepping things for an eventual UI I hope to add onto this so it is simpler to use.

I have worked out that with recent firmwares you can send the gcode command M193 T0 SX to adjust the temperature of the nozzle, where SX ranges from S-10 to S10 and is a relative adjustment up or down from the temp set in the RFID tag in the filament spool.  I have not tested this out yet, but I am confident it works.

I need to add in better logging on temp, maybe keeping track of some statistics.  Using just a casual glance it seems that the temp on my machine is running 3-4 degrees hotter than requested and initially there is a lot of fluctuation.  I don't know if you can adjust the PID loop for the nozzle temp using gcode commands, but I suspect you can not.  However we may be able to correct for an overall offset one way or the other.

I also modified my printer with a small cooling fan that is just wired into a 24 volt line on the printer with a switch to turn it off. I need to do some more experiments with this as well to see if it really helps at all.  Initial indications are that it helps a little bit but not much.  Unfortunately there is only about 3 mm of clearance between the nozzle and bottom of the print head so it is hard to make something that blows a lot of air at the part.  Right now I am loosing about half the flow volume of my fan because of restrictions in the nozzle.  I measured this by timing how long it takes to fill a garbage bag with air with and without the nozzle.

Oh, and I have a sheet of buildtack on my print bed, that seems to have been a good investment.  Parts stick better to it than to the tape and glue, and the finish on the bottom is more uniform as well.  Plus I just wipe it with some alcohol to get the stickiness back.

8 (edited by david.tucker 2018-01-16 01:36:21)

Re: print gcode files to miniMaker

Here is my fan.  I temporarily mounted it with double sided foam tape.  There is a small gap on the left side of the nozzle that has just enough clearance for the fan. http://soliforum.com/i/?ovWEWTd.jpg

9

Re: print gcode files to miniMaker

Your fan blows down, and you change direction toward right with the green duct, that is where most energy lost.

Change the fan direction toward right down, and guide the direction towards 3mm under the nozzle will give you better energy efficiency. You can design something to fuse your green duct with the fan protector to replace the current hotend fan protector so that you can mount your layer cooling fan on the hotend fan protector.

(Da Vinci 1.0, Jr. 1.0 RAMPS, miniMaker) X4, (Creality CR-10S, CR-10 mini, Ender-3) X4, Anycubic MEGA X4, Anycubic Chrion X1, ADMILAB Gantry X2 (MonoPrice Maker Select V2, Plus, Ultimate)X4--Select mini X1, Anycubic photon X4, Wanhao duplicate D7 X1.
iNSTONE Inventor Pro X2, CTC Dual X2, ANET-A8, Hictop 3DP-11, Solidoodle Press, FLSUN I3 2017X1

10 (edited by david.tucker 2018-01-16 01:48:43)

Re: print gcode files to miniMaker

yizhou.he wrote:

Your fan blows down, and you change direction toward right with the green duct, that is where most energy lost.

Change the fan direction toward right down, and guide the direction towards 3mm under the nozzle will give you better energy efficiency. You can design something to fuse your green duct with the fan protector to replace the current hotend fan protector so that you can mount your layer cooling fan on the hotend fan protector.

Changing direction is not the biggest problem, it is the surface area of the fan opening vs nozzle opening.  The nozzle opening is somewhere around 1/5 the area of the fan.  I did some experiments on this, plugging up the fan opening with tape, and you can only reduce the surface area by 1/2 before the fan starts to loose energy.

Also it is super tight in the case, I have almost no clearance around the fan.  I spent some time trying different locations trying to find a way to fit a fan in, this was one of the only options.  The other ok option is to mount the fan directly above the extruder and use a long duct to bring the air down.

I did think about replacing the shroud around the hot end with a custom part but decided against it for several reasons.  First my 3D modeling skills are weak, and I can only print PLA (heat is bad) and this is a rather elaborate part.

In a future version I will probably make the opening as wide as the extruder block, I can probably get 2x as much air flow that way.  I may hunt around for a more compact fan as well, then I can experiment with other mounting options.

I did buy a 6" box fan and mounted it to the back of the machine to just blast everything with air, but I did not see much benefit from that either.  I think the way the extruder is setup it is just difficult to get good air ddsflow to the plastic that is being extruded.

11

Re: print gcode files to miniMaker

Ok, I pushed up a new version with some small fixups in it.  The biggies are now you can hit space to pause/resume a print in progress and hit any other key to cancel a print.  Also I attempt to strip out the print time and filament used parameters from your gcode to get a better estimate of print time. 

Initial tests indicate that this does not work very good, but I need to make some more tests to see if it is just working as designed or if I need to parse out even more data.  Basically I get a print time estimate now, but the estimate is way too low initially and it grows over time as the print continues.  It is off by a factor of 10 initially.

12

Re: print gcode files to miniMaker

That's great, thanks for sharing all of those info.

I'll try on my printer, but still trying to get a grasp of how everything works :-)

For the print time, XYZWare also have a hard time giving a precise estimate, sometimes displaying up to 10h of estimated remaining time after 10minutes of print for a total of 2 hours printing time...

13

Re: print gcode files to miniMaker

I was running some temp tests and worked out that the M193 T0 SX command does not adjust the temp relative to the default temp, but relative to the last temp.  So if you call M193 T0 S2 and follow it with M193 T0 S1 you don't end up with a temp 1 degree above default but 3 degrees above default.

On the upside it looks like M104 and M109 work as expected to set the temp directly.

14

Re: print gcode files to miniMaker

So I have been trying to work out a proper profile in Cura now that I can actually adjust everything.
For starters I have been experimenting with print speed and temperature.  I printed these three temp towers.
  The one on the left goes from 210 C at the bottom to 250 at the top, with no cooling fan, and is a complete mess.  The one on the middle goes from 210 on the bottom to 170 on the top and is ok, but with poor overhangs. You can't tell in the picture but from 200 to 210 there are zits on the side of the blocks.  The one on the right is the same as the middle but with the fan turned on.  It looks much better but with tiny zits between 200 and 210.

http://soliforum.com/i/?ARL2QQo.jpg

With that info in hand I tried to print at 195 degrees but it would not stick to the bed.  I bumped up the first layer temp to 210 and now it is sticking nicely.

Next I printed some squares with small details in them (an x and y) to check for ringing.  I found that there is light ringing when running with a speed of 60, but going down to 20 removed almost all the ringing.  The ringing was not that bad but if you want perfect prints then go slow.

I spent some time playing with acceleration and jerk limits as well but mostly those seem to only slow down the print.

I'm tackling a tolerance test now, that is my main goal, to print inner holes and features with some accuracy.  I found that the xyzware software reduced my holes by a whole millimeter, too much for my needs.

15

Re: print gcode files to miniMaker

Still to do is to thin down the start/end gcode I copied out of the xyz header.  I would like to eventually get rid of the wipe strip so I can use the whole bed among other things.

16

Re: print gcode files to miniMaker

Interesting tool, was actually trying to write something similar, but failed to create a proper .3w file so far.
Do you mind sharing an executable of the latest version? I can't set up a visual studio environment atm (i'm on linux), but would try to run it using wine :-)
Thank you for documenting/sharing your findings and publishing your code!

17

Re: print gcode files to miniMaker

Sorry about that, I had it attached to the first post but I must have messed up the attachment at some point. I have it uploaded on git hub and attached to the first post now.  Someday I will figure out how to do releases on git hub as well...

18 (edited by david.tucker 2018-02-06 02:05:14)

Re: print gcode files to miniMaker

Just a quick update, I am about 90% of the way through adding in a proper windows UI for this.  I have a simple thread handler in place that wraps up the base communication class and the UI is all up and running.  I just need to take care of a few signals so that the UI is more responsive.  I will keep the command line version as well, both share a common set of classes so only the interface logic changes.

Anyway work is slow since this is just for fun, I have to fit it in around work and family.  I'm hoping to start testing the code on my end next week and maybe have something up to you the week after.

http://soliforum.com/i/?bg9uSll.png

19

Re: print gcode files to miniMaker

Looks good. I will have to give it a try.

20

Re: print gcode files to miniMaker

Thank you very much! I can confirm that miniMover can be run under linux using wine. I just converted a tricky gcode file and send it to the printer. No issues so far.

21

Re: print gcode files to miniMaker

madman907 wrote:

Thank you very much! I can confirm that miniMover can be run under linux using wine. I just converted a tricky gcode file and send it to the printer. No issues so far.

Good to hear!  It would not be too hard to port the code over to linux, all that is windows dependent is the serial code and that is isolated into its own class.

22 (edited by david.tucker 2018-02-19 21:07:42)

Re: print gcode files to miniMaker

Ok, my UI is up and running.  See the first post to download it.

I'm probably going about this all wrong.  I'm trying to share the base libraries between the command line and windows UI but the base libraries can block for several seconds, or even minutes on some commands. 

I'm throwing the worst offenders into there own thread and letting everything else just block the UI while it runs.  That is ok, but not great.  It would probably be better to turn this all into a state machine and let windows pump while we wait on the serial port.  There is certainly nothing here that requires multithreading, and in fact it just adds to the complication.

Anyway I wanted to get this out there before it stalled out completely, feel free to use it but realize that it may hang up for a while when you click on a button.  Feedback is greatly apriciated, let me know how well it works for you and what machines you may have tried it on.

http://soliforum.com/i/?8IOJXEv.png

23

Re: print gcode files to miniMaker

I had some time to mess with my printer and I think I have it dialed in fairly well.  I was able to print a rather large part using cura and my mini mover app without it all exploding.  Attached is a screen shot of all the relavant settings in cura. 

The really important thing to do is to make sure the filament diameter is set to 1.75 and not 3.0 mm, and it is worth lowering the print speed at least initially.

I'm currently using a z-offset of 325 nm, I still can't work out why it needs to be so large but that works very well for me.

http://soliforum.com/i/?dBsKc3A.png

24

Re: print gcode files to miniMaker

My UI seems to be working well.  I'm thinking of dumping the thread and just letting the UI block while uploading a file to the printer.  It would simplify my code a lot and it would properly block the UI from doing anything while the serial port is buisy.  Right now I have a hack to ignore button input but it is wonky.

I'm also thinking of how to monitor the print job without making the UI overly complicated.  You can hit the refresh button now to update the info tab and if you know what you are doing you can watch the print progress, but it is not super obvious.  It would be better to have a progress bar, and a pause/cancel button.

Finally I have a wacky bug I can't figure out.  When running in release mode the nozzle diameter increments every time you refresh the info tree, however that is set using a constant and should not change.  I must have a memory leak somewhere but I can't find it.  In debug builds it works just fine, of course.

25

Re: print gcode files to miniMaker

Nice work! Thanks for all you hard work. Personally, I'm just using the command-line tool in my conversion/print script and it works like a charm with my minimaker. Have you ever tought of creating a Cura-Plugin for printing from Cura directly? Would save some time. I have to save the gcode file and call my script on the gcode to get it printed. Not a big deal, but...