1

Topic: solidoodle 2 extruder upgrade

I am currently printing a lawsy mk5 extruder assembly and considering the e3d hotend.  I am trying to find a parts list or BoM for a full extruder assembly.  I wanted to keep the existing assembly as a backup, so I'm trying to figure out what i need to buy to rebuild one from scratch.

Does anyone know where i can find this information?

Thanks

2 (edited by driggers 2016-02-13 22:06:58)

Re: solidoodle 2 extruder upgrade

I *just* finished the e3d mod for my SD2 and it's amazing!  I haven't yet edited the video tutorial I recorded, but I can summarise here.  I preserved the original hot-end and connectors, for the most part.

Edit: I just realised I answered the wrong question.   big_smile

First, I'm sure you know about http://www.soliwiki.com/E3D_extruder, and I assume you are going to get an E3D or similar kit.  You'll be following this to the letter if you get the latest: http://wiki.e3d-online.com/wiki/E3D-v6_Assembly

Things to print before install:
Extended Z-stop http://www.thingiverse.com/thing:135575
mk5 extruder assembly http://www.thingiverse.com/thing:111213
but with special mk5 for e3d part http://www.thingiverse.com/thing:393928  (there is also this one http://www.thingiverse.com/thing:946800, and a bowden version http://www.thingiverse.com/thing:1275636 )
(optional) for safety, print this before wiring your PSU http://www.thingiverse.com/thing:40377

Print all strucrual parts at high infill in ABS (especially the hot-end holder, but also z-top, since that will be inside warm printer).

Hardware:
a better 12v PSU than stock http://www.soliwiki.com/Upgrade_The_Power_Supply 360w switching PSU is best

Wires and connectors:
-Connector from fan to any constant 12v output - I just connected this straight to the 12v PSU for the moment.
-Connector from the thermistor to the board - I just used a jst plug from a lithium battery pack http://www.ebay.co.uk/itm/351067025481
-Connector from the e3d hot end to the board - I temporarily used one of those jst plugs above, but they are not very thick, so I have now cannibalised the original SD2 bed heater connector (because I now have a DC-DC SSR for bed heater and use one of the JST connectors from board to SSR).  In any case, the JST plug wires didn't get warm.
-You need shrink tubing to make nice connections.
-A roll of kapton tape, since you'll be taking things apart at the extruder and then taping them snugly back together.
-Small tie wraps to organise wires.

Tools:
-an adjustable spanner
-another adjustable spanner or similar to tighten hot end nozzle while holding the heating block
-long hex drivers for those m3 bolts.  consider drilling a hole in the top of the SD2 to access the z-stop adjust, and that it will be further down after you extend the z-stop (or you will go crazy)
-simple soldering iron / station
-something to efficiently fish wires through the wire tube.
-(optional) a drill and bits to put holes in the SD2 frame.  I make holes with total abandon big_smile

Abilities:
- flashing firmware:  you need to change the thermistor value in firmware.  If it's an absolute MUST, you can try and rig up the stock thermistor, but mind you'll need to change the insulation for the heat-resistant stuff that comes with the e3d.

Here is my wiring as of last night:
http://i.imgur.com/F5pplKI.jpg

SD2 Sanguinololu 1.3a atmega1284p, wood platform, lawsy's carriages, braided fishing line, pallet wood overhead spool mount, carboard/magnet enclosure, glass bed, E3D v6, bed levelling knobs, extended z-stop, 25A DC-DC SSR for bed heater, everything fixed to the SD2 frame, marlin firmware with some adjustments and extra failsafes enabled.  I'll never give up on you, little printer that could(n't)!

3

Re: solidoodle 2 extruder upgrade

maaltan wrote:

I am currently printing a lawsy mk5 extruder assembly and considering the e3d hotend.  I am trying to find a parts list or BoM for a full extruder assembly.  I wanted to keep the existing assembly as a backup, so I'm trying to figure out what i need to buy to rebuild one from scratch.

Does anyone know where i can find this information?

Thanks

Like many, I recommend the E3D 100%.
As for the extruder parts....
3x M5 washers
1x 625zz bearing
1x M3x35mm socket cap screw
?x M3x20mm screws
1x M3 washer
1x M3 knurled nut
1x M3 nut
The parts with question marks are ones I do not remember how many were needed. But I know you will want to grab a few M3x12mm and M3x16mm. Even if these aren't needed or you have a few left over, it is wise to stock up on M3 screws of all lengths.

Printit Mason and Printit Horizon printers
Multiple SD2s- Bulldog XL, E3D v5/v6/Lite6, Volcano, Hobb Goblin, Titan, .9 motor, Lawsy carriages, direct Y drive, fishing line...the list goes on
Filawinder and Filastruder #1870.....worth every penny!

4 (edited by maaltan 2016-02-16 17:19:34)

Re: solidoodle 2 extruder upgrade

Sigh, I never realized how annoying it was to try to buy metric stuff in the US.  I'm trying to find a nice socket cap head metric screw assortment somewhere. The only thing i found close to what i need ships from Asia.

I looked at Mcmaster Carr and it seems i can only buy specific screws in lots of 100.

Does anyone have any suggestions where i can get a good metric bolt "starter kit"? 

Driggers:
I look forward to your videos.  I would definitely like to see how everything comes together.  Also that picture explains your slightly odd comment I've been meaning to ask you about in the other thread about attaching an old piece of pallet as a spool holder.  A great and simple mod. Unfortunately, i run my printer in a cool room, so i have to keep it enclosed or my ABS prints curl up into themselves.

Also, dang that SSR is huge.  I expected something that fit on a perf board.  I guess at 25A it couldn't be too small.  I assume this is heating your bed?   Are you still running your hot end from the motherboard?

5

Re: solidoodle 2 extruder upgrade

maaltan wrote:

Also, dang that SSR is huge.  I expected something that fit on a perf board.  I guess at 25A it couldn't be too small.  I assume this is heating your bed?   Are you still running your hot end from the motherboard?

Yeah SSR for the bed.  I didn't really look for anything smaller, just the cheapest thing out there.  Hot end from motherboard, should be no problem.

SD2 Sanguinololu 1.3a atmega1284p, wood platform, lawsy's carriages, braided fishing line, pallet wood overhead spool mount, carboard/magnet enclosure, glass bed, E3D v6, bed levelling knobs, extended z-stop, 25A DC-DC SSR for bed heater, everything fixed to the SD2 frame, marlin firmware with some adjustments and extra failsafes enabled.  I'll never give up on you, little printer that could(n't)!

6

Re: solidoodle 2 extruder upgrade

maaltan wrote:

Sigh, I never realized how annoying it was to try to buy metric stuff in the US.  I'm trying to find a nice socket cap head metric screw assortment somewhere. The only thing i found close to what i need ships from Asia.

I looked at Mcmaster Carr and it seems i can only buy specific screws in lots of 100.

Does anyone have any suggestions where i can get a good metric bolt "starter kit"? 

Driggers:
I look forward to your videos.  I would definitely like to see how everything comes together.  Also that picture explains your slightly odd comment I've been meaning to ask you about in the other thread about attaching an old piece of pallet as a spool holder.  A great and simple mod. Unfortunately, i run my printer in a cool room, so i have to keep it enclosed or my ABS prints curl up into themselves.

Also, dang that SSR is huge.  I expected something that fit on a perf board.  I guess at 25A it couldn't be too small.  I assume this is heating your bed?   Are you still running your hot end from the motherboard?

Try MrMetric.com
You pay more per screw, but can buy individually

Printit Mason and Printit Horizon printers
Multiple SD2s- Bulldog XL, E3D v5/v6/Lite6, Volcano, Hobb Goblin, Titan, .9 motor, Lawsy carriages, direct Y drive, fishing line...the list goes on
Filawinder and Filastruder #1870.....worth every penny!

7

Re: solidoodle 2 extruder upgrade

this pic gives me an idea for my dream modded SD3. duct the entire back electronics area including PSU and leave bottom screened about 2" from desk top then use cooling fans at top to draw air through the electronics cabinet and direct it into Build area enclosure (with removable plexi sides front door and box on top with duel filament spool rack. then place charcoal filtered exhaust fan on top. that way electronics stay cool, build area stays warm and fumes go bye bye.


driggers wrote:

I *just* finished the e3d mod for my SD2 and it's amazing!  I haven't yet edited the video tutorial I recorded, but I can summarise here.  I preserved the original hot-end and connectors, for the most part.

Edit: I just realised I answered the wrong question.   big_smile

First, I'm sure you know about http://www.soliwiki.com/E3D_extruder, and I assume you are going to get an E3D or similar kit.  You'll be following this to the letter if you get the latest: http://wiki.e3d-online.com/wiki/E3D-v6_Assembly

Things to print before install:
Extended Z-stop http://www.thingiverse.com/thing:135575
mk5 extruder assembly http://www.thingiverse.com/thing:111213
but with special mk5 for e3d part http://www.thingiverse.com/thing:393928  (there is also this one http://www.thingiverse.com/thing:946800, and a bowden version http://www.thingiverse.com/thing:1275636 )
(optional) for safety, print this before wiring your PSU http://www.thingiverse.com/thing:40377

Print all strucrual parts at high infill in ABS (especially the hot-end holder, but also z-top, since that will be inside warm printer).

Hardware:
a better 12v PSU than stock http://www.soliwiki.com/Upgrade_The_Power_Supply 360w switching PSU is best

Wires and connectors:
-Connector from fan to any constant 12v output - I just connected this straight to the 12v PSU for the moment.
-Connector from the thermistor to the board - I just used a jst plug from a lithium battery pack http://www.ebay.co.uk/itm/351067025481
-Connector from the e3d hot end to the board - I temporarily used one of those jst plugs above, but they are not very thick, so I have now cannibalised the original SD2 bed heater connector (because I now have a DC-DC SSR for bed heater and use one of the JST connectors from board to SSR).  In any case, the JST plug wires didn't get warm.
-You need shrink tubing to make nice connections.
-A roll of kapton tape, since you'll be taking things apart at the extruder and then taping them snugly back together.
-Small tie wraps to organise wires.

Tools:
-an adjustable spanner
-another adjustable spanner or similar to tighten hot end nozzle while holding the heating block
-long hex drivers for those m3 bolts.  consider drilling a hole in the top of the SD2 to access the z-stop adjust, and that it will be further down after you extend the z-stop (or you will go crazy)
-simple soldering iron / station
-something to efficiently fish wires through the wire tube.
-(optional) a drill and bits to put holes in the SD2 frame.  I make holes with total abandon big_smile

Abilities:
- flashing firmware:  you need to change the thermistor value in firmware.  If it's an absolute MUST, you can try and rig up the stock thermistor, but mind you'll need to change the insulation for the heat-resistant stuff that comes with the e3d.

Here is my wiring as of last night:
http://i.imgur.com/F5pplKI.jpg

Solidoodle 2 with Deluxe kit cover & glass bed with heater. and 2nd board SD2 used not 3rd and alum platform not installed yet still wood. also need cooling fan installed to board. use Repetier Host couple vers. Slic3r also have all free ware STL programs

8

Re: solidoodle 2 extruder upgrade

http://www.boltdepot.com is good too.

SD2 Expert stock, ABS fume fan,
XYZ DaVinci 1.0 stock ABS, Simplify3D
QUBD Two-Up PLA, new 3D printed X gantry, Y idler, flex z coupler, extruder mount, E3D Lite

9

Re: solidoodle 2 extruder upgrade

I have a 3DP 1000 printer. Does anyone know if the glass is tempered

10

Re: solidoodle 2 extruder upgrade

I got tired of studying and just took the leap.   Ill do e3d later.

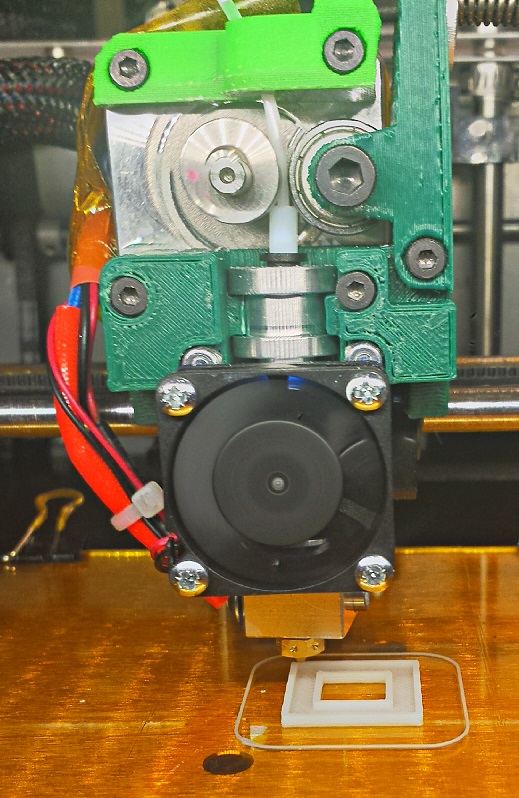
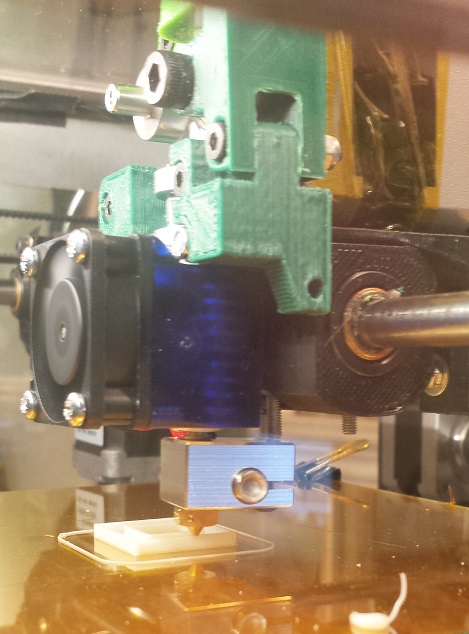
I replaced my jigsaw with the lawsy mk5.  Since i couldn't find a good concise  list of steps (in text at least...) on removing the old extruder assembly I'll try to give my blow by blow it case it helps someone in the future. I immediately printed another lawsy .. and ill probably print another one tonight.


0a.  i stared at the thing for a week (see above smile
0b.  i determined that there was little chance of saving the jigsaw assembly since the minimum number of required screws that needed to be removed pretty much makes it fall apart

1. I disconnected the hotend wires.  Note:  the quick disconnects have a lock of sorts on the red/blue end.  the actual piece that comes out is the tiny white side. pull on that little lever sticking out of the colored side while pulling on the white piece and it will come out really easy.

2.  I took off the 4 longer screws that attach the assembly to the stepper motor.  Note: the motor just sits on a perch behind the assembly so make sure you catch it and set it aside gently.

3.  i removed the 2 nuts visible from the front that attaches the assembly to the perch.  I noticed after the fact that the screws go all the way through the perch and can be steadied  with a Phillips head screwdriver (the blasphemy !! smile ) if the nuts just spin.

At this point you should have the entire assembly in your hands.  Now to remove the hot end.

4.  Remove the 2 nuts that hold the hot end onto the assembly (I now know why it took so long to ship the blasted solidoodles.  They must have had a crew of 20 who's sole job is going in with tweezers and pliers to attach these nuts to the captured screws.   incredibly frustrating. look for "solidoodle replacing hotends" for tips..)

5.  Now you have to deal with the piece of wood  around the hotend.  I suppose you could cut it with tinsnips or something, but like I said, I wanted a way back worst case scenario.  I decided to unscrew the peek insulator from the nozzle.  search for "unclogging solidoodle nozzle" for tips. I will add one thing.  slide the black insulation off and locate the thermocouple. it looks like a tiny glass bead attached to the nozzle with kapton.  if you have to use a wrench, steer clear of this. it is very fragile.  In hindsight, This is probably the most dangerous part of the operation. 

Now you have everything in pieces.   Pick up with the instructions for installing Lawsy's mk5 extruder on the thingiverse page.  I ended up reusing most of the screws from the old jigsaw.

I did have to improvise:
1x m3x10mm  - for the locking arm - used an old ugly pan screw that was way too big.  i cracked the top hole but got a good firm lock on the arm.  probably not the best approach

1x m3 x "shorter".  for the filament guide, you need much shorter screws than stock.  the left one i ended up chopping a bit off of one of the original hotend to wood screws with a dremel tool. for the right end i used one of the bolts from the tension arm assembly.

I was able to use the extra screws to put the jigsaw pieces back together ..just incase. smile


protip:  when cutting bolts, you will invariably screw up the threads (lol ..puns...:) ).  Put one or more nuts on the bolt before cutting it.  Once cut, removing the nuts you will mostly straighten out the threads.  Also it will be a lot easier to cross thread so be really careful. Also the nuts gives you a good place to grab it with a vice while your cutting it.

11

Re: solidoodle 2 extruder upgrade

Nice work.  You can also just put nuts on the bolts and leave them there as spacers.  That get's you a shorter bolt in a pinch.

SD2 Sanguinololu 1.3a atmega1284p, wood platform, lawsy's carriages, braided fishing line, pallet wood overhead spool mount, carboard/magnet enclosure, glass bed, E3D v6, bed levelling knobs, extended z-stop, 25A DC-DC SSR for bed heater, everything fixed to the SD2 frame, marlin firmware with some adjustments and extra failsafes enabled.  I'll never give up on you, little printer that could(n't)!

12

Re: solidoodle 2 extruder upgrade

ok .. wow.  There are a lot of possibly garbage clones (depends on percentage of shill reviews) of the e3d v6 out there.  Is the only sure place to buy a real one in the UK? (e3d-online.com)

13

Re: solidoodle 2 extruder upgrade

If you order direct from e3d-online.com you will have no doubt that it is genuine.

Printit Industries Model 8.10 fully enclosed CoreXY, Chamber heat
3-SD3's & a Workbench all fully enclosed, RH-Slic3r Win7pro, E3D V6, Volcano & Cyclops Hot End
SSR/500W AC Heated Glass Bed, Linear bearings on SS rods. Direct Drive Y-axis, BulldogXL
Thanks to all for your contributions

14

Re: solidoodle 2 extruder upgrade

yeah ..that seems to be the best option.

i found the kit here:
https://www.matterhackers.com/store/pri … -universal

I can get the fully assembled version from e3d shipped to US for about the same price (barring unexpected international fees.)

Also, since this looks roughly drug/bomb related, has anyone run into any problems importing this into US?

15

Re: solidoodle 2 extruder upgrade

Ok, E3d assembled and installed successfully.  Pictures below (with my first attempt at acrylic enclosure)

A couple of questions though.

Setting the extruder to 195 does not seem hot enough to extrude ABS.  The wheel just grinds the filament.  I found a page about installing e3d on solidoodle saying you would have to increase temps by 20-30 degrees because the solidoodle thermistor under measured. Those docs were really old apparently since they mentioned things like "this hotend will let you get to temperatures of 350c+"  On the E3D's docs it blatantly says that going over 295C would damage the thermistor.

I set things to 220 and ran a test cube successfully.  Bridging seems to be suffering though... What range should i be shooting for with the e3d v6? What about PLA?

Second:   The temp seems a little less stable than old hotend.  I probably need to run PID tuning again.  When i did it before the hotend had no plastic in it and i had the enclosure removed with the bed cold.


Third:  Are there any good profile management solutions for slic3r (or a different slicer)?   I'm having to keep a notebook of what profiles are for what.  It is going to be a big task converting everything to the new E3d.  I have a lot of manual pre- post job code.

note: I forgot to turn off HDR for first picture and didn't have time to retake, please ignore stitching issues around the stepper motor. I did not take a bat to it. smile

http://soliforum.com/i/?PskW6SO.jpghttp://soliforum.com/i/?RSYG15c.jpg

16

Re: solidoodle 2 extruder upgrade

you definitely will need to run PID tuning again for the new thermistor.  I print e3d's "everyday" PLA around 210 for first layer and 200 for higher layers, with a heated bed around 70/60 (first, other)...  that's all a bit too hot, if anything.

SD2 Sanguinololu 1.3a atmega1284p, wood platform, lawsy's carriages, braided fishing line, pallet wood overhead spool mount, carboard/magnet enclosure, glass bed, E3D v6, bed levelling knobs, extended z-stop, 25A DC-DC SSR for bed heater, everything fixed to the SD2 frame, marlin firmware with some adjustments and extra failsafes enabled.  I'll never give up on you, little printer that could(n't)!

17

Re: solidoodle 2 extruder upgrade

235-240 for ABS bed at 108

Printit Industries Model 8.10 fully enclosed CoreXY, Chamber heat
3-SD3's & a Workbench all fully enclosed, RH-Slic3r Win7pro, E3D V6, Volcano & Cyclops Hot End
SSR/500W AC Heated Glass Bed, Linear bearings on SS rods. Direct Drive Y-axis, BulldogXL
Thanks to all for your contributions

18

Re: solidoodle 2 extruder upgrade

I'm still tweaking slic3r settings. Undoing, recalculating, and replacing the solidoodle hacks  is getting complicated. .. that's ok though i need to learn what these numbers mean if I'm going to make the best out of these mods.

My first test cube was about .025mm to large.  I put the extrude width overrides back to zero to see what I have baseline.  now its about .25mm to small ..sigh.  Also, i forgot to reduce the print speed.

Also, why I'm replying,  I'm  now seeing the diagonal "moire" effect on the walls.  Some fixes say adjust the driver pots, but i wanted to make sure it wasn't something obvious I've screwed up in slic3r before i go messing with electricity.

19

Re: solidoodle 2 extruder upgrade

I'm still tweaking slic3r settings. Undoing, recalculating, and replacing the solidoodle hacks  is getting complicated. .. that's ok though i need to learn what these numbers mean if I'm going to make the best out of these mods.

My first test cube was about .025mm to large.  I put the extrude width overrides back to zero to see what I have baseline.  now its about .25mm to small ..sigh.  Also, i forgot to reduce the print speed.

Also, why I'm replying,  I'm  now seeing the diagonal "moire" effect on the walls.  Some fixes say adjust the driver pots, but i wanted to make sure it wasn't something obvious I've screwed up in slic3r before i go messing with electricity.

20

Re: solidoodle 2 extruder upgrade

I just bought such an E3D Hotend on ebay, and perhaps I´m going to put it into my SD2
Short question: What exactly are the benefits of it? Or are there any?
I found at least 10 threads of putting it into the machine...

21

Re: solidoodle 2 extruder upgrade

protorix wrote:

I just bought such an E3D Hotend on ebay, and perhaps I´m going to put it into my SD2
Short question: What exactly are the benefits of it? Or are there any?
I found at least 10 threads of putting it into the machine...

Very unlikely you got a genuine E3d from eBay.  Maybe post some pictures and a link.

Printit Industries Model 8.10 fully enclosed CoreXY, Chamber heat
3-SD3's & a Workbench all fully enclosed, RH-Slic3r Win7pro, E3D V6, Volcano & Cyclops Hot End
SSR/500W AC Heated Glass Bed, Linear bearings on SS rods. Direct Drive Y-axis, BulldogXL
Thanks to all for your contributions

22

Re: solidoodle 2 extruder upgrade

So far, the biggest benefit is a lot less oozing.  make sure you reduce your retract settings to the recommended <1mm  in your settings though.  Retracting more than that with mine causes it to extrude bubbles sometimes. Also ive read it will pull melted filament into the cold part of tube possilby causing it to get stuck requiring a quite a bit of cleanup (including dissasmbly).

I am currently still tweaking, but I've been a little dissapointed.  I've not seen amazingly better stuff yet.  the reduction in ooze blobbing is worth the money though in my opinion.

23

Re: solidoodle 2 extruder upgrade

So what are the benefits of a E3d Hotend, weather orignal or not wink
but thanks for the advice, it maybe or sure be not original.

24

Re: solidoodle 2 extruder upgrade

Ok Thank you,
so I´m not sure, if I really want to switch. I wanted to use flexible filament, that was the initial thought, that caused the purchase.
You know ... never touch a running system, and using ABS my old SD2 is working pretty well.