1

Topic: Would splitting the 7 inch turntable be possible for smaller printers?

I have a M3D Micro, which means I am limited to the 4 inch turntable. Seems like many of the sub-$500 printers can't print even the 5 inch version, as another printer I have backed, the Tiko, is just barely unable to print the larger version as it's max print size is 4.9 inches.

So I figured the next best thing for those with small format printers would be the split up the turntable into quadrants instead.

Looking at the design of the 7 inch turntable, it is certanely symmetrical enough so it can be split into a single STL that can be printed four times and then rejoined into a single one rather than having to have separate STL files for the different parts of the turntable.

However, this is where could and should come into play. Splitting it up into four pieces would obviously create a weaker structure as a whole, but would it be significant or not matter? There is also the matter of how one would join the pieces. Glue is the obvious answer but that's kinda inelegant and permanent, not to mention leaves room for uncorrectable errors and PLA doesn't respond well to most achieves. A screw-and-nut like how most other parts of the Atlas 3D connect together makes more sense, but I am not sure how reliable this would be in keeping the whole turntable flat or in one piece, and how many one would need in each quadrant and where. Just one in the center? Two at even distances? Three, one at each edge and one in the middle?

On top of that, I backed a 3D scanner because my 3D modeling skills are.... lacking. Or rather, completely nonexistent. I have the turntable rotated perfectly in Meshlab where if I sliced it straight down the center on the X and Y axis it would... err, SHOULD, form four perfectly symmetrical quadrants, but I can't seem to figure out how. And I am certainly not going to trust myself to just freehand eyeball it with a mouse select and make to get it perfectly centered. So considering I can barely figure out how I would even slice the turntable like a pizza, I don't have much confidence I would be able to copy an example of the screw and nut holes from the other models and add them to the split turntable instead of just glue it together.

Would this idea even work? And would glue be enough, or would I have to use screws?

2

Re: Would splitting the 7 inch turntable be possible for smaller printers?

I would recommend screws over glue but I can't guarantee that your table design will work well because I have not tried it.  However, I vaguely remember seeing something similar on thingiverse.

3 (edited by 8-Bits 2015-04-29 02:12:05)

Re: Would splitting the 7 inch turntable be possible for smaller printers?

Cyber Akuma wrote:

Would this idea even work? And would glue be enough, or would I have to use screws?

Unless you want to stay with all 3D printed parts I would suggest that you consider using a standard laser cut 7" x 1/4" thick birch plywood disk covered with self-adhesive light absorbing flocking material.  That is what I used for my A3D scanner build in the attached photo.

If you do decide to print and glue the turntable in sections be sure to use a special ABS adhesive if you use ABS filament; and a cyanoacrylate adhesive (aka Super Glue) if you use PLA.

http://soliforum.com/i/?pMm9ME4.jpg

John


Maker Farm Prusa i3 kit (a very good first printer kit)
Printrbot Simple Metal kit (worked great from the start) ++ FlashForge Creator Pro (RTR out of the box)
Atlas 3D Scanner (KS Backer kit with mods)

4

Re: Would splitting the 7 inch turntable be possible for smaller printers?

Good thing I decided to check back on this forum manually, seems the e-mail notifications feature isn't working >.<

Anyway....

hairu526 wrote:

I would recommend screws over glue but I can't guarantee that your table design will work well because I have not tried it.  However, I vaguely remember seeing something similar on thingiverse.

I would prefer screws too, I am just not sure if I will be able to do it.

By some miracle I actually managed to do something useful with a 3D modeling application and split the 7 inch turntable into quadrants. Granted, I had to use two separate applications because I was able to rotate it properly in one but not the other, then cut out pieces properly in one but not the other.... and then that left the edges hollow so I had to use a third application to repair it and hopefully it didn't make any other changes that I can't find. I didn't try printing it but it loaded fine in my printing software, and when I loaded that piece four times over, rotated it, and joined four pieces together the end result looked exactly like the STL file for the one piece solid model so I guess I got it right.  I am a little worried about the hole in the middle of the turntable now being made out of the corner of four pieces, but I couldn't tell from the assembly video what exactly fits into that, if anything. It looks like just extra slack for the motor shaft rather than something with a functional purpose. I aligned it so the four screw holes are in the middle of he quadrant instead of cut in half, since that would cause all sorts of integrity issues when you tighten the screw.

But the glue version will be a last-resort option for me if I can't manage to create a screw-version, or find someone who can print the whole 7 inch version for me at an affordable price, or any other alternative that isn't high priced. So I am trying to see if I can pull off a second miracle and manage to put tabs for screws and nuts on it.

Ironically, the best way I have found to get a sample of the screw/nut tabs are from the split version of the camera tower, it has a screw tab on one side joined by a nut tab on the other. So for the moment I loaded the two models together back-to-back and am editing them as if they were one to try to slice out a "tab" for the screw and another for the nut at the other end, then I can just un-join them and I will have a perfect reference model for one of each

I am not structural engineer, so I am also not sure where best to place and tabs and how many of them to try to make it stay as solid and not deform as much as possible compared to a single piece turntable. I was thinking of putting three, one as close as possible on the inside edge, as close as possible to the center spoke, and one right in the middle. Problem is I am not sure how to perfectly measure both tabs I am trying to cut out of the camera tower models to make them even on both sides of the screw hole, and even after that how to properly put them on the turntable model. While I am sure pretty much every free 3D modeling application likely has a way to measure the length between the tabs out perfectly, and a way to align the bottom of the tab perfectly flat with the bottom of the turntable I want to put it on, I have no idea how to do that, and "eyeballing" it using my mouse would be completely out of the question since it's a single piece which needs to be perfectly symmetrical with three more copies of itself, and there is no way I would be able to align the screw holes on one end of the turntable quadrant exactly with the nut holes on the other end of the quadrant that way.
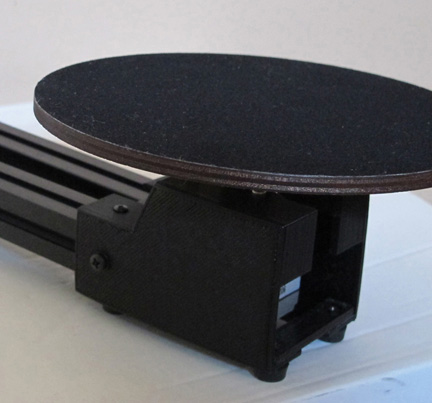
8-Bits wrote:

Unless you want to stay with all 3D printed parts I would suggest that you consider using a standard laser cut 7" x 1/4" thick birch plywood disk covered with self-adhesive light absorbing flocking material.  That is what I used for my A3D scanner build in the attached photo.

Huh, where would I get something like that?

Also, how much does it weigh? I remember once someone asking if it would be possible to use a 10" turntable since they had a very large format printer, and were told that while technically it would fit and work, objects that extend too much towards the edge might put too much weight and strain on the motor. How much heavier is this thing than a PLA or ABS printed part would be?

Also about the material, the parts included with the Atlas 3D include a surface you would cut and fit across the turntable you are expected to print, though I don't know what material it is and which would be better.

8-Bits wrote:

If you do decide to print and glue the turntable in sections be sure to use a special ABS adhesive if you use ABS filament; and a cyanoacrylate adhesive (aka Super Glue) if you use PLA.

Going to go with PLA, since my printer doesn't do well with ABS for anything with a raft larger than about a 1"x1" or 2"x2" postage stamp-sized square. Trying to do a test-print that is only 3"x3" and it keeps lifting when using ABS...

5

Re: Would splitting the 7 inch turntable be possible for smaller printers?

Cyber Akuma wrote:

Huh, where would I get something like that?

Also, how much does it weigh? I remember once someone asking if it would be possible to use a 10" turntable since they had a very large format printer, and were told that while technically it would fit and work, objects that extend too much towards the edge might put too much weight and strain on the motor. How much heavier is this thing than a PLA or ABS printed part would be?

Also about the material, the parts included with the Atlas 3D include a surface you would cut and fit across the turntable you are expected to print, though I don't know what material it is and which would be better.

I purchased the laser cut plywood disks from WoodCrafter.com.  I got two 7" disks for $12 USD including shipping.   The Baltic Birch plywood is actually lighter and more stable (balance and rigid) than the 7.5" printed plastic turntable I made.

You can spray paint the surface of the plywood black and use the material that comes with the kit.  The self-adhesive light absorbing black flock material I used was from (http://www.scopestuff.com/ss_flok.htm ).  It's a little pricey, but I already had some from another of my hobbies.

John


Maker Farm Prusa i3 kit (a very good first printer kit)
Printrbot Simple Metal kit (worked great from the start) ++ FlashForge Creator Pro (RTR out of the box)
Atlas 3D Scanner (KS Backer kit with mods)

6 (edited by Cyber Akuma 2015-05-19 17:31:00)

Re: Would splitting the 7 inch turntable be possible for smaller printers?

Ok, so after stumbling around blindly through several free 3D modeling applications (Namely, MeshLab, Netfabb Basic, and Meshmixer) I actually managed to pull it off somehow.

Anyway, since right now I am scrambling to print a spool holder before the tiny spool my printer came with runs out so I can use standard sized spools, I haven't had a chance to try to print these yet. I will try first thing once I have my spools set up. They matched perfectly in all the 3D modeling applications I ran them in through, and put them through a few paces of automatic repair to make sure there would be as few issues as possible.

So anyway....

Here is the glue version:
https://www.dropbox.com/s/fdvnewfkkuusc … t.stl?dl=0


Here is a version with tabs for screws and nuts, it uses the same size as the ones which come with the Atlas 3D:
(THIS MODEL IS FLAWED, I DO NOT RECOMMEND DOWNLOADING IT)
https://www.dropbox.com/s/t4hl3jisibzwy … 9.stl?dl=0


And here is a version with lowered screw tabs. I was worried that the original tabs stuck out a bit too much and it would both reduce stability and waste filament, but the lowered ones might be a little tricky to put some of the screws in:
(THIS MODEL IS FLAWED, I DO NOT RECOMMEND DOWNLOADING IT)
https://www.dropbox.com/s/upjvpwzb51zls … 9.stl?dl=0

Please reply back if anyone else finds this useful or prints it before I have been able to. smile

7 (edited by scotta 2015-05-09 15:44:39)

Re: Would splitting the 7 inch turntable be possible for smaller printers?

8-Bits wrote:
Cyber Akuma wrote:

Would this idea even work? And would glue be enough, or would I have to use screws?

...That is what I used for my A3D scanner build in the attached photo.


http://soliforum.com/i/?pMm9ME4.jpg

8-Bits - where did you get the design from for your scanner. Would you be willing to share them?
Thanks

8

Re: Would splitting the 7 inch turntable be possible for smaller printers?

Discovered many flaws with the models I made, working on it right now to see how I can fix them.

9

Re: Would splitting the 7 inch turntable be possible for smaller printers?

Sorry that took so long, was occupied with a lot... and Google SketchUp really didn't want to play nice.

https://www.dropbox.com/s/uv8zlqiv3cibd … s.stl?dl=0

https://www.dropbox.com/s/6kmdtns32b3vi … s.stl?dl=0

Anyway, the new version seems to print fine. The tabs now print completely flat and there is a little extra room from the closest tab for the coupler to fit on:

http://i.imgur.com/ORSYjG8.jpg

I still made a lowered-tabs version since when trying to go by the assembly video and photos of assembled versions, I still couldn't tell much much clearance was from the bottom of the standard turntable to the top of the motor holder (Left and Right Frame Connector 3) as there are bolts that stick out the top of that part a bit. So just to be safe, I made the lowered tabs version as well, which is nearly flush with the larger part of the table coupler, so there should be no chance of this not having enough clearance.

10

Re: Would splitting the 7 inch turntable be possible for smaller printers?

Those look really good!! Well done!

11

Re: Would splitting the 7 inch turntable be possible for smaller printers?

Very cool

12

Re: Would splitting the 7 inch turntable be possible for smaller printers?

This is very good work! I will have to wait to buy my Atlas, but I've been looking over all the details you folks have been putting out. A buddy of mine got in on the kickstarter, and has a smaller printer, so I'll point him to this thread.

For my printer (flashforge Creator Pro), it would seem to be a simple matter to clip 1/2" off each side of the 7" turntable in scad to get it to fit on my 6" print bed. I don't think it matters much whether it's really a circle or not.

One might need to ensure the matte flocking covers that edge of the bed to avoid confusing the imager...

Am I incorrect in my assumption?

Cheers,

John