1

Topic: best way to adjust trimpots?

Any tips? Motherboard is Rev E printrboard.

I fried my old board trying to do this. Don't want to do it to my new board. I slipped and made a spark. I am very shaky. Don't have anyone I know that can help me. So hard to hold two probes and a screwdriver.

Should it be plugged into USB and 12v both when I'm adjusting trimpots, or just the 12v? Is there anything I can buy or use to help shield the motherboard from making sparks if I slip?

Is there a way I can ground the multimeter probes or the screwdriver? Thanks

My SD3:  Clear plexiglass case, case heater, X axis stabilizer, Z axis stabilizer, thumb screws, filament guide, heatsinks on all motors, extruder fan, controller fan, heatsinks on motherboard, Y rod pillow block, USB and Power on/off switch, fully calibrated including trimpot tuning. Am I missing anything?

2

Re: best way to adjust trimpots?

Buy a ceramic or plastic screwdriver.  Then skip the meter and adjust them by ear.

Printit Industries Model 8.10 fully enclosed CoreXY, Chamber heat
3-SD3's & a Workbench all fully enclosed, RH-Slic3r Win7pro, E3D V6, Volcano & Cyclops Hot End
SSR/500W AC Heated Glass Bed, Linear bearings on SS rods. Direct Drive Y-axis, BulldogXL
Thanks to all for your contributions

3 (edited by ohbaby714 2014-05-07 17:10:16)

Re: best way to adjust trimpots?

Will that work with all motor?
X, Y, and Z also?

If so how?

4

Re: best way to adjust trimpots?

It will work for all axis.
Set them to travel slowly for E: and for a good distance to allow enough time to adjust it.  For X- and Y-axis I like to remove the belt and tell it to home with out it against the end stop switch (although it isn't necessary).  All your listening for is nice smooth operation with no or minimal pulsing (voltage to low) or heavy groaning and noise (voltage to high).  It is fairly easy to tell when you have them at the optimal setting.  Very small adjustments go a long way.

Printit Industries Model 8.10 fully enclosed CoreXY, Chamber heat
3-SD3's & a Workbench all fully enclosed, RH-Slic3r Win7pro, E3D V6, Volcano & Cyclops Hot End
SSR/500W AC Heated Glass Bed, Linear bearings on SS rods. Direct Drive Y-axis, BulldogXL
Thanks to all for your contributions

5

Re: best way to adjust trimpots?

Awesome, i'll try this tonight.
I did the voltage adjustment and my print still look like crap.

Thank you for an easy way to fine tune it.

6

Re: best way to adjust trimpots?

I hope it works out for you.  Just remember this is only one of many calibrations needed to attain high quality results.

Printit Industries Model 8.10 fully enclosed CoreXY, Chamber heat
3-SD3's & a Workbench all fully enclosed, RH-Slic3r Win7pro, E3D V6, Volcano & Cyclops Hot End
SSR/500W AC Heated Glass Bed, Linear bearings on SS rods. Direct Drive Y-axis, BulldogXL
Thanks to all for your contributions

7 (edited by Tomek 2014-05-07 18:42:02)

Re: best way to adjust trimpots?

I disagree adjusting by ear.

If you do with a voltmeter though do this:

Don't bother with finding the tiny via that they tell you to check the voltage at. The metal pot is the same voltage.

So clip or otherwise attach ground of the voltmeter to gnd of the driver board. Then take a screwdriver and put it into the potentiometer. Apply your red prob of the voltmeter onto the screw, which connects to the potentiometer and shows you ref voltage. Little to no risk of slipping things this way.

8

Re: best way to adjust trimpots?

I'll try both ways and compare the print smile

Thank again for the helps.

9

Re: best way to adjust trimpots?

Don't get me wrong Tomek is right and has described a great way to avoid shorting something out on your board.  The correct way is with a good meter setting them to the correct voltages.  That being said theoretical voltages don't account for variations in resistance from one component to another.  This has led me to fine tune by ear or even visual results on many occasion.  It is just that adjusting by ear is so quick and easy with little to no risk of damaging anything.  It becomes an easy way for someone with limited electronics background to make a notable difference in the quality of their prints.
Please don't forget what I said in the previous post.   "This is only one of many calibrations needed to attain high quality results."  I repeat it because if your prints are as you said.  "I did the voltage adjustment and my print still look like crap."
Then I believe you have other issues because adjusting the VREF's that way should have yielded fair results.
Take your time and have fun with it and as always
Happy Printing

Printit Industries Model 8.10 fully enclosed CoreXY, Chamber heat
3-SD3's & a Workbench all fully enclosed, RH-Slic3r Win7pro, E3D V6, Volcano & Cyclops Hot End
SSR/500W AC Heated Glass Bed, Linear bearings on SS rods. Direct Drive Y-axis, BulldogXL
Thanks to all for your contributions

10 (edited by ohbaby714 2014-05-09 11:10:30)

Re: best way to adjust trimpots?

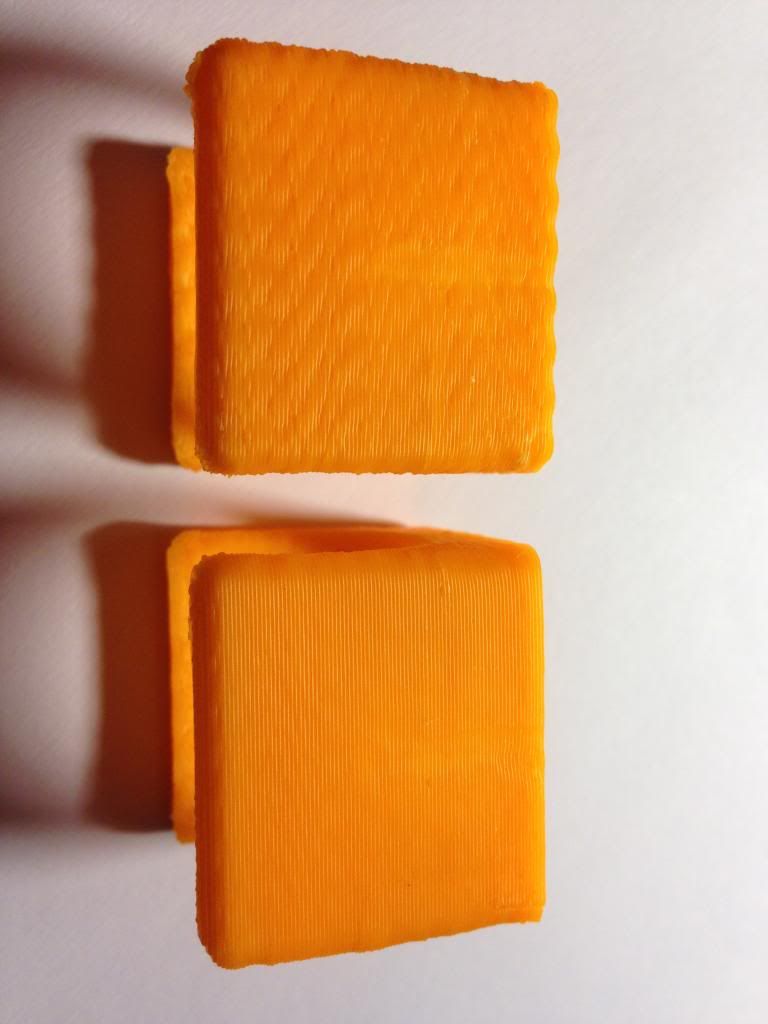
http://i1183.photobucket.com/albums/x461/ohbaby714/Mobile%20Uploads/2014-05/FA4426AD-2802-428B-8B82-BCA78E4F4349.jpg


I'm not posting this to prove anyone wrong but just want to share my results as it may help other.
FYI, I use this voltage for the Vref below (Rev E.)
Extruder: 0.770V
X-Axis: 0.443V
Y-Axis: 0.520V
Z-Axis: 0.500V


Voltage adj is on top, by sound is on the bottom.
So for my case, by sound definitely the way to go.
Anyway, thank bro.

Everything sound quieter too.
Awesome tips.

Happy printing thank to you,

11

Re: best way to adjust trimpots?

Not proving any one wrong we are all here to help and I am just happy it's working out for you.

Printit Industries Model 8.10 fully enclosed CoreXY, Chamber heat
3-SD3's & a Workbench all fully enclosed, RH-Slic3r Win7pro, E3D V6, Volcano & Cyclops Hot End
SSR/500W AC Heated Glass Bed, Linear bearings on SS rods. Direct Drive Y-axis, BulldogXL
Thanks to all for your contributions

12

Re: best way to adjust trimpots?

Nice! I like seeing how adjusting by ear seems to work well.

My big concern with adjusting my ear is skipped steps because the ideal microstepping current limit might not have enough current.

Do you folks have any problems with that?

13

Re: best way to adjust trimpots?

Tried to do this by ear. Not sure what I am listening for exactly . Can get pulsing to stop but so does the motor and the opposite I begin to hear a clicking , presumably to high. I go approximately mid between the two and can hear a consistant pulsing sound. Adjust toward the low side and the pulsing sound is higher pitched. The only way to get the pulsing to stop pulsing is right before the motor stops moving.

Tried different positions and still get the gaps and moire pattern shown in your example pic.
Can't seem to get rid of it.

Tried different extrusion multipliers and filament settings, no difference.

The layers measure .3 thick per slicer setting.

X, Y, and Z seem to be right on since the part measures to model size.

14 (edited by ohbaby714 2014-05-09 23:56:20)

Re: best way to adjust trimpots?

This is what i did and it apply to all motors.

There are 2 end (i'm not sure clock wise or counter clock wise), but all the way to one side the motor will click loudly, the other end it will totally stop moving.
Like the advise, for extruder, i set it to extrude around 35 mm
Set the speed to 10 mm/min, turn the pot on end till it stop and back up about quarter of a turn. It will extrude smooth silky line. Repeat with all other motor. Just move the x, y, z while turn each pot.
Again, one side will make a lond clicking noise, the other will turn the motor off. I find that spot (off) and go the opposite way quarter of a turn.

15

Re: best way to adjust trimpots?

KD wrote:

Tried to do this by ear. Not sure what I am listening for exactly . Can get pulsing to stop but so does the motor and the opposite I begin to hear a clicking , presumably to high. I go approximately mid between the two and can hear a consistant pulsing sound. Adjust toward the low side and the pulsing sound is higher pitched. The only way to get the pulsing to stop pulsing is right before the motor stops moving.

Tried different positions and still get the gaps and moire pattern shown in your example pic.
Can't seem to get rid of it.

Tried different extrusion multipliers and filament settings, no difference.

The layers measure .3 thick per slicer setting.

X, Y, and Z seem to be right on since the part measures to model size.

With 1/16 micro steps you will never completely eliminate pulsing or moire.  For that you'll need to go to 1/32.  Try it at twice the speed.  As for skipped steps I have never had that problem.

Printit Industries Model 8.10 fully enclosed CoreXY, Chamber heat
3-SD3's & a Workbench all fully enclosed, RH-Slic3r Win7pro, E3D V6, Volcano & Cyclops Hot End
SSR/500W AC Heated Glass Bed, Linear bearings on SS rods. Direct Drive Y-axis, BulldogXL
Thanks to all for your contributions

16

Re: best way to adjust trimpots?

Thanks.

Will try it again with your method.

I don't get skipped steps. Just the gaps between the layers relative to the moire effect as shown in the previous posted pic. Could the gaps be a flow issue?

How to change to 1/32, or is that for another thread?

17

Re: best way to adjust trimpots?

The gaps could be many things flow being one of them.  As far as 1/32 steps go that is definitely a whole other topic but if you have a search you'll see what's involved.

Printit Industries Model 8.10 fully enclosed CoreXY, Chamber heat
3-SD3's & a Workbench all fully enclosed, RH-Slic3r Win7pro, E3D V6, Volcano & Cyclops Hot End
SSR/500W AC Heated Glass Bed, Linear bearings on SS rods. Direct Drive Y-axis, BulldogXL
Thanks to all for your contributions