Topic: Easiest way to disable 3 axis printing?
Assuming I can get the bed level, whats the best way to turn off the auto bed leveling macro and just operate like solidoodle 2's and 3's?
Thanks.
You are not logged in. Please login or register.
SoliForum - 3D Printing Community → Solidoodle Press → Easiest way to disable 3 axis printing?
Assuming I can get the bed level, whats the best way to turn off the auto bed leveling macro and just operate like solidoodle 2's and 3's?
Thanks.
It would be in your firmware if it runs the auto level at startup. if it runs the auto level at the beginning of each print then it would be in your start up g-code.
M100
G21
G90
G28 X0 Y0
G1 Z15 F4800
G1 Y5 F4800
G1 X5 F4800
G29
Above is the press's default startup G-Code in Slic3r. My press is in pieces right now or I'd test it for you, but I'm pretty sure you can remove "G29" to disable automatic bed leveling, as Carl said. You then need to tell the printer to home the Z axis by adding "Z0" to G28.
Your new startup code should look like this:
M100
G21
G90
G28 X0 Y0 Z0
G1 Z15 F4800
G1 Y5 F4800
G1 X5 F4800
You could also take out "X0 Y0" from G28 - this would accomplish the same thing as adding "Z0" since it automatically homes all three axes if you don't specify which ones.
I'll try and test it out this weekend, and get back to everyone! thanks!
Here is was I did to get rid of auto bed leveling on the Solidoodle Workbench I used to use: http://www.soliforum.com/topic/12823/re … s-endstop/
Here is the post I followed:
Someprinterguy:
"New here, but I saw this and wanted to try to save you hours of fiddling around fixing this.
I've already done this fix on the workbench I have. It's really quite simple.
If you already have your endstop setup as it sounds like you do, you only need to know 3 Gcode commands to fix this:
M851 Z* - Change the preset offset for the Z height in the eeprom where the * represents the distance it comes up in mm
M500 - save the values to the eeprom
M501 - see the stored value in the eeprom
What you have to do is:
1)type M851 Z0 to set the offset at 0 and send it to the printer
2)type M500 to save to the eeprom and send it to the printer
3)set your start code to:
G28
G1 X145 Y145 F3000 ; move to back right corner
4)Start a print so that it will home the z, and then stop the print.
5)Dial in your print bed level to match the new fixed bed height.
6)Repeat steps 5 & 6 until you get a consistent first layer.
You can use M501 to me sure that the offset saved to the eeperom
The command that starts the auto leveling process is actually M29. Without the M29 code, you are not running the auto leveling code. There is no need to eliminate the option from the firmware if you are not using the command. Eliminating it from the firmware will not fix the problem either.
M28 is the auto homing code which will bring the extruders out, run the bed up to the stop, and then include the z offset. This is where you are having the problem. By eliminating the offset, you will eliminate the raise of the platform. It took a lot of research and fussing with mine to figure this out. Once I set the offset to 0, it all became a matter of manually leveling the bed, which is fussy but achievable."
You may need to change the G1 values since those above are Workbench specific, but I hope this helps!
My settings:
Send: M501
Recv: echo:Stored settings retrieved
Recv: echo:Steps per unit:
Recv: echo: M92 X80.00 Y80.00 Z400.00 E138.00
Recv: echo:Maximum feedrates (mm/s):
Recv: echo: M203 X500.00 Y500.00 Z5.00 E25.00
Recv: echo:Maximum Acceleration (mm/s2):
Recv: echo: M201 X1200 Y1200 Z100 E10000
Recv: echo:Acceleration: S=acceleration, T=retract acceleration
Recv: echo: M204 S3000.00 T3000.00
Recv: echo:Advanced variables: S=Min feedrate (mm/s), T=Min travel feedrate (mm/s), B=minimum segment time (ms), X=maximum XY jerk (mm/s), Z=maximum Z jerk (mm/s), E=maximum E jerk (mm/s)
Recv: echo: M205 S0.00 T0.00 B20000 X20.00 Z0.40 E5.00
Recv: echo:Home offset (mm):
Recv: echo: M206 X0.00 Y0.00 Z0.00
Recv: echo:PID settings:
Recv: echo: M301 P13.00 I0.70 D62.00
Here is the settings that it pinged back to me. I see the Home offset is Z0.00 already?
I homed it, and afterwards commanded it to go G00Z0 and there is roughly a 2mm gap when using feeler gauges between the glass bed and extruder? Technically no gap should exist correct?
Random thought, but ill have to check, maybe the probe length is incorrect? in the firmware? It clearly must use an offset from the hotend. maybe it's off 2mm? it clearly triggers the probe, subtracts its length, and in a perfect world would give me Z0, without any gap between the hotend and the glass?
I homed it, and afterwards commanded it to go G00Z0 and there is roughly a 2mm gap when using feeler gauges between the glass bed and extruder? Technically no gap should exist correct?
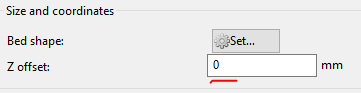
What slicer are you using? In Slic3r, you can set the Z Offset option under printer settings. A negative number will move the nozzle closer to the bed.
Not to bring back a dead topic, but I checked this again, and for some reason my gap of 1.5mm exists but does not show in the eprom?
Not to bring back a dead topic, but I checked this again, and for some reason my gap of 1.5mm exists but does not show in the eprom?
Not all settings are in the EEPROM. Only the most common ones.
Must be in the config.h file. Anyone enable the lower z limit switch?
SoliForum - 3D Printing Community → Solidoodle Press → Easiest way to disable 3 axis printing?
Powered by PunBB, supported by Informer Technologies, Inc.