<?xml version="1.0" encoding="utf-8"?>
<feed xmlns="http://www.w3.org/2005/Atom">
	<title type="html"><![CDATA[SoliForum - 3D Printing Community — How I assemble 'naked' Hotends]]></title>
	<link rel="self" href="https://www.soliforum.com/feed/atom/topic/5494/" />
	<updated>2017-08-19T18:10:58Z</updated>
	<generator>PunBB</generator>
	<id>https://www.soliforum.com/topic/5494/how-i-assemble-naked-hotends/</id>
		<entry>
			<title type="html"><![CDATA[Re: How I assemble 'naked' Hotends]]></title>
			<link rel="alternate" href="https://www.soliforum.com/post/137280/#p137280" />
			<content type="html"><![CDATA[<p>Kapton tape apparently comes in different thicknesses as well as different widths. You mentioned 10mm ,15mm, and 20mm as good widths. Can you suggest a thickness as well (I see 1mil, 2mil, and 5mil at <a href="http://www.polyimidetapeonline.com/catalog/index.php?cPath=31&amp;osCsid=700jlt5d7el5o410mnh0j39p02)?">http://www.polyimidetapeonline.com/cata … h0j39p02)?</a></p>]]></content>
			<author>
				<name><![CDATA[b-morgan]]></name>
				<uri>https://www.soliforum.com/user/17396/</uri>
			</author>
			<updated>2017-08-19T18:10:58Z</updated>
			<id>https://www.soliforum.com/post/137280/#p137280</id>
		</entry>
		<entry>
			<title type="html"><![CDATA[Re: How I assemble 'naked' Hotends]]></title>
			<link rel="alternate" href="https://www.soliforum.com/post/49344/#p49344" />
			<content type="html"><![CDATA[<p>Love a good bit of electrical installation. Strain relief is usually completely overlooked!</p><p>Have you used grey RTV before for the thermistor? It&#039;s often rated to 700F (370C), and says O2 sensor safe on the tube. Figure it would be about the same, maybe a bit thicker (more like sikaflex / bathroom silicone sealant).</p>]]></content>
			<author>
				<name><![CDATA[grob]]></name>
				<uri>https://www.soliforum.com/user/4515/</uri>
			</author>
			<updated>2014-02-11T02:45:32Z</updated>
			<id>https://www.soliforum.com/post/49344/#p49344</id>
		</entry>
		<entry>
			<title type="html"><![CDATA[Re: How I assemble 'naked' Hotends]]></title>
			<link rel="alternate" href="https://www.soliforum.com/post/49259/#p49259" />
			<content type="html"><![CDATA[<p>As always very detailed and informative.&nbsp; Nice work <img src="https://www.soliforum.com/img/smilies/smile.png" width="15" height="15" alt="smile" /></p>]]></content>
			<author>
				<name><![CDATA[wardjr]]></name>
				<uri>https://www.soliforum.com/user/2291/</uri>
			</author>
			<updated>2014-02-10T16:09:12Z</updated>
			<id>https://www.soliforum.com/post/49259/#p49259</id>
		</entry>
		<entry>
			<title type="html"><![CDATA[Re: How I assemble 'naked' Hotends]]></title>
			<link rel="alternate" href="https://www.soliforum.com/post/49251/#p49251" />
			<content type="html"><![CDATA[<p>Beautiful post. Well done as always, Adrian!</p>]]></content>
			<author>
				<name><![CDATA[elmoret]]></name>
				<uri>https://www.soliforum.com/user/221/</uri>
			</author>
			<updated>2014-02-10T13:25:21Z</updated>
			<id>https://www.soliforum.com/post/49251/#p49251</id>
		</entry>
		<entry>
			<title type="html"><![CDATA[How I assemble 'naked' Hotends]]></title>
			<link rel="alternate" href="https://www.soliforum.com/post/49249/#p49249" />
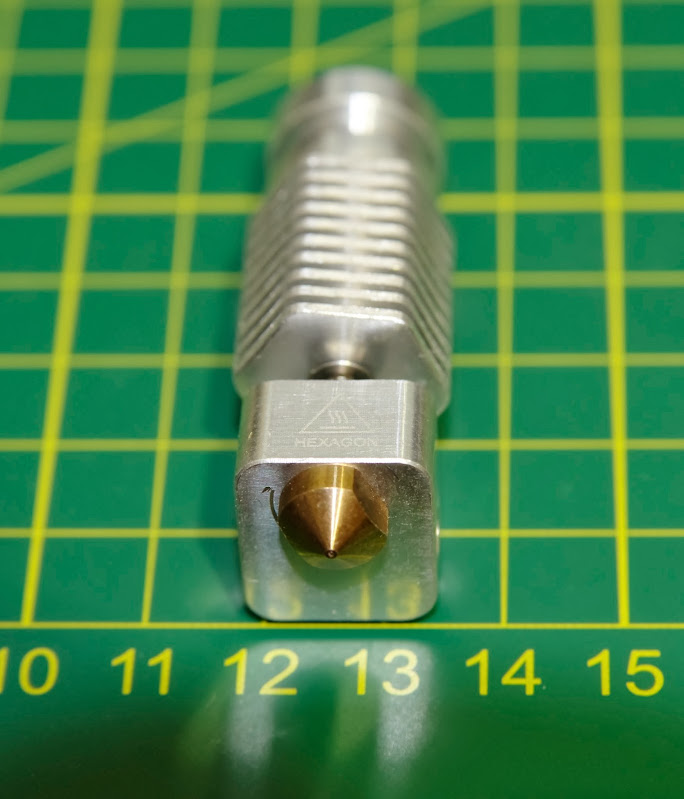
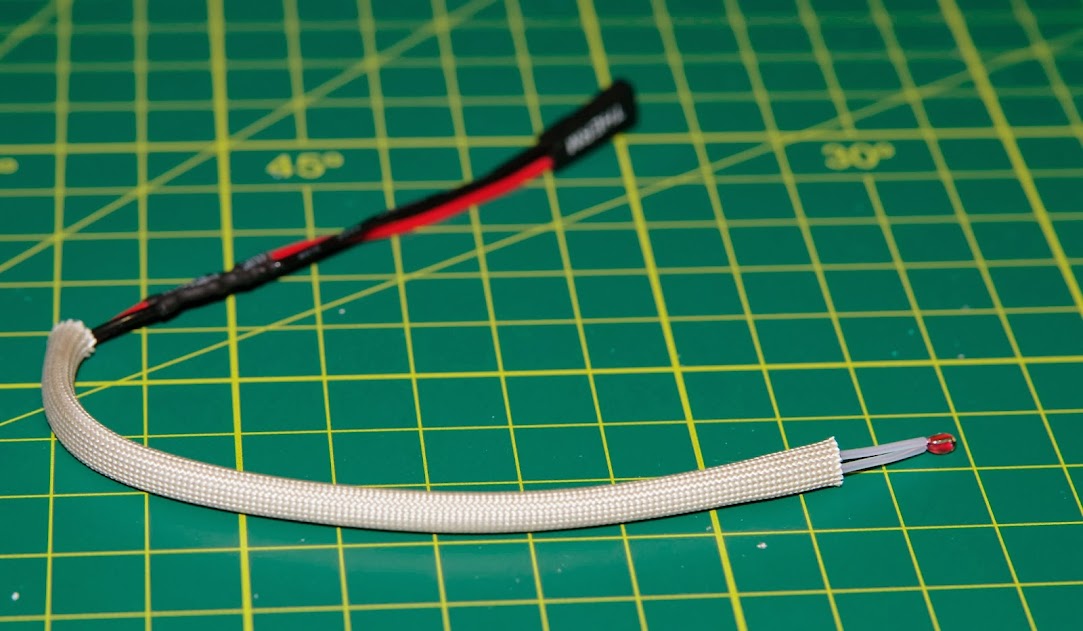
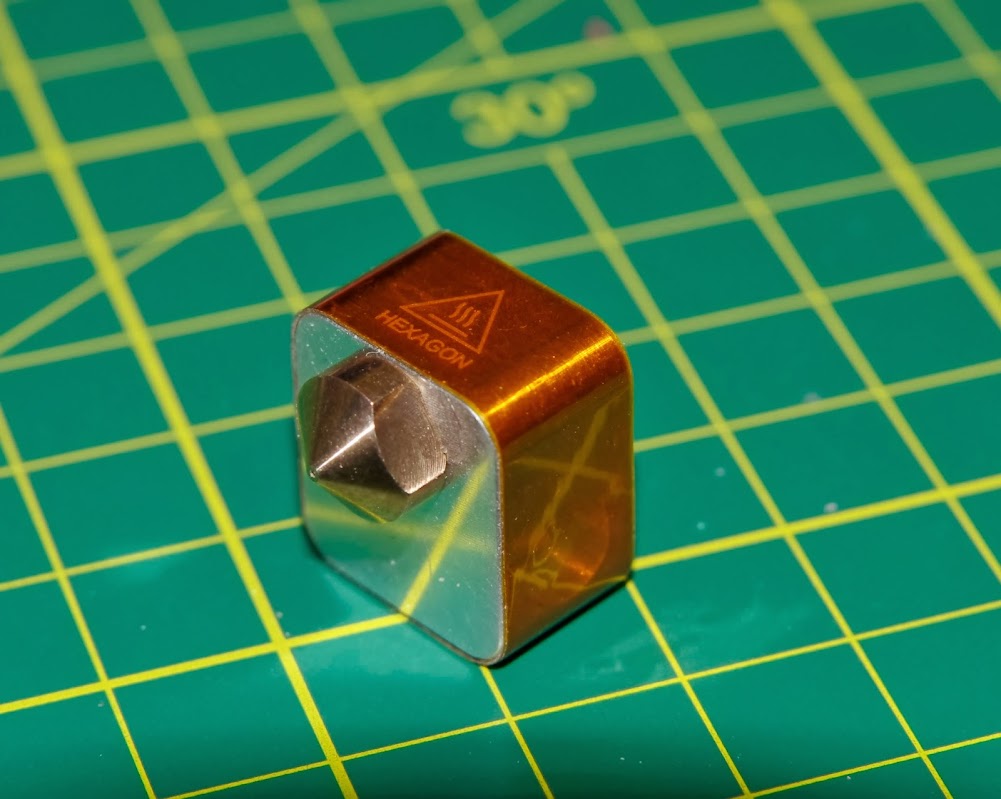
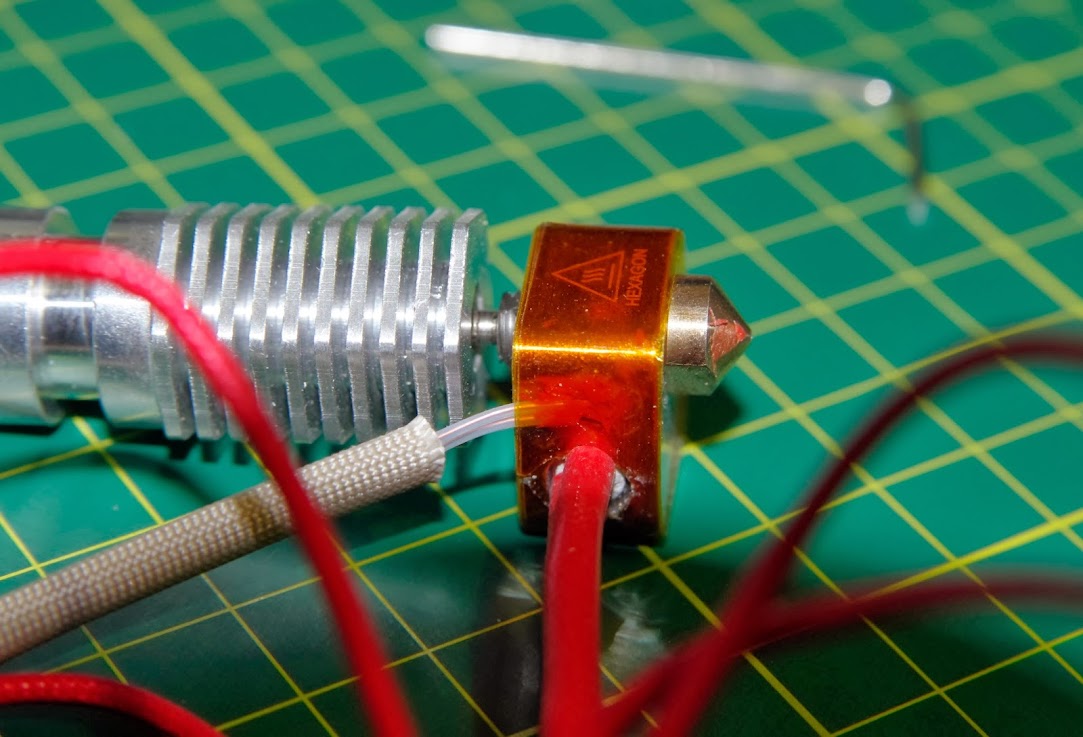
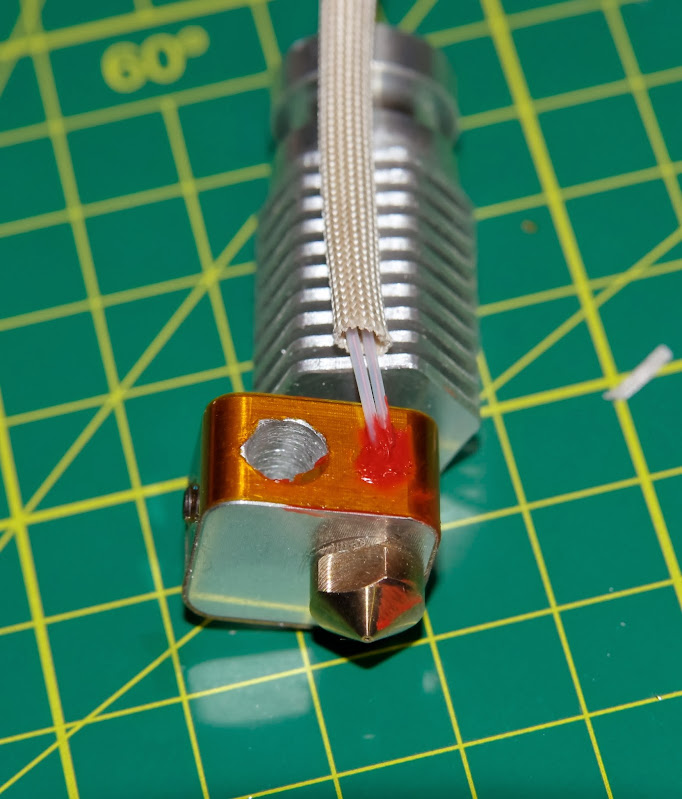
			<content type="html"><![CDATA[<p>When you receive a new hotend, it quite often will come &#039;naked&#039; - that is, un-assembled and without the electronics inserted. Something like this, often even broken down further:</p><p><span class="postimg"><img src="https://lh5.googleusercontent.com/--NTLyFN4Vsg/UvirtDbWGgI/AAAAAAAAKMM/5rfmzNqXGeI/w684-h799-no/IMGP0002___15_F056_01600_075_---_K-5IIs.jpg" alt="https://lh5.googleusercontent.com/--NTLyFN4Vsg/UvirtDbWGgI/AAAAAAAAKMM/5rfmzNqXGeI/w684-h799-no/IMGP0002___15_F056_01600_075_---_K-5IIs.jpg" /></span></p><p>I in fact prefer receiving a hotend this way, as then I know precisely what thermistor I&#039;m putting into it etc and how it is affixed. This post covers how I tend to set them up - clearly the pictures contain a brand new Hexagon hotend from RepRapDiscount.com - but this is the same method I use for every hotend I assemble (like the blocks I&#039;ll have to do this week for my Kraken! <img src="https://www.soliforum.com/img/smilies/smile.png" width="15" height="15" alt="smile" /> )</p><p>Firstly; for everyone that is reading old and new, here&#039;s a quick recap of the terminology certainly I use when dealing with bits of the Hotend. Hotends may all differ in design or function of the different parts ; but they all feature this same anatomy for all intents and purposes (some may use PEEK heat sinks/breaks; some may use water in a water block, etc) - So this method is easily adaptable for all. :</p><p><span class="postimg"><img src="https://lh3.googleusercontent.com/-4L9iVKEd_-A/Uvi1pBjTM-I/AAAAAAAAKNw/26kgv3NaaWk/w1083-h619-no/Hotend+Anatomy.jpg" alt="https://lh3.googleusercontent.com/-4L9iVKEd_-A/Uvi1pBjTM-I/AAAAAAAAKNw/26kgv3NaaWk/w1083-h619-no/Hotend+Anatomy.jpg" /></span><br />Not pictured is the grub screw that usually accompanies an all-metal hotend these days to retain the cartridge. On this particular Hexagon its located underneath the heater block relative to the above pic; on an E3D it appears just &#039;behind&#039; the nozzle on the &#039;base&#039; of the heater block.&nbsp; </p><p>So when I first receive a hotend, I will dry assemble all the bits, just to make sure everything fits. This is very true of prototypes or short/hand production runs of a hotend. With it all more or less together, I hand run an appropriate sized Drill bit through the heater cartridge/resistor hole. This just makes sure that its all cleaned up and really is 5/5.5/6mm in size. This is a worthwhile step as it is surprisingly easy to get a cartridge wedged in a hole - at which point its worth mentioning that you should always check the size of your cartridge and that its round - 10&#039;s of a millimeter can count here.. Now is when I&#039;d also determine how much I need to pack a resistor by with foil to get a tight fit in the hole (although I just don&#039;t use them these days...). Do NOT use a power drill - you will rapidly eat the aluminium blocks. </p><p><span class="postimg"><img src="https://lh3.googleusercontent.com/-Chxoxg6C4Ag/UvirtuMPiWI/AAAAAAAAKMQ/j_hLzR6vZqs/w854-h799-no/IMGP0003___80_F071_01600_043_---_K-5IIs.jpg" alt="https://lh3.googleusercontent.com/-Chxoxg6C4Ag/UvirtuMPiWI/AAAAAAAAKMQ/j_hLzR6vZqs/w854-h799-no/IMGP0003___80_F071_01600_043_---_K-5IIs.jpg" /></span></p><p>My thermistor setup takes a minute more in prep, but has never failed me in operation yet. I use small .7mm PTFE tube and place about 15mm&#039;s of it over each each leg. Using a bootlace ferrule, I then crimp on high gauge wire and heat shrink the whole thing before adding a final layer of &quot;VIDAFLEX&quot; fibreflass sleeving which is a woven &#039;spaghetti&#039; insulator designed for high temp or abrasive conditions (often seen protecting mains circuits). RepRapDiscount has started shipping their kit thermistors this way (minus the vidaflex) however I still cut it down and heatshrink/vidaflex them as the as shipped ones are long enough to run all the way back to the controller; however I run a small plug block on my x-carriage so dont need anywhere near that length. Use bootlaces at the thermistor side, however solder is acceptable at the top end where I rejoined the 2-pin header socket - just use a &#039;<a href="http://en.wikipedia.org/wiki/Western_Union_splice">Western Union Splice</a>&#039; to join them and heatshrink it all to be safe. Use lead free solder for its higher meltpoint if you are so equipped.</p><p><span class="postimg"><img src="https://lh4.googleusercontent.com/-Ayxh3pxWnrQ/UvirxUyBl9I/AAAAAAAAKMY/lITAlhCN1Ds/w1083-h631-no/IMGP0004___80_F071_01600_075_---_K-5IIs.jpg" alt="https://lh4.googleusercontent.com/-Ayxh3pxWnrQ/UvirxUyBl9I/AAAAAAAAKMY/lITAlhCN1Ds/w1083-h631-no/IMGP0004___80_F071_01600_075_---_K-5IIs.jpg" /></span></p><p>Once this is done, I disassemble the heater block and then using the nearest-to-the-vertical-height-of-the-heaterblock width kapton(or off-brand polymide clone ; stock up via DX/Aliexpress/eBay - 10mm, 15mm, 20mm are good all over the printer sizes to have on hand)&nbsp; and then wrap 2-3 layers around it, making sure to start and finish on either undrilled sides (usually the &#039;front&#039; or &#039;back&#039; of the block). Do this as tightly as possible.</p><p><span class="postimg"><img src="https://lh4.googleusercontent.com/-sNt1dzHrF9E/UvirznYP_RI/AAAAAAAAKMg/XCuifCUUqoM/w1001-h799-no/IMGP0005___80_F071_01600_063_---_K-5IIs.jpg" alt="https://lh4.googleusercontent.com/-sNt1dzHrF9E/UvirznYP_RI/AAAAAAAAKMg/XCuifCUUqoM/w1001-h799-no/IMGP0005___80_F071_01600_063_---_K-5IIs.jpg" /></span></p><p>Eagle eyed viewers will note I&#039;ve covered the holes. Using a sharp knife such as an xacto/scalpel ; trim out the tape around the holes - I usually punch a hole either side of the circles and then just trim with the tension of the tape. You only need to do the thermistor hole at this stage but I often just do all of them. </p><p>Now insert you thermistor into its hole and fold it over so it runs out the top of the heater block. I usually &#039;pre shape&#039; the thermistor with a right angle. You want to make sure the thermistor &#039;exits&#039; the heater block with only PTFE against the block. Make sure in this process that the PTFE stays pushed up against the ends of the thermistor - whilst the aluminium block is now insulated for both heat and electrically only the outside, its still possible to mash the thermistor leads together or short insde the hole. </p><p>Once inserted, use a small piece of card or a pallete knife to apply some Sensor Safe High-Temp Silicone Gasket compound. I use Loctite 596 . Whilst it can be argued that this does potentially have a slight hysteresis on the temp readings; in practice it is not an issue and can be ignored - particularly if you make sure the thermistor is right against the back of its recess. The compound is there to hold it all in place and ensure a good seal on the cavity - so make sure the back of the hole and thermistor is properly covered. </p><p><span class="postimg"><img src="https://lh4.googleusercontent.com/--9WqonkstGo/Uvir1BVjsOI/AAAAAAAAKMo/02w4edv3hPQ/w682-h799-no/IMGP0006___80_F071_01600_075_---_K-5IIs.jpg" alt="https://lh4.googleusercontent.com/--9WqonkstGo/Uvir1BVjsOI/AAAAAAAAKMo/02w4edv3hPQ/w682-h799-no/IMGP0006___80_F071_01600_075_---_K-5IIs.jpg" /></span></p><p>Once this is done; Its time for a final kapton wrap to secure the thermistor in place against the top of the block and make sure it can&#039;t be pulled out by accident. Trim out the main heater cartridge holes and you can now insert and secure the cartridge or resistor:<br /><span class="postimg"><img src="https://lh5.googleusercontent.com/-zcjGf3mWQ24/Uvir2UMa0mI/AAAAAAAAKMw/jewCIWylLbE/w735-h799-no/IMGP0007___80_F071_01600_075_---_K-5IIs.jpg" alt="https://lh5.googleusercontent.com/-zcjGf3mWQ24/Uvir2UMa0mI/AAAAAAAAKMw/jewCIWylLbE/w735-h799-no/IMGP0007___80_F071_01600_075_---_K-5IIs.jpg" /></span><br /><span class="postimg"><img src="https://lh4.googleusercontent.com/-0_ddHPUY_pg/Uvir7z32PpI/AAAAAAAAKM8/pWDCOQZGEys/w1083-h737-no/IMGP0008___80_F071_01600_075_---_K-5IIs.jpg" alt="https://lh4.googleusercontent.com/-0_ddHPUY_pg/Uvir7z32PpI/AAAAAAAAKM8/pWDCOQZGEys/w1083-h737-no/IMGP0008___80_F071_01600_075_---_K-5IIs.jpg" /></span></p><p>And we are done! You can install your new hotend and get printing!<br /><span class="postimg"><img src="https://lh5.googleusercontent.com/-B8OPxtbeoS8/Uvir7qhx1rI/AAAAAAAAKNA/5fnA2x_hyDY/w1059-h799-no/IMGP0009___80_F071_01600_055_---_K-5IIs.jpg" alt="https://lh5.googleusercontent.com/-B8OPxtbeoS8/Uvir7qhx1rI/AAAAAAAAKNA/5fnA2x_hyDY/w1059-h799-no/IMGP0009___80_F071_01600_055_---_K-5IIs.jpg" /></span></p><p>This takes a few minutes more, but the small preparations mean that I can remove my hotends, throw them around in boxes, ignore them for a few weeks, and put them back in and they work. I have yet to have a thermistor in this setup fail , fall out or end up shorting randomly down the road. </p><p>Hope this information is helpful to some!</p><p>Adrian</p>]]></content>
			<author>
				<name><![CDATA[adrian]]></name>
				<uri>https://www.soliforum.com/user/663/</uri>
			</author>
			<updated>2014-02-10T13:02:50Z</updated>
			<id>https://www.soliforum.com/post/49249/#p49249</id>
		</entry>
</feed>