<?xml version="1.0" encoding="utf-8"?>
<feed xmlns="http://www.w3.org/2005/Atom">
	<title type="html"><![CDATA[SoliForum - 3D Printing Community — Soliprint failure]]></title>
	<link rel="self" href="https://www.soliforum.com/feed/atom/topic/17277/" />
	<updated>2018-05-21T23:39:24Z</updated>
	<generator>PunBB</generator>
	<id>https://www.soliforum.com/topic/17277/soliprint-failure/</id>
		<entry>
			<title type="html"><![CDATA[Re: Soliprint failure]]></title>
			<link rel="alternate" href="https://www.soliforum.com/post/144095/#p144095" />
			<content type="html"><![CDATA[<p>We have another one of these guys here that likes to do things in addition to what is asked so it makes it very hard to help him when you have no clue what he has done and if he has done what you asked.</p><p>Please people, if you want help then please do and only do the things that those helping you ask. Most of us follow a troubleshooting flow that helps us eliminate possible issues. Once we know those are not an issue we move on.</p><p>But when you do other things or don&#039;t do exactly what we ask we are left with nothing to move forward with because we have no clue what you did or did not do.</p><p>So long story short, when asking for help only do what the person helping you ask. If you are too impatient to wait for a reply then don&#039;t expect the help to last too long unless you tell them everything you did and why.</p><p>Nit trying to bash anyone. You all just need to understand that with 3D Printers there is a process of elimination that must be followed when troubleshooting and it must be taken one step at a time.</p>]]></content>
			<author>
				<name><![CDATA[carl_m1968]]></name>
				<uri>https://www.soliforum.com/user/7731/</uri>
			</author>
			<updated>2018-05-21T23:39:24Z</updated>
			<id>https://www.soliforum.com/post/144095/#p144095</id>
		</entry>
		<entry>
			<title type="html"><![CDATA[Re: Soliprint failure]]></title>
			<link rel="alternate" href="https://www.soliforum.com/post/144091/#p144091" />
			<content type="html"><![CDATA[<p>what do you mean - &quot;is it normal for the mesh to be incomplete in places?&quot;<br />how, specifically, is it incomplete? </p><p>also, if you have not yet done the calibrations outlined in the links I gave you several posts back, you should really start there.. you should not need to turn flow rates down while printing. Proper calibration is a key component to getting good prints. That and proper temperature. <br />Don&#039;t worry so much about trying to fix the &quot;smudged&quot; corners until you get things properly calibrated.</p>]]></content>
			<author>
				<name><![CDATA[heartless]]></name>
				<uri>https://www.soliforum.com/user/10399/</uri>
			</author>
			<updated>2018-05-21T23:13:52Z</updated>
			<id>https://www.soliforum.com/post/144091/#p144091</id>
		</entry>
		<entry>
			<title type="html"><![CDATA[Re: Soliprint failure]]></title>
			<link rel="alternate" href="https://www.soliforum.com/post/144089/#p144089" />
			<content type="html"><![CDATA[<p>So after rigging up the bed stabiliser I did another test print of the small square. Much better resolution but still smudged at three corners. So I wound back the flow rate from 100 to 90 and three corners came good with only one a little smudged. Better.<br />However now I am sure the head only is moving I took some measurements of the finished product and it seems one wall, (not sure which one yet as it was late and I forgot) has 0.6 mm extra thickness compared to the opposite one which is 0.6mm under 2.2mm.<br />The outside measurement is also 0.6mm under 20mm on this plane. <br />I am thinking it may have something to do with the screw pitch calculations for the end-stop. I haven&#039;t put the -4mm into the &quot;zero&quot; field on the printer settings yet. (I think it is that tab, I will have another look at it tonight).</p><p>Also haven&#039;t run the temp calibration square with differing extruder temps yet but did a short test print of the original g-code. Is it normal for the mesh to be incomplete is places?</p><p>I will have time to upload some pics tonight.</p><p>Thanks.</p>]]></content>
			<author>
				<name><![CDATA[krazy4gone]]></name>
				<uri>https://www.soliforum.com/user/18921/</uri>
			</author>
			<updated>2018-05-21T22:01:19Z</updated>
			<id>https://www.soliforum.com/post/144089/#p144089</id>
		</entry>
		<entry>
			<title type="html"><![CDATA[Re: Soliprint failure]]></title>
			<link rel="alternate" href="https://www.soliforum.com/post/144014/#p144014" />
			<content type="html"><![CDATA[<p>i dunno about a &quot;G-code for Idiots&quot; guide, but there is a wiki for them: <a href="http://reprap.org/wiki/G-code">http://reprap.org/wiki/G-code</a></p><p>M104 - Set Extruder Temperature<br />Sxxx - the desired temp</p>]]></content>
			<author>
				<name><![CDATA[heartless]]></name>
				<uri>https://www.soliforum.com/user/10399/</uri>
			</author>
			<updated>2018-05-16T00:01:04Z</updated>
			<id>https://www.soliforum.com/post/144014/#p144014</id>
		</entry>
		<entry>
			<title type="html"><![CDATA[Re: Soliprint failure]]></title>
			<link rel="alternate" href="https://www.soliforum.com/post/144013/#p144013" />
			<content type="html"><![CDATA[<p>Thanks heartless.<br />I figured the temp was too high. I have never read anything about temps and layer adhesion before, but when pulling on the walls of the test cube they are very solid. No way I can release them.<br />I am a welder, (well, have been) and know something about mig welding processes. I also have some plastic welding experience. Seems to me like layering plastic is a similar thing.<br />I had already started to turn down the heat but this was overall heat and it is difficult to judge the effect. I had started at 195 and went to 190. Probably too small an increment to effectively judge changes, especially with a multi-run wall. I had also looked at the g-code wondering where the temp settings were. M104 is temperature request for the log? And Sxxx is set temperature?</p><p>I wonder if there is a g-code for idiots book I could grab somewhere....lol</p><p>Anyway, I will be doing the advised exercise as soon as possible to determine the best temperature. I have a non-contact thermometer I can use to measure the heat of the tip for cross referencing.</p><p>What is your advice re: Flowrate adjustments?</p><p>I had some time in the shed last night on the old xp with some tutorials for freeCAD I downloaded and transferred across. The machine is coping so far, but when the object begins to get too large it is probably going to begin slowing down. When and if it gets to that stage (the object I have in mind to build first is not complex) I will be looking into getting another pc. The xp is an old one from my local high school so it has some pretty high end stuff in it for it&#039;s era but how long it will cope with the processing demands of 3D modelling is unknown by me.</p>]]></content>
			<author>
				<name><![CDATA[krazy4gone]]></name>
				<uri>https://www.soliforum.com/user/18921/</uri>
			</author>
			<updated>2018-05-15T22:40:16Z</updated>
			<id>https://www.soliforum.com/post/144013/#p144013</id>
		</entry>
		<entry>
			<title type="html"><![CDATA[Re: Soliprint failure]]></title>
			<link rel="alternate" href="https://www.soliforum.com/post/144006/#p144006" />
			<content type="html"><![CDATA[<p>you are probably going to think I am nuts, but if you are using the manufacturer recommended temps, turn the temperature down... by a fair bit.</p><p>the stock Solidoodle hotend is <strong>not</strong> accurate as far as temps go - the placement of the thermistor is the reason why. Before swapping my stock hotend for the E3D, my temps were running about 40-45 degrees lower than most &quot;recommended&quot; temps. For PLA it was between 160-165C - not the 200-210C that most use. Overheating will also cause major &quot;drooling&quot;.</p><p>There is a relatively simple way of calibrating for temperature using a very simple, <strong>single</strong> wall tall tower. (the single wall is achieved through slic3r settings - it is <strong>not</strong> modeled.)</p><p>using the attached temp calibration tower, which is 20mm x 20mm x 100mm tall (and can also be used for filament calibrations, just don&#039;t print the entire thing - kill the print at about 4-5mm tall) you will need to make a few adjustments in Slic3r print settings.</p><p>Layers and Perimeters<br />&nbsp; &nbsp; Layer Height<br />&nbsp; &nbsp; &nbsp; &nbsp; Layer Height: 0.2963 (not 0.3 - this is due to the use of a 5/16” threaded rod vs metric)<br />&nbsp; &nbsp; &nbsp; &nbsp; First Layer Height: can be same as above<br />&nbsp; &nbsp; Vertical Shells<br />&nbsp; &nbsp; &nbsp; &nbsp; Perimeters: 1<br />&nbsp; &nbsp; &nbsp; &nbsp; Spiral vase: unchecked<br />&nbsp; &nbsp; Horizontal Shells<br />&nbsp; &nbsp; &nbsp; &nbsp; Solid Layers - Top: 0,&nbsp; Bottom: 1 or 2<br />&nbsp; &nbsp; Quality - uncheck everything except “Detect Thin Walls”<br />&nbsp; &nbsp; Advanced<br />&nbsp; &nbsp; &nbsp; &nbsp; Seam Position: Nearest<br />&nbsp; &nbsp; &nbsp; &nbsp; External perimeters first: unchecked<br />Infill<br />&nbsp; &nbsp; Fill Density: 0<br />&nbsp; &nbsp; Fill Pattern: (should be greyed out)<br />&nbsp; &nbsp; Top/Bottom fill pattern: Rectilinear</p><p>If you have gone through the blog posts about calibration you should have the basics for this part down.</p><p>to do the temperature calibration, you will want to go ahead and slice the tower with the correct settings.<br />Once it has finished slicing, you will need to go into the g-code and do a bit of editing.</p><p>In RH, on the Preview window, there should be a tab that says &quot;G-Code Editor&quot; - click on that.<br />you should see something that looks like this:</p><p><span class="postimg"><img src="http://soliforum.com/i/?7OqvYhP.jpg" alt="http://soliforum.com/i/?7OqvYhP.jpg" /></span></p><p>
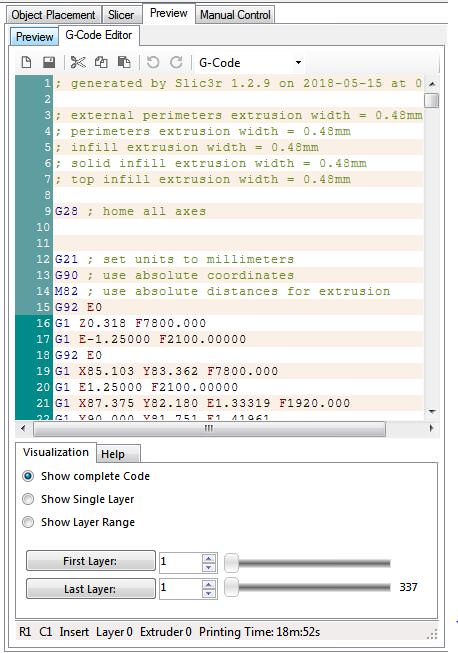
Dont be intimidated by it, yes it is a lot of code if you scroll through it, but it is actually pretty easy to navigate.</p><p>1st, decide how often you want to change temps - I would suggest every 15-20 layers<br />On a piece of paper, jot down layer heights that you want to change temps at...</p><p>Lets say every 20 layers, you want to change the temp 5 degrees Celsius, so your list will look something like this</p><p>1-20 - starting temp - 200C<br />21-40 - 195C<br />41-60 - 190C<br />61-80 - 185C<br />and so on... </p><p>
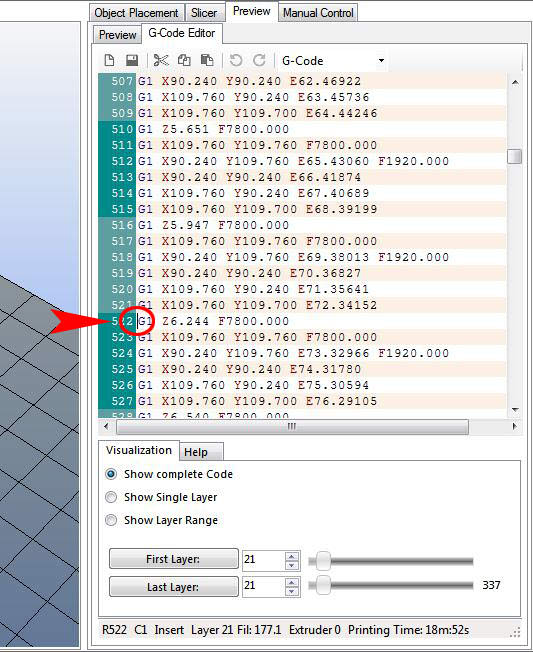
Using the layer tool at the bottom of the screen, you can type in the layer you want in the &quot;First Layer&quot; box, then click the button (that says &quot;First Layer&quot; and it will jump to that layer in the g-code. Notice where the cursor is - that is the beginning of layer 21. Also note the color changes on the left side (alternating light green &amp; dark green) - each time the color changes is a new layer.</p><p><span class="postimg"><img src="http://soliforum.com/i/?6nSpxyY.jpg" alt="http://soliforum.com/i/?6nSpxyY.jpg" /></span></p><p>Now, click on the last line of the previous layer (at the end in empty space) to move the cursor up, then hit &quot;enter&quot; this will insert a new line for your temperature edit - should look like this at this point...</p><p><span class="postimg"><img src="http://soliforum.com/i/?cmZrVij.jpg" alt="http://soliforum.com/i/?cmZrVij.jpg" /></span></p><p>
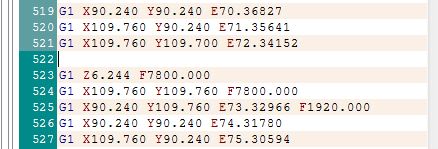
in that line type the following: M104 Sxxx (xxx is the temperature you want to change to - if you are starting at 200, this number would be 195, so your line would actually read M104 S195)</p><p>Note: you <strong>MUST</strong> use Capitol Letters when editing G-code, or it will not be read correctly.</p><p>repeat the procedure for each temperature change you want to make - enter the layer number you want, hit the button, add your temp edit.</p><p>when you have finished editing, you are ready to print, there is nothing else you need to do.. Set your starting temperature, heat up and hit the print button.. it should automatically change the temperature when it gets to the layers the temp changes have been added to.</p><p>If the temp gets low enough that the print starts to fail, kill it. </p><p>If the print finishes, remove it, and carefully look it over - you should be able to see where the temp changes occurred in good light.. you may want to mark the boundary of the temp changes with a marker so you can figure out which temp is best.<br />Test the layer adhesion by pulling at the layers.. if they separate easily, it is too cold. if they wont separate without serious effort, it is still to hot. It should take a little bit of effort to separate the layers.</p><p>If none of the temps seem right, repeat the process with new temp changes... starting with a lower temp than before and working your way down until you get it where it should be.</p>]]></content>
			<author>
				<name><![CDATA[heartless]]></name>
				<uri>https://www.soliforum.com/user/10399/</uri>
			</author>
			<updated>2018-05-15T13:37:24Z</updated>
			<id>https://www.soliforum.com/post/144006/#p144006</id>
		</entry>
		<entry>
			<title type="html"><![CDATA[Re: Soliprint failure]]></title>
			<link rel="alternate" href="https://www.soliforum.com/post/144002/#p144002" />
			<content type="html"><![CDATA[<p>Thanks heartless. I am going to go with the parts from the sewing machine. I am confident that it will do what I need. I followed your blog posts regarding calibrating the feed rate and have it feeding correctly. I think it is the nozzle pressure that needs winding back. The second print was with 10 degrees lees on the printhead, and it made some difference but I had to hold the bed with my finger while it was printing to try to prevent the smudging. I will know more with some more fiddling about.</p><p>There is also the feedrate and flowrate to adjust. It may be the flowrate is too high. I think it is that the filament is being squeezed out of the nozzle after a print command ends but I have not done any &quot;air printing&quot; to observe this.</p><p>Any ideas on how to go about this? Is there a thingiverse command set to observe the filament injection rest period flow rate or could I simply set the bed low and feed a little filament through and observe the nozzle for &quot;dribbling&quot; between feed commands and then adjust the feedrate until it stops leaking between injection commands?</p>]]></content>
			<author>
				<name><![CDATA[krazy4gone]]></name>
				<uri>https://www.soliforum.com/user/18921/</uri>
			</author>
			<updated>2018-05-15T04:08:43Z</updated>
			<id>https://www.soliforum.com/post/144002/#p144002</id>
		</entry>
		<entry>
			<title type="html"><![CDATA[Re: Soliprint failure]]></title>
			<link rel="alternate" href="https://www.soliforum.com/post/143991/#p143991" />
			<content type="html"><![CDATA[<p>there is a super easy to make front brace for the Solidoodles on thingiverse...you will need a couple of bearings, and something to support them - the directions call for carbon fiber rod, but I used a piece of brass tubing I had on hand. I have this on both of my SD4s.</p><p><a href="https://www.thingiverse.com/thing:195266">https://www.thingiverse.com/thing:195266</a></p><p>for a pretty good digital caliper, I can highly recommend this one: <br /><a href="https://www.amazon.com/iGaging-Electronic-Digital-Fractions-Stainless/dp/B001AQEZ2W/ref=sr_1_2?ie=UTF8&amp;qid=1526346624&amp;sr=8-2&amp;keywords=ez+cal">https://www.amazon.com/iGaging-Electron … rds=ez+cal</a></p><p>it gives 3 different readouts, including mms &amp; decimal inches, and actual fractions of an inch. Uses a common CR2032 battery, and does come with a spare battery in a case. I have had mine since shortly after getting the 1st 3d printer and love it.</p><p>Calibration starts with making sure the machine is feeding <strong>in</strong> exactly what you ask it for. <br />If you ask it for 50mms, it should be feeding in 50mms - not 47, not 54 - but 50.<br />The stock Solidoodle settings typically have it feeding in way too much.</p><p>if you want more info on how to do get things calibrated correctly, just ask.</p>]]></content>
			<author>
				<name><![CDATA[heartless]]></name>
				<uri>https://www.soliforum.com/user/10399/</uri>
			</author>
			<updated>2018-05-15T01:18:13Z</updated>
			<id>https://www.soliforum.com/post/143991/#p143991</id>
		</entry>
		<entry>
			<title type="html"><![CDATA[Re: Soliprint failure]]></title>
			<link rel="alternate" href="https://www.soliforum.com/post/143988/#p143988" />
			<content type="html"><![CDATA[<p>I have been cleaning the shed to find exactly that!! It took me a week or so to find it....And when I did I forgot where to put the numbers into. I don&#039;t think it is that though or wouldn&#039;t it be that all the corners and edges would be smudged? Some are real crisp while others, especially where the printhead reverses direction, are not. I will strengthen the bed first then retry the cube to gauge the effect of just that before altering anything else.</p>]]></content>
			<author>
				<name><![CDATA[krazy4gone]]></name>
				<uri>https://www.soliforum.com/user/18921/</uri>
			</author>
			<updated>2018-05-14T23:42:31Z</updated>
			<id>https://www.soliforum.com/post/143988/#p143988</id>
		</entry>
		<entry>
			<title type="html"><![CDATA[Re: Soliprint failure]]></title>
			<link rel="alternate" href="https://www.soliforum.com/post/143982/#p143982" />
			<content type="html"><![CDATA[<p>Get a digital caliper if you dont have one already. You need to to calibrate youre extrusion multiplier to get the correct amount of material extruded</p>]]></content>
			<author>
				<name><![CDATA[Kronikabuse]]></name>
				<uri>https://www.soliforum.com/user/6797/</uri>
			</author>
			<updated>2018-05-14T13:33:41Z</updated>
			<id>https://www.soliforum.com/post/143982/#p143982</id>
		</entry>
		<entry>
			<title type="html"><![CDATA[Re: Soliprint failure]]></title>
			<link rel="alternate" href="https://www.soliforum.com/post/143980/#p143980" />
			<content type="html"><![CDATA[<p>Well, I managed to get a test cube to print tonight....hoorah. I had a false start with one of the files from thingyverse.....the XP did not like it but a restart seems to have sorted it. There are still some kinks to work out with the settings but I want to thank heartless and everyone who has helped so far. I would not have been able to do this on my own. I have added a pic of the two cubes I printed. Curiously, the first one (the left one) is better. I have to have a look at the dimensions again as the walls are too thin I think. There is some discrepancy between the walls as well but one thing at a time.</p><p>I have noticed the bed skews off to the side a little each time there is a direction reversal of the extrusion head so I had a hunt through my shed and found a small shaft out of an old sewing machine I think I can use as a vertical brace to prevent the swinging. This might prevent the chaffing seen on the back sides of the cubes, as the front corners were perfect. It will take me a few days to make this adjustment, but I will post some pics of the change.</p>]]></content>
			<author>
				<name><![CDATA[krazy4gone]]></name>
				<uri>https://www.soliforum.com/user/18921/</uri>
			</author>
			<updated>2018-05-14T12:13:14Z</updated>
			<id>https://www.soliforum.com/post/143980/#p143980</id>
		</entry>
		<entry>
			<title type="html"><![CDATA[Re: Soliprint failure]]></title>
			<link rel="alternate" href="https://www.soliforum.com/post/143868/#p143868" />
			<content type="html"><![CDATA[<p>completely agree with Carl re modeling on the XP box...</p><p>3d modeling is a huge resource hog - processing power and gobs of RAM are essential to be able to do more complicated items.<br />You may get by ok on the XP box for something simple, but beyond that... <img src="https://www.soliforum.com/img/smilies/hmm.png" width="15" height="15" alt="hmm" />&nbsp; <br />XP will only recognize up to 4GB of RAM. My Win7 box has 12gig of usable RAM and at times that is not enough.</p>]]></content>
			<author>
				<name><![CDATA[heartless]]></name>
				<uri>https://www.soliforum.com/user/10399/</uri>
			</author>
			<updated>2018-05-03T12:29:40Z</updated>
			<id>https://www.soliforum.com/post/143868/#p143868</id>
		</entry>
		<entry>
			<title type="html"><![CDATA[Re: Soliprint failure]]></title>
			<link rel="alternate" href="https://www.soliforum.com/post/143867/#p143867" />
			<content type="html"><![CDATA[<p>You can always model in the house on good pc then put the STL on a thumb drive and take it out to the XP machine. If the machine is really as old as you say then 3d modeling is going to be slow on it and pushing it.</p>]]></content>
			<author>
				<name><![CDATA[carl_m1968]]></name>
				<uri>https://www.soliforum.com/user/7731/</uri>
			</author>
			<updated>2018-05-03T10:17:01Z</updated>
			<id>https://www.soliforum.com/post/143867/#p143867</id>
		</entry>
		<entry>
			<title type="html"><![CDATA[Re: Soliprint failure]]></title>
			<link rel="alternate" href="https://www.soliforum.com/post/143866/#p143866" />
			<content type="html"><![CDATA[<p>This guy should be a good resource for you . Do not know how close to you he really is. </p><br /><p><a href="http://www.makersmuse.com/">http://www.makersmuse.com/</a><br />Check out his you tube channel</p>]]></content>
			<author>
				<name><![CDATA[Tin Falcon]]></name>
				<uri>https://www.soliforum.com/user/6775/</uri>
			</author>
			<updated>2018-05-03T09:23:16Z</updated>
			<id>https://www.soliforum.com/post/143866/#p143866</id>
		</entry>
		<entry>
			<title type="html"><![CDATA[Re: Soliprint failure]]></title>
			<link rel="alternate" href="https://www.soliforum.com/post/143865/#p143865" />
			<content type="html"><![CDATA[<p>I have an Electrolux fan forced oven in the shed with a 30 c dehydration setting built in. I will dry out all four rolls tonight. Good to know they go brittle with moisture. I think I read that they go brittle with exposure to UV as well or is that a myth? I will store them differently now. I have some desiccant sachets I will also dry out and store them together in an airtight drum.</p><p>I think I may have not raised the bed to the thickness of the copy paper last night in my excitement at the prospect of doing my first print. I must be more patient. I will bake all the Filament I have before I go too far. I guess it would also effect the extrusion rate if the filament is high in moisture, and also the heat absorption rate as it flowed. I have a non-contact thermometer here, and so will try to get a reading of the filament extrusion temp versus nozzle temp with wet and dry filament to gauge the possible effect. I also read that PLA and ABS have a certain shrinkage. This would also be changed by moisture content and extrusion temp. </p><p>Seems another build is a container for the filament spools with a minimum orifice for the raw material to exit, with possibly an airtight seal and a carriage for some desiccant sachets within the container to maintain the filament in a dry state.</p><p>I am going with FreeCAD for now, but thanks for the heads up about the other software. I like the concept of Python, and want to learn the language as I am heading into my later years, and have wanted to build and invent electro-mechanical devices my entire life but never had the chance to do so before.</p>]]></content>
			<author>
				<name><![CDATA[krazy4gone]]></name>
				<uri>https://www.soliforum.com/user/18921/</uri>
			</author>
			<updated>2018-05-03T03:08:43Z</updated>
			<id>https://www.soliforum.com/post/143865/#p143865</id>
		</entry>
</feed>
