1

Topic: Printit Industries new Mica Heatbed install on SD4

I have to preface this write-up by saying that I had modified my #1 SD4 by installing a much thicker aluminum plate for the bed due to severe warping of the stock plate. The aluminum I chose to use is 3/16" plate (4.66mm according to my calipers), the stock bed is only 3mm thick. I also use mirror tile cut to size on top as my actual print surface, adding another 3mm of thickness.

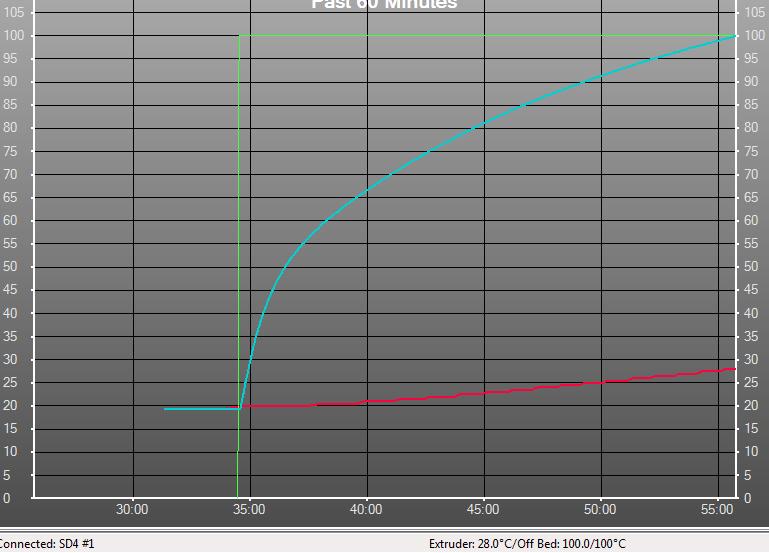
I don't have bed warping problems anymore, but with the stock silicone heat pad (150x150mm) it would take a looonnng time to heat to 100C for printing ABS... roughly 22-23 minutes from cold... but once there, it would hold it very well. (And before someone says it, no, it is not a power supply issue, it is a small pad trying to heat a large thermal mass)

Temperature graph of the old set up...
http://soliforum.com/i/?dXXUW12.jpg

So, when Printit Industries introduced the new Mica Heat bed, I grabbed one hoping that the full 8x8 dimension would help with the heat up times - more than 20 mins gets old after a while...

so, 1st things 1st - had to remove the old heat pad, which means pulling the bed out of the printer. This is pretty straight forward, disconnect the wiring from the controller board, remove the adjusting wing nuts and the whole thing lifts out pretty easily.

I had stuck a layer of cork under the bed to help insulate and drive the heat upward, so that had to be removed to get to the heat pad...
http://soliforum.com/i/?xeBHk4V.jpg

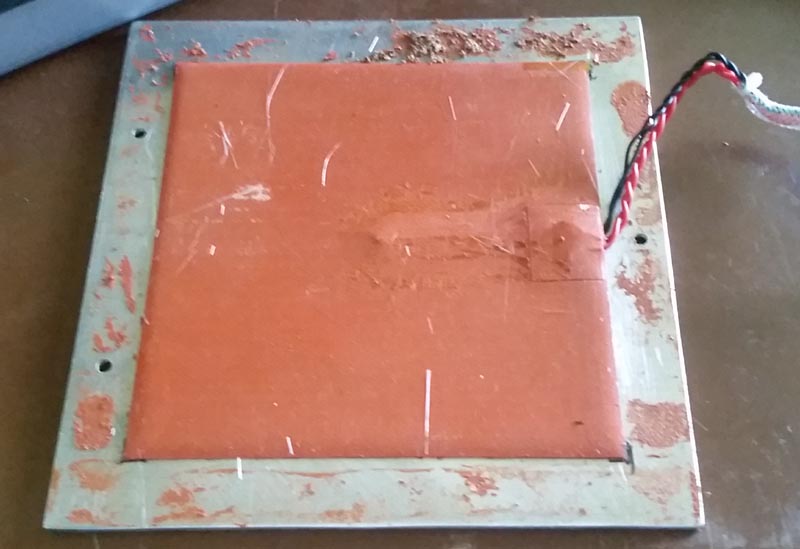
you can see how much smaller the stock heater is compared to bed size... those outer, unheated edges have been a problem when trying to do larger parts...

The silicone pad is quite tough so don't worry about destroying it. To remove it you just need to get under a corner and start pulling it loose. I had used automotive Ultra Copper gasket maker to stick the heat pad on the thicker bed, and the cork insulating material as well - it works very well and I had a time getting it all removed. This is the hardest part of the whole process.

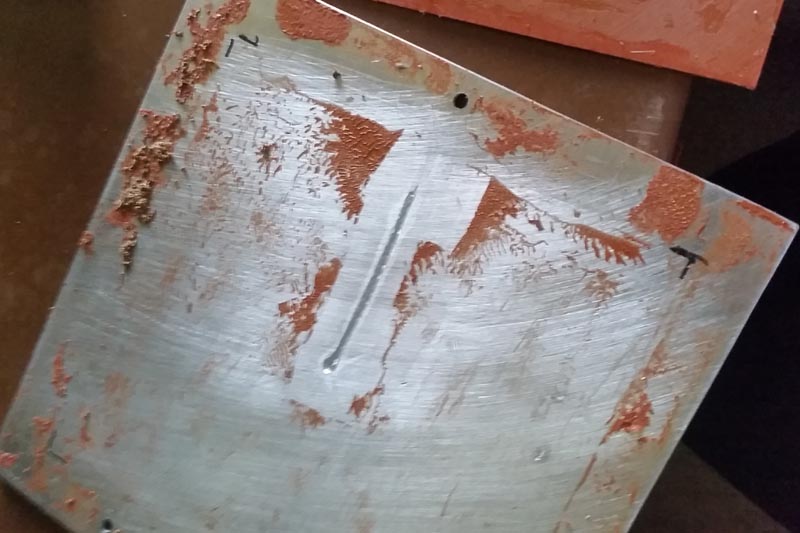
Now I had a bit of a mess to clean up after removing the old heater...
http://soliforum.com/i/?6MycJaf.jpg

Goof Off is some great stuff for cleaning up adhesive residues. smile

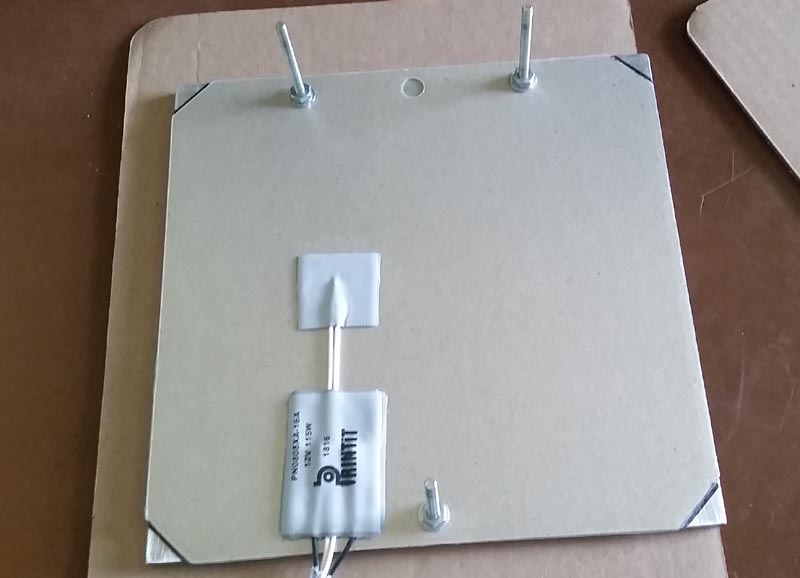
Got the aluminum bed all cleaned up and placed the new Mica heater...
http://soliforum.com/i/?9OXV0gx.jpg

It really is just that easy to install - I lined it up where I wanted it, marked the corners to help with re-alignment, peeled off the 3M adhesive backing and stuck it on... easy peasy.

back into the printer it goes...
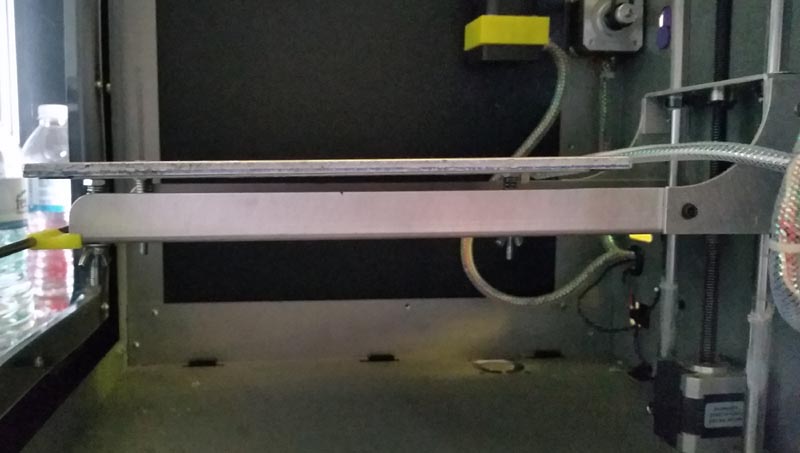
http://soliforum.com/i/?4qRzopF.jpg

Then route the wiring and make the connections to the controller board...

I only had one gripe - the wire gauge used for the thermistor wiring is a bit large, making it difficult to crimp ends on for the connector. I ended up snipping about 8 strands of the wire off to get the ends on successfully. Have already mentioned this to one of the guys at Printit, so hopefully that gets resolved in the next batch. Other than that, wiring went smoothly.

One thing I did not realize right away was that the thermistor needs to be changed in the firmware for accurate temp reading - it uses table 5, just like the E3D hotends (stock uses table 1). Perhaps a note included in the package, reminding purchasers of this would be advisable. wink

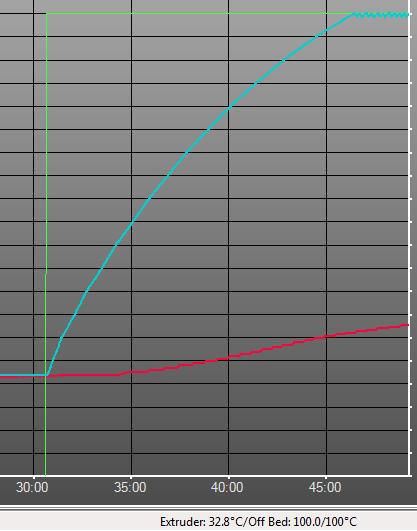
Anyway, a test run (after updating my firmware) shows heat time from cold to be cut nearly in half - approximately 13mins - and this is with NO insulation underneath...

temp graph of the new mica heater...
http://soliforum.com/i/?F6j3OX0.jpg

I plan on putting cork under this one, as I had with the old one - hoping it will help reduce heat up times just a little more. I would be quite happy to get heat up time to under 10 mins - keep in mind that I am heating 7.5mm of thickness... so yeah, under 10 mins would be outstanding.

I still need to re-level the bed and run some prints, but so far, I am quite happy with my purchase. I will update after further testing/use.

SD4 #1 & #2 - Lawsy carriages, E3D v6, Rumba controller board, mirror bed plate, X motor fan, upgraded PSU & Mica bed heater
SD4 #3 - in the works ~ Folgertech FT-5, rev 1
Printit Industries Beta Tester - Horizon H1

2 (edited by mloebl 2016-05-20 18:16:30)

Re: Printit Industries new Mica Heatbed install on SD4

Nice! Just ordered one.  I have one someone on the board here was selling and no longer sells... and the first batch he got, the wires were a bit undersized so get a bit warm.  So not sure how it's going to last long term.

Mine will heat the 1/4" MIC6 bed to 110C in about 5mins.  HOWEVER, guessing a bit of a swing from thermistor to bed surface (though it is f'ing hot to touch).  I also have a full enclosure around my SD3, and don't turn the fans on until bed is to temp.

SD3, Lawsy Carriages with GT2 belts on x axis, BLTouch, Bondtech BMG extruder, E3D v6 via bowden, MIC6 bed with 200W heater w/SSR relay and a RUMBA controller

3

Re: Printit Industries new Mica Heatbed install on SD4

I have been in contact with a couple of the guys from Printit - and they have been very helpful. smile

We are trying a couple of things, one at a time, to see if we can reduce heat times a bit more.

regardless of the outcome of these "experiments" I am still quite happy with the improvement in heat up time - cutting it nearly in half with no major changes other than the heater itself is impressive.

SD4 #1 & #2 - Lawsy carriages, E3D v6, Rumba controller board, mirror bed plate, X motor fan, upgraded PSU & Mica bed heater
SD4 #3 - in the works ~ Folgertech FT-5, rev 1
Printit Industries Beta Tester - Horizon H1
4 (edited by heartless 2016-05-21 21:26:10)

Re: Printit Industries new Mica Heatbed install on SD4

Quick update... after a bit of discussion with wardjr about my setup, we decided to try a few things to see if we can reduce heat-up times a bit more..

1. It was suggested to me to apply a square of foil tape (the kind used for HVAC ductwork) over the thermistor pad. It just so happened I had some heavy duty tape of this type on hand so that one was easy. Iron Man also suggested doing this in a separate message.
     Result: shaved about a minute off, give or take. (stop watch time was 12:33 - had not used a stop watch prior to this, so prior heat times were approximate)

2. Bed PID tune - funny, but I had never done one on the bed... guess it was about time...
     Result: didn't really seem to make much of a difference time wise...

3. Last suggestion was to turn up the PSU output a little. It was set at 12.69vDC and would maintain that under load with no problem.
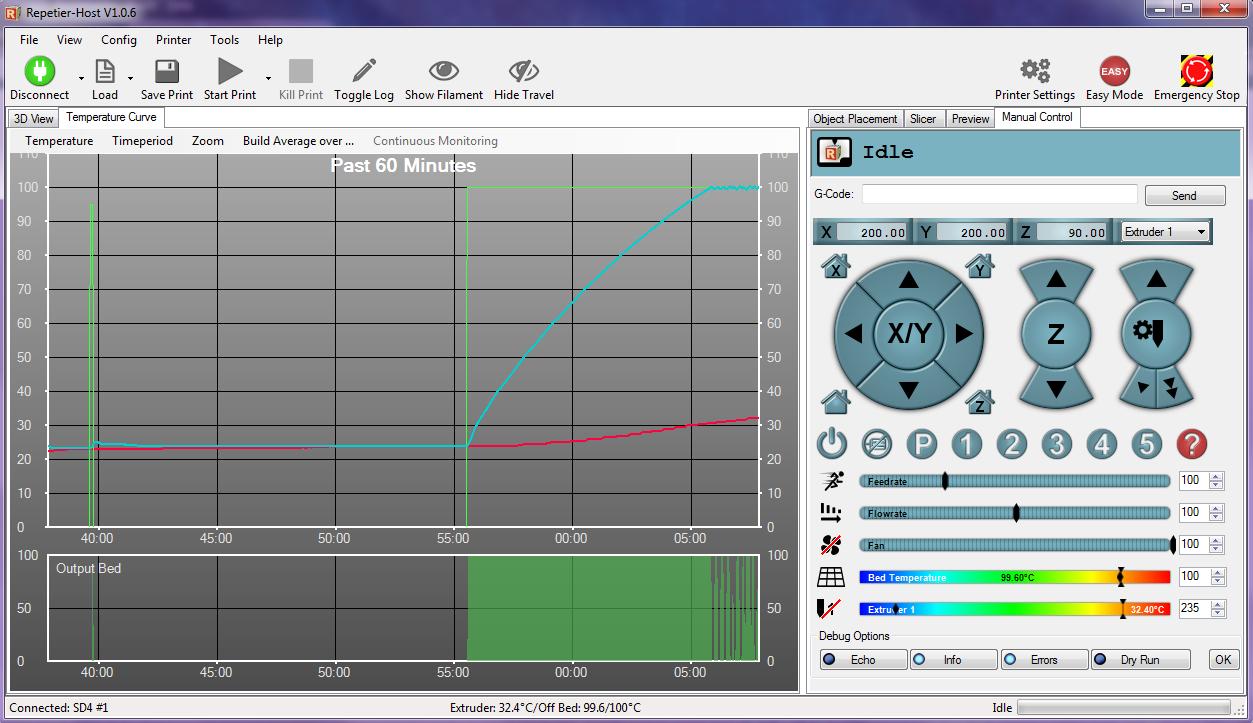
Turned it up to 13.6vDC today (read 13.59 under load), and ran a heat up test... Cold start temp was 24C as reported by both the bed and hotend
     Result: Stopwatch time is - 10:12 - so yes, power supply output voltage definitely makes a difference. wink

temp graph from the latest test run (30 minute zoom)...

http://soliforum.com/i/?QI6OBfb.jpg

SD4 #1 & #2 - Lawsy carriages, E3D v6, Rumba controller board, mirror bed plate, X motor fan, upgraded PSU & Mica bed heater
SD4 #3 - in the works ~ Folgertech FT-5, rev 1
Printit Industries Beta Tester - Horizon H1
5 (edited by jagowilson 2016-05-21 21:43:05)

Re: Printit Industries new Mica Heatbed install on SD4

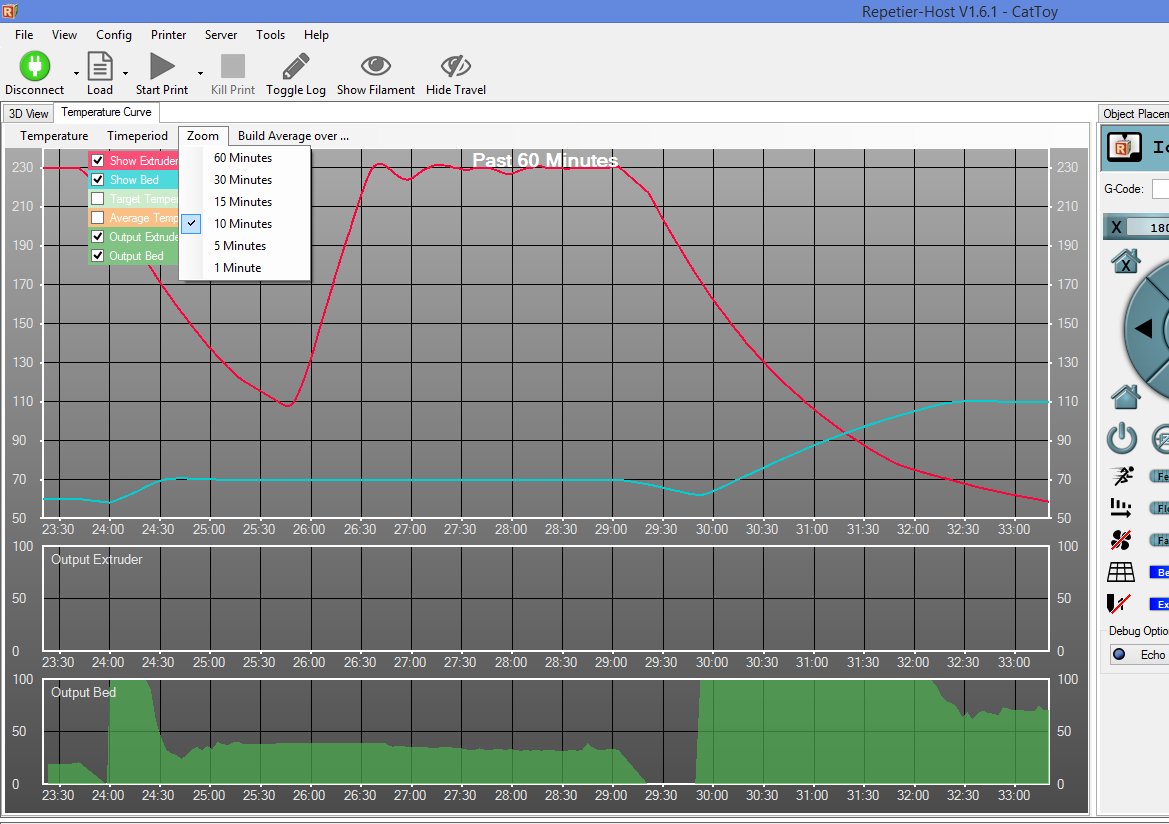
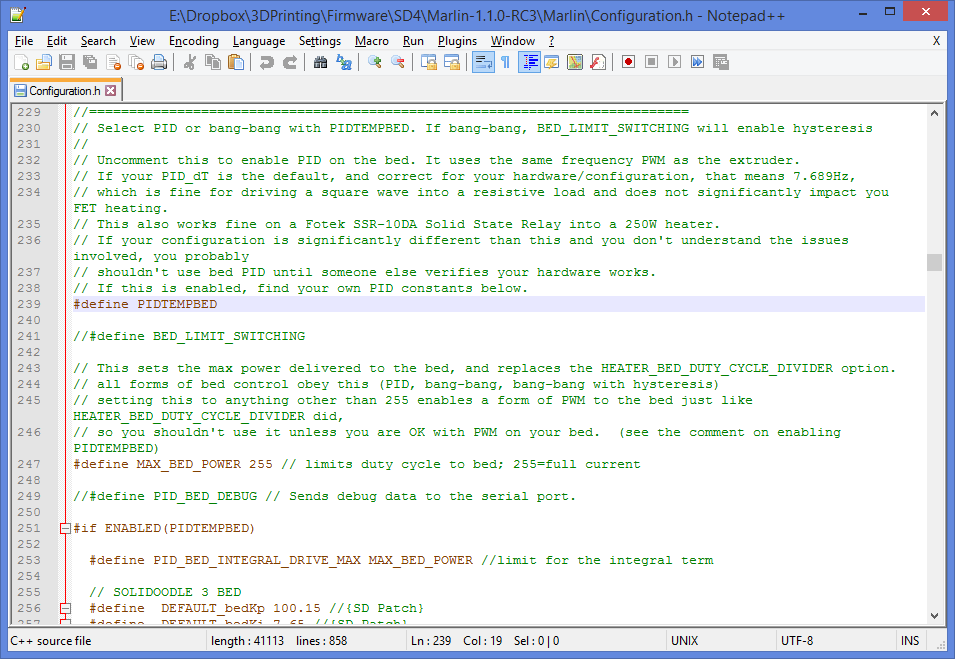
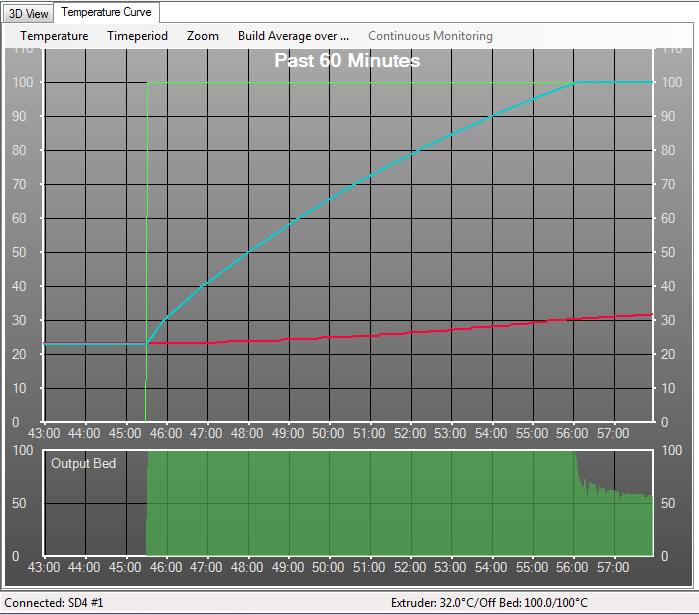
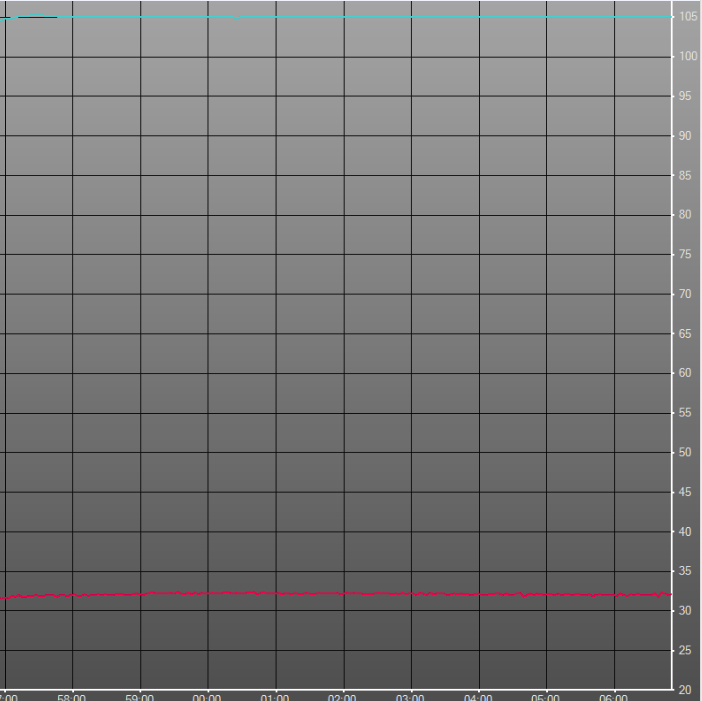
Looking much better. Did you for sure uncomment "#define PIDTEMPBED" in Configuration.h? Your power output graph looks more like bang-bang than PID. See mine for reference. (I've been printing TPU all day and am now switching to ABS, which is why you see lower temperatures in the graph). If PID tuned properly, there should be absolutely no wobble in the bed temperature. Mine will stay stable and hardly fluctuate 0.01c over several hours of printing. I see your temperature curve has a sine-wave pattern, which is expected with bang-bang but not PID. I was able to attain this same level of temperature precision with the stock bed, as well.

The more stable the temperature is, the less warping trouble you will have. Changes as low as 0.5c can have a dramatic effect on part appearance and adhesion.

Note: There's a bug in Repetier Host where it always says "Past 60 Minutes" even if you use a different time scale. I showed my time scale in the image (10 minutes) to make this clear.

http://soliforum.com/i/?Boe3GA2.png

6

Re: Printit Industries new Mica Heatbed install on SD4

One other note, make sure MAX_BED_POWER is 255 when you check to make sure PIDTEMPBED is enabled. This is what your Configuration.h should roughly look like. This is from Marlin-1.1.0-RC3, but any Marlin should look about the same. http://soliforum.com/i/?TFSeFSa.png

7

Re: Printit Industries new Mica Heatbed install on SD4

jagowilson - thank you very much for sharing that screenshot...

I thought that bed PID was enabled, but after comparing lines between your screenshot, and my copy of the firmware, apparently it wasnt... =P
I will be correcting that little issue shortly (printer is currently running - for another hour & a half)

oy-vey... it is the little things that trip us up, LOL

SD4 #1 & #2 - Lawsy carriages, E3D v6, Rumba controller board, mirror bed plate, X motor fan, upgraded PSU & Mica bed heater
SD4 #3 - in the works ~ Folgertech FT-5, rev 1
Printit Industries Beta Tester - Horizon H1
8 (edited by heartless 2016-05-22 13:03:58)

Re: Printit Industries new Mica Heatbed install on SD4

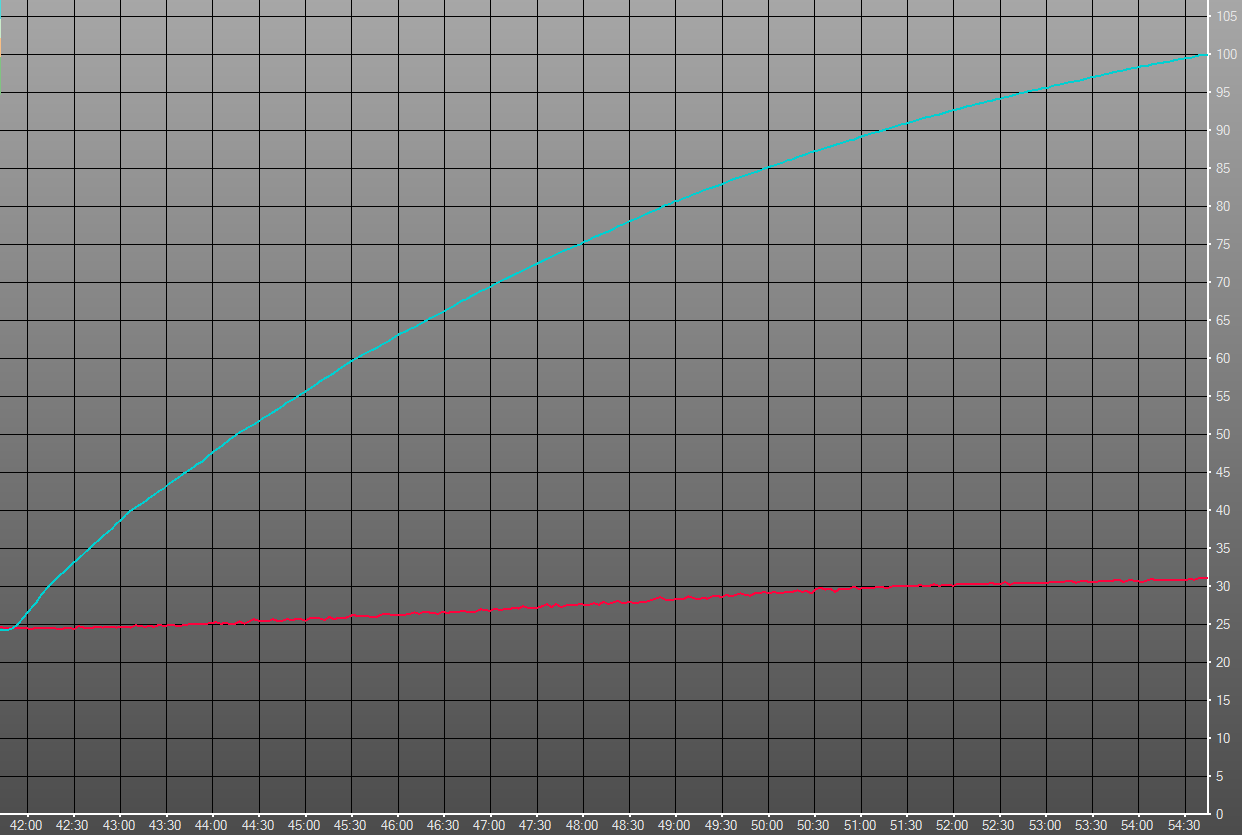
ok, bed PID enabled (for sure this time, lol), PID tune run, numbers updated... and the latest heat graph from this morning (15min zoom, regardless of what the screen says, lol. they really should fix that)...

http://soliforum.com/i/?kXESkHi.jpg

running right at the 10.5minute mark for time starting at about 24C to 100C (still no insulation under the bed) and I now have a nice, flat line - no more wobbles in the heat profile. yay!

SD4 #1 & #2 - Lawsy carriages, E3D v6, Rumba controller board, mirror bed plate, X motor fan, upgraded PSU & Mica bed heater
SD4 #3 - in the works ~ Folgertech FT-5, rev 1
Printit Industries Beta Tester - Horizon H1
9 (edited by jagowilson 2016-05-22 13:15:42)

Re: Printit Industries new Mica Heatbed install on SD4

Nice! I have to wonder if it's the thicker aluminum or the mirror glass that makes our heat up times so different, but either way, you should have much more consistent temps across the surface compared to stock. Let us know how some big prints go!

10

Re: Printit Industries new Mica Heatbed install on SD4

yeah, I do have a LOT of thermal mass there to heat up... I am sure that has at least a little to do with the time...but that thicker aluminum plate has not warped, even a little bit. hehe

the first larger print on it went pretty well - once I got the temp stabilized. tongue

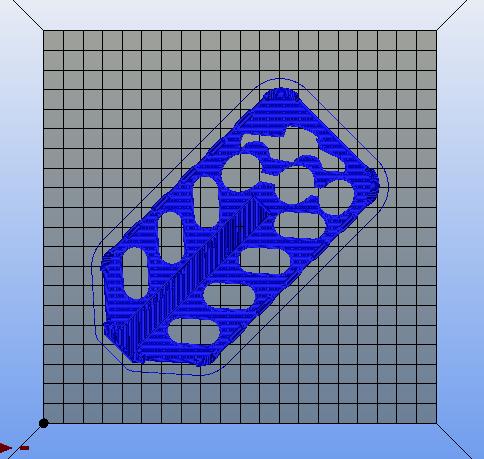
the piece is right at 6 in long, 3 in wide, and about 5/8 in tall - had tired printing a couple of times before and the narrow end kept warping and popping off the build plate. fairly sure the variation in bed temp had something to do with that...

http://soliforum.com/i/?MhiJF0b.jpg

actually ended up rotating it to point at the other front corner, and moved it back slightly to get it away from the door gap (& airflow)
Now that I have that one out of the way.... the rest of the order should go smoothly - smaller parts. wink

SD4 #1 & #2 - Lawsy carriages, E3D v6, Rumba controller board, mirror bed plate, X motor fan, upgraded PSU & Mica bed heater
SD4 #3 - in the works ~ Folgertech FT-5, rev 1
Printit Industries Beta Tester - Horizon H1
11

Re: Printit Industries new Mica Heatbed install on SD4

heartless wrote:

One thing I did not realize right away was that the thermistor needs to be changed in the firmware for accurate temp reading - it uses table 5, just like the E3D hotends (stock uses table 1).

Can you tell me how you found it uses 5? looking at the specs "Thermistor Type: NTC 100 kOhm" I would think it would use table 8 " 8 is 100k 0603 SMD Vishay NTCS0603E3104FXT (4.7k pullup)"

I honestly have no idea how these work. I just noticed when I was updating the firmware that number 8 said 100k and NTC smile

12

Re: Printit Industries new Mica Heatbed install on SD4

Here is my first heat test with my new printit heatbed smile stock plate on top + glass. Currently no insulation under smile
http://soliforum.com/i/?HiSwnpI.png

13

Re: Printit Industries new Mica Heatbed install on SD4

Love the difference in temp regulation

Stock:
http://soliforum.com/i/?GipXgfU.png

Printit:
http://soliforum.com/i/?CTdXCJo.png

14

Re: Printit Industries new Mica Heatbed install on SD4

yeah, it is nice, isnt it? smile

Now, just need one in a bigger size for my new toy... 12" x 12" please? hehe

SD4 #1 & #2 - Lawsy carriages, E3D v6, Rumba controller board, mirror bed plate, X motor fan, upgraded PSU & Mica bed heater
SD4 #3 - in the works ~ Folgertech FT-5, rev 1
Printit Industries Beta Tester - Horizon H1
15

Re: Printit Industries new Mica Heatbed install on SD4

Just an update on using the Mica heater - Still loving this thing! It works so well I have actually been able to lower the set point and still get excellent adhesion when printing ABS.

I used to set the bed to 100C with the old bed heater and would still occasionally have problems - with the Mica heat bed, I am currently running at 90C (with even faster heat up times) and actually thinking about lowering a little more. smile A very happy camper, I am. Well worth the investment.

SD4 #1 & #2 - Lawsy carriages, E3D v6, Rumba controller board, mirror bed plate, X motor fan, upgraded PSU & Mica bed heater
SD4 #3 - in the works ~ Folgertech FT-5, rev 1
Printit Industries Beta Tester - Horizon H1

16 (edited by knowack 2016-07-10 13:49:03)

Re: Printit Industries new Mica Heatbed install on SD4

heartless wrote:

Just an update on using the Mica heater - Still loving this thing! It works so well I have actually been able to lower the set point and still get excellent adhesion when printing ABS.

I used to set the bed to 100C with the old bed heater and would still occasionally have problems - with the Mica heat bed, I am currently running at 90C (with even faster heat up times) and actually thinking about lowering a little more. smile A very happy camper, I am. Well worth the investment.

+1

I too have found that I can actually run a lower bed temp: 10-15 degrees cooler, depending on the filament I use.  I didn't make any firmware changes for the thermistor, and didn't reinstall the fiberglass insulating blanket on the bottom.  The PrintIt heater also heats very evenly to the edges of the bed.  When I removed the original Solidoodle heater, I saw why I had problems with large builds!

-Kevin

17

Re: Printit Industries new Mica Heatbed install on SD4

And another update...

I had purchased a 2nd bed heater for my #2 SD4, but hadnt gotten around to installing it - until today... running the PID tune on it now to stabilize the temps, and it will be fully functional.

Using the stock aluminum bed this time, heat-up times are MUCH lower than on #1, with it's thicker bed.

Still loving this bed heater! printing all the way to the outer edge of the bed is no longer a challenge! smile prints stick the same there as they do in the middle.

Well done Guys! Thanks for a GREAT product!

SD4 #1 & #2 - Lawsy carriages, E3D v6, Rumba controller board, mirror bed plate, X motor fan, upgraded PSU & Mica bed heater
SD4 #3 - in the works ~ Folgertech FT-5, rev 1
Printit Industries Beta Tester - Horizon H1
18

Re: Printit Industries new Mica Heatbed install on SD4

Thanks for the kind words and glad to hear you're happy.

FYI: I cleaned up the double post for you wink

Printit Industries Model 8.10 fully enclosed CoreXY, Chamber heat
3-SD3's & a Workbench all fully enclosed, RH-Slic3r Win7pro, E3D V6, Volcano & Cyclops Hot End
SSR/500W AC Heated Glass Bed, Linear bearings on SS rods. Direct Drive Y-axis, BulldogXL
Thanks to all for your contributions

19

Re: Printit Industries new Mica Heatbed install on SD4

wardjr wrote:

Thanks for the kind words and glad to hear you're happy.

FYI: I cleaned up the double post for you wink

Ooops - sorry about that... internet was being weird this morning. tongue

and yes, I am very happy with the heat beds - they work extremely well and I can actually use the entire bed now, instead of trying to stay away from the outer 1 inch or so.

SD4 #1 & #2 - Lawsy carriages, E3D v6, Rumba controller board, mirror bed plate, X motor fan, upgraded PSU & Mica bed heater
SD4 #3 - in the works ~ Folgertech FT-5, rev 1
Printit Industries Beta Tester - Horizon H1