1 (edited by evanboothe 2018-06-04 13:36:48)

Topic: Da Vinci 1.0 Azteeg x5 WiFi Build

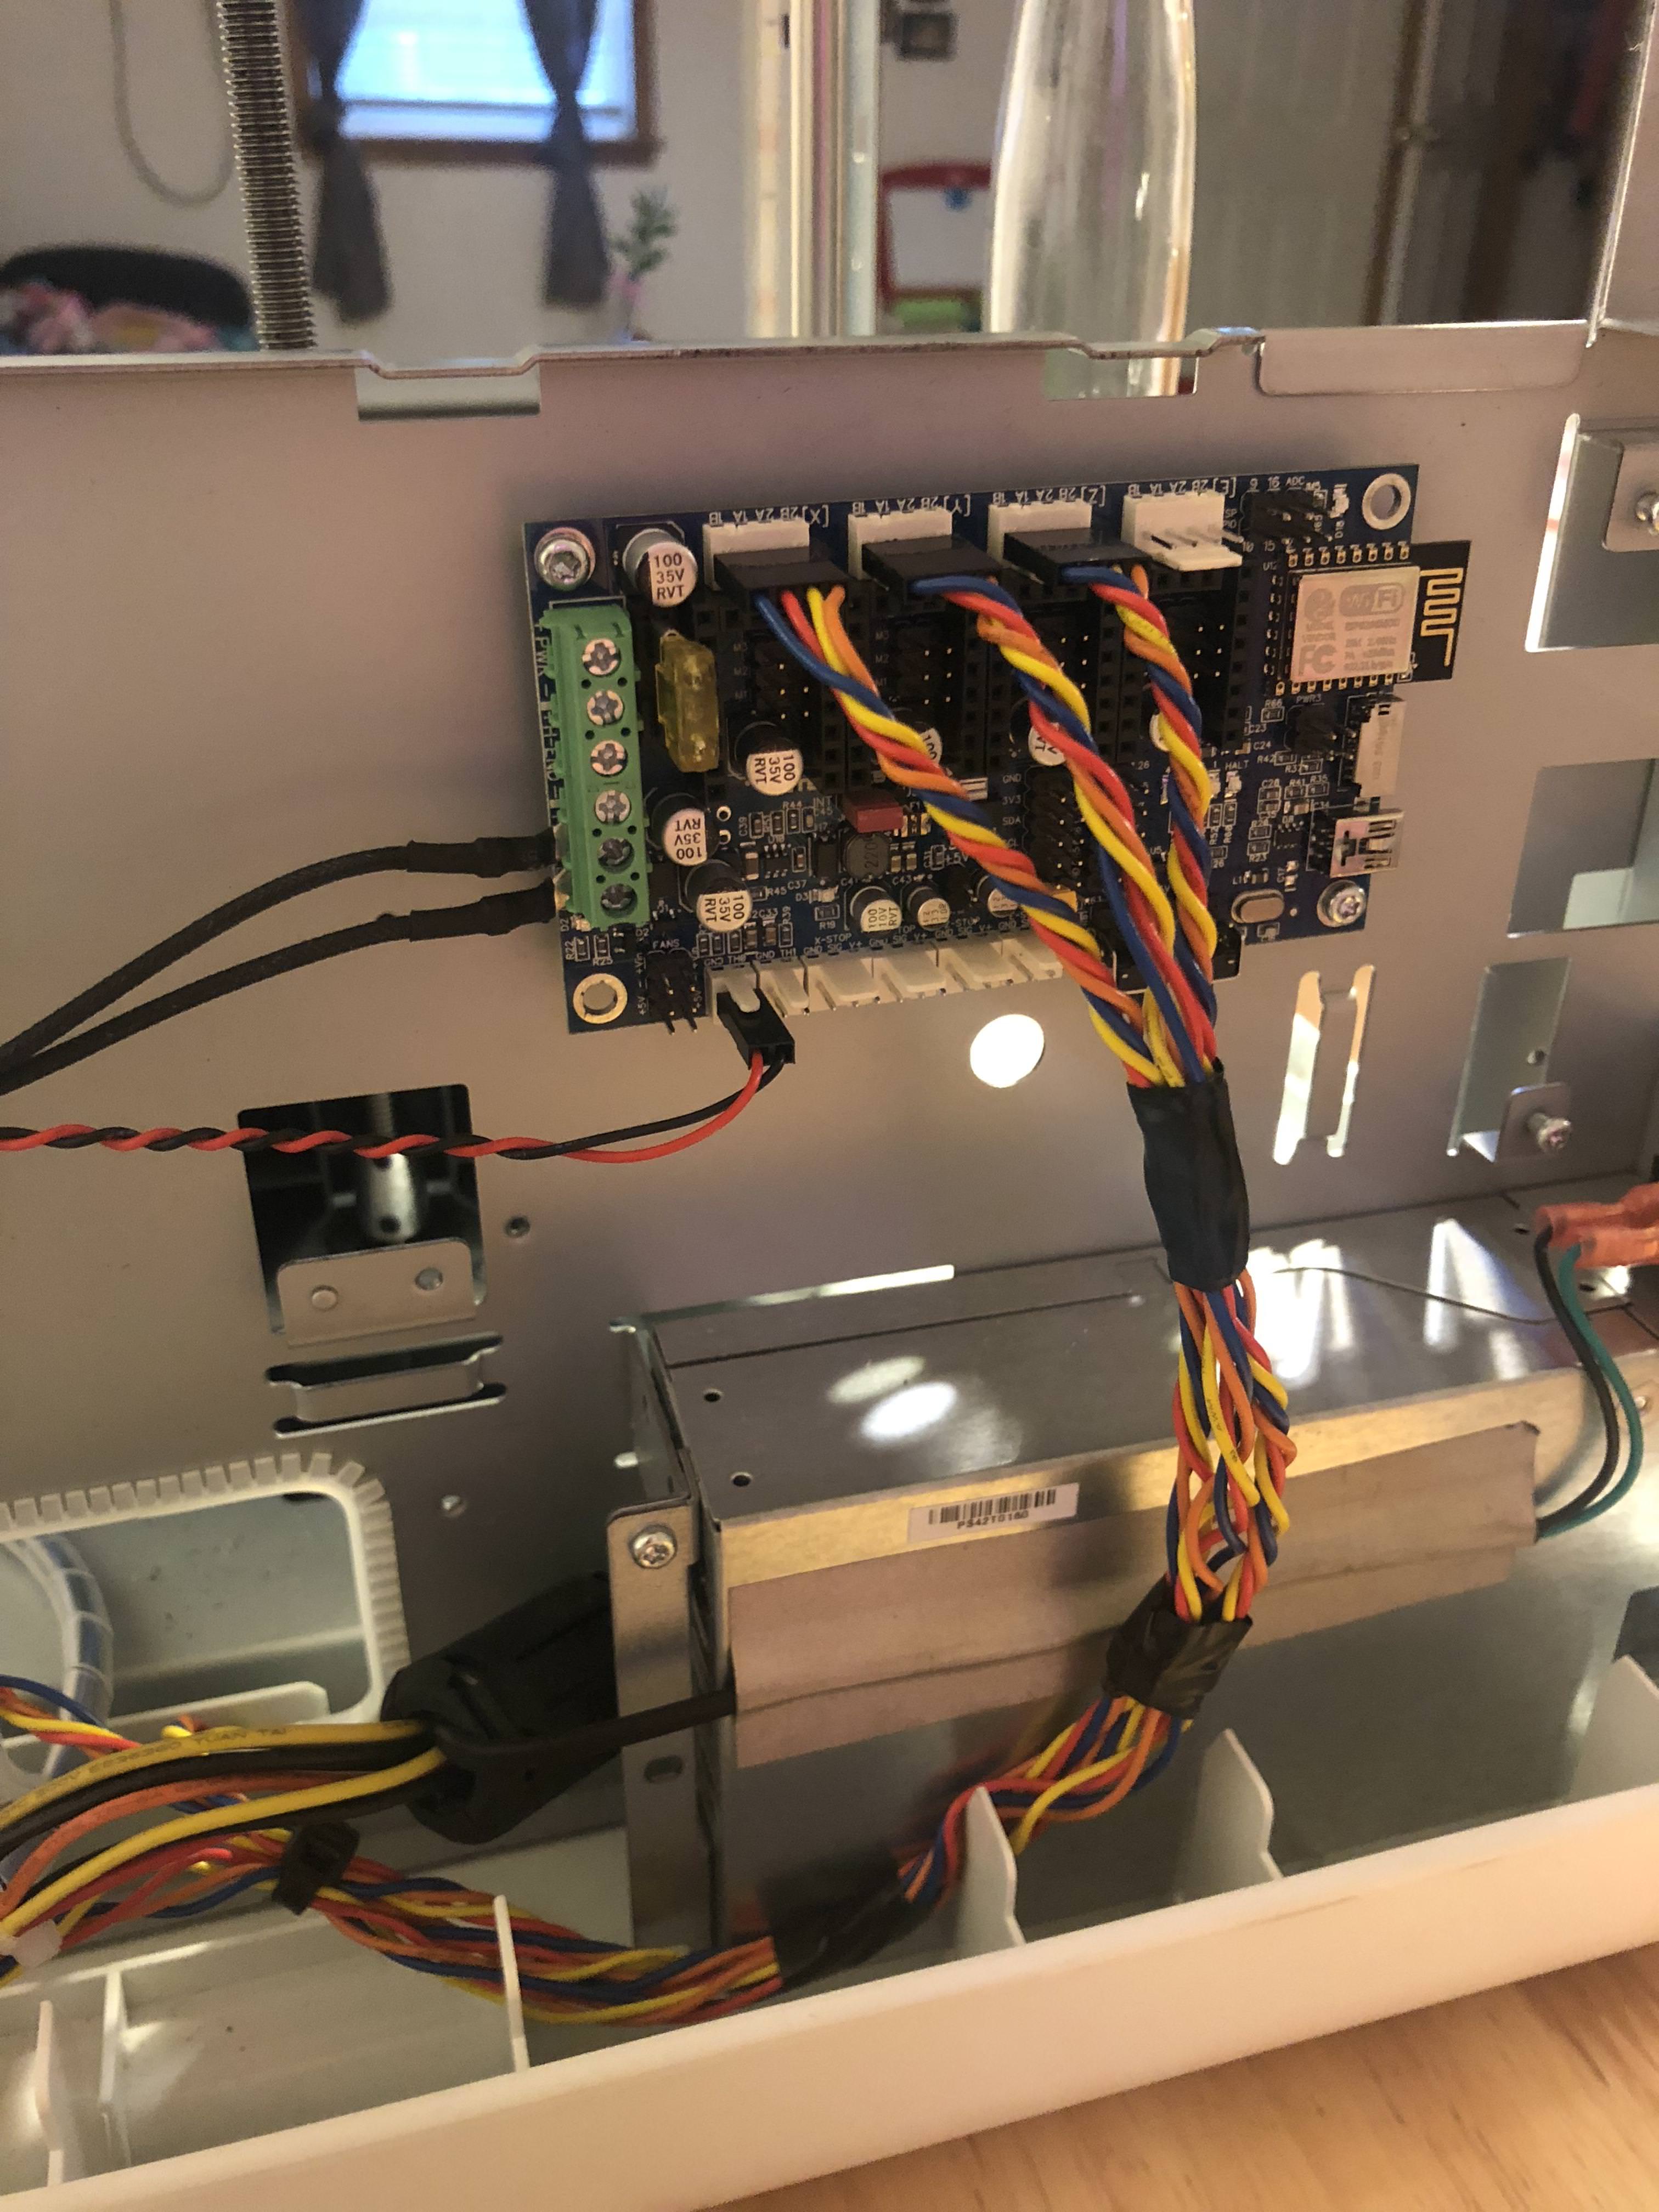
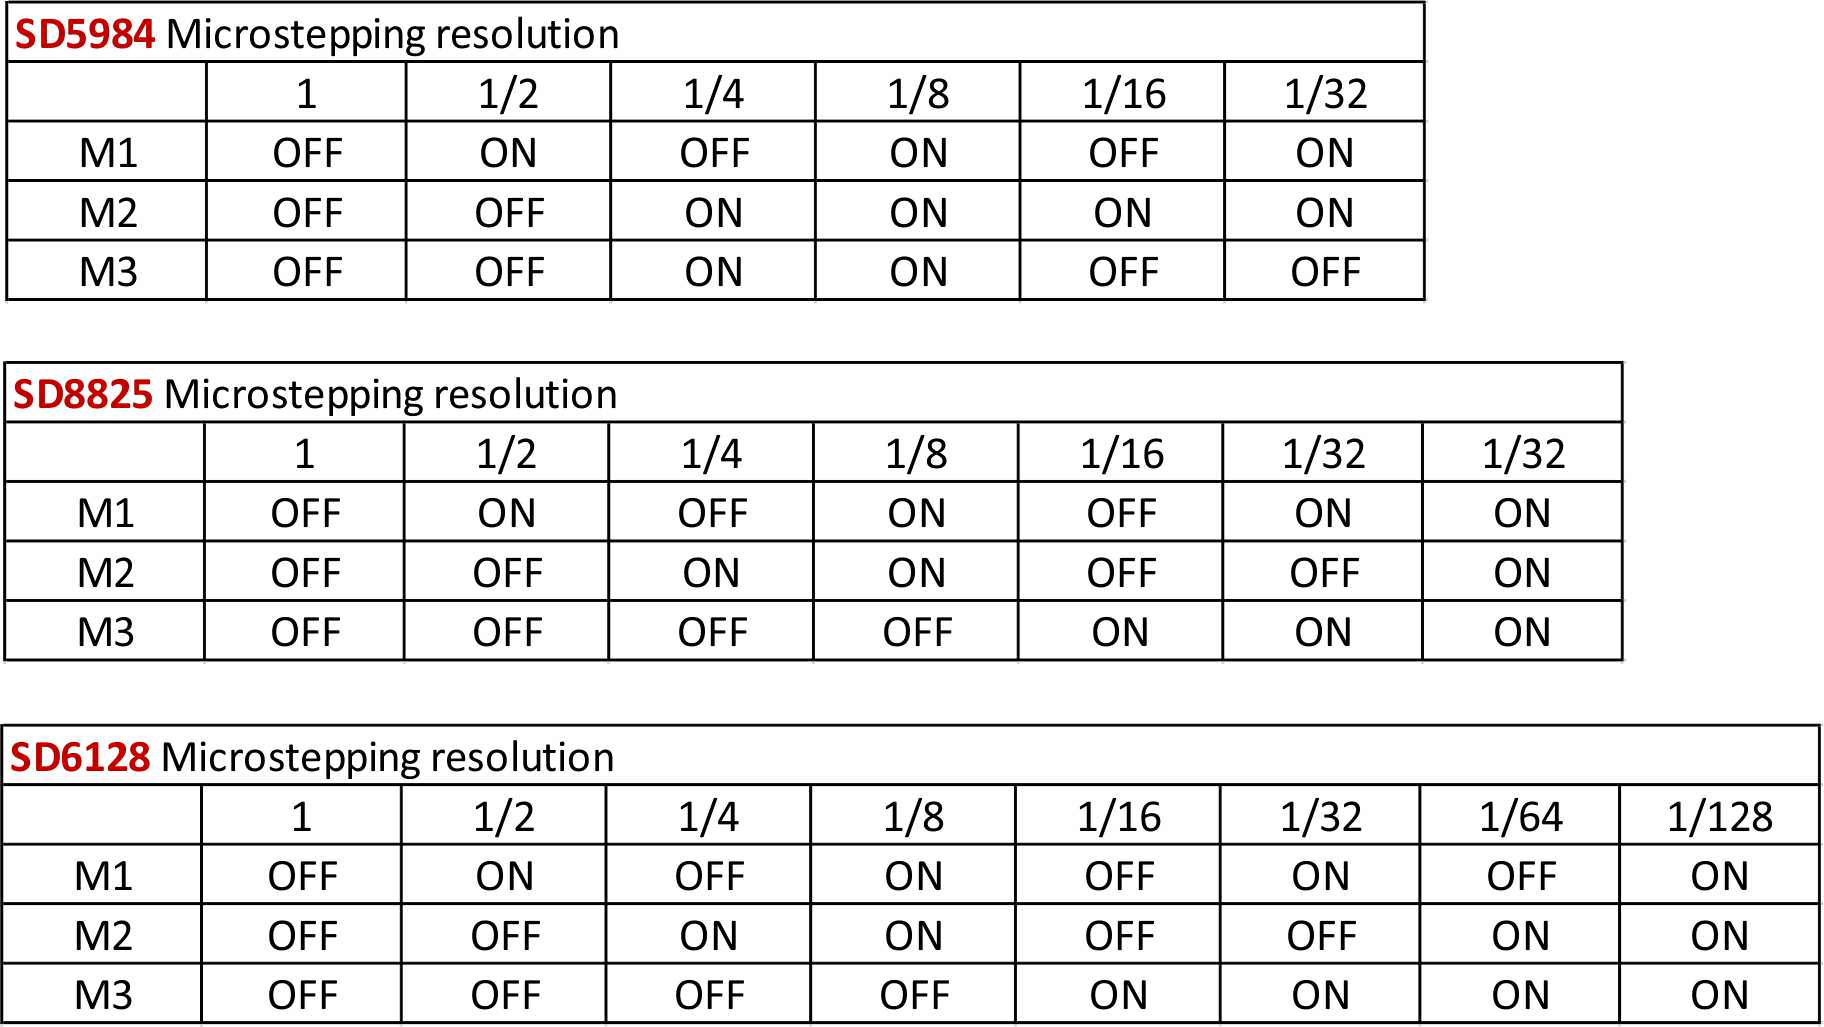
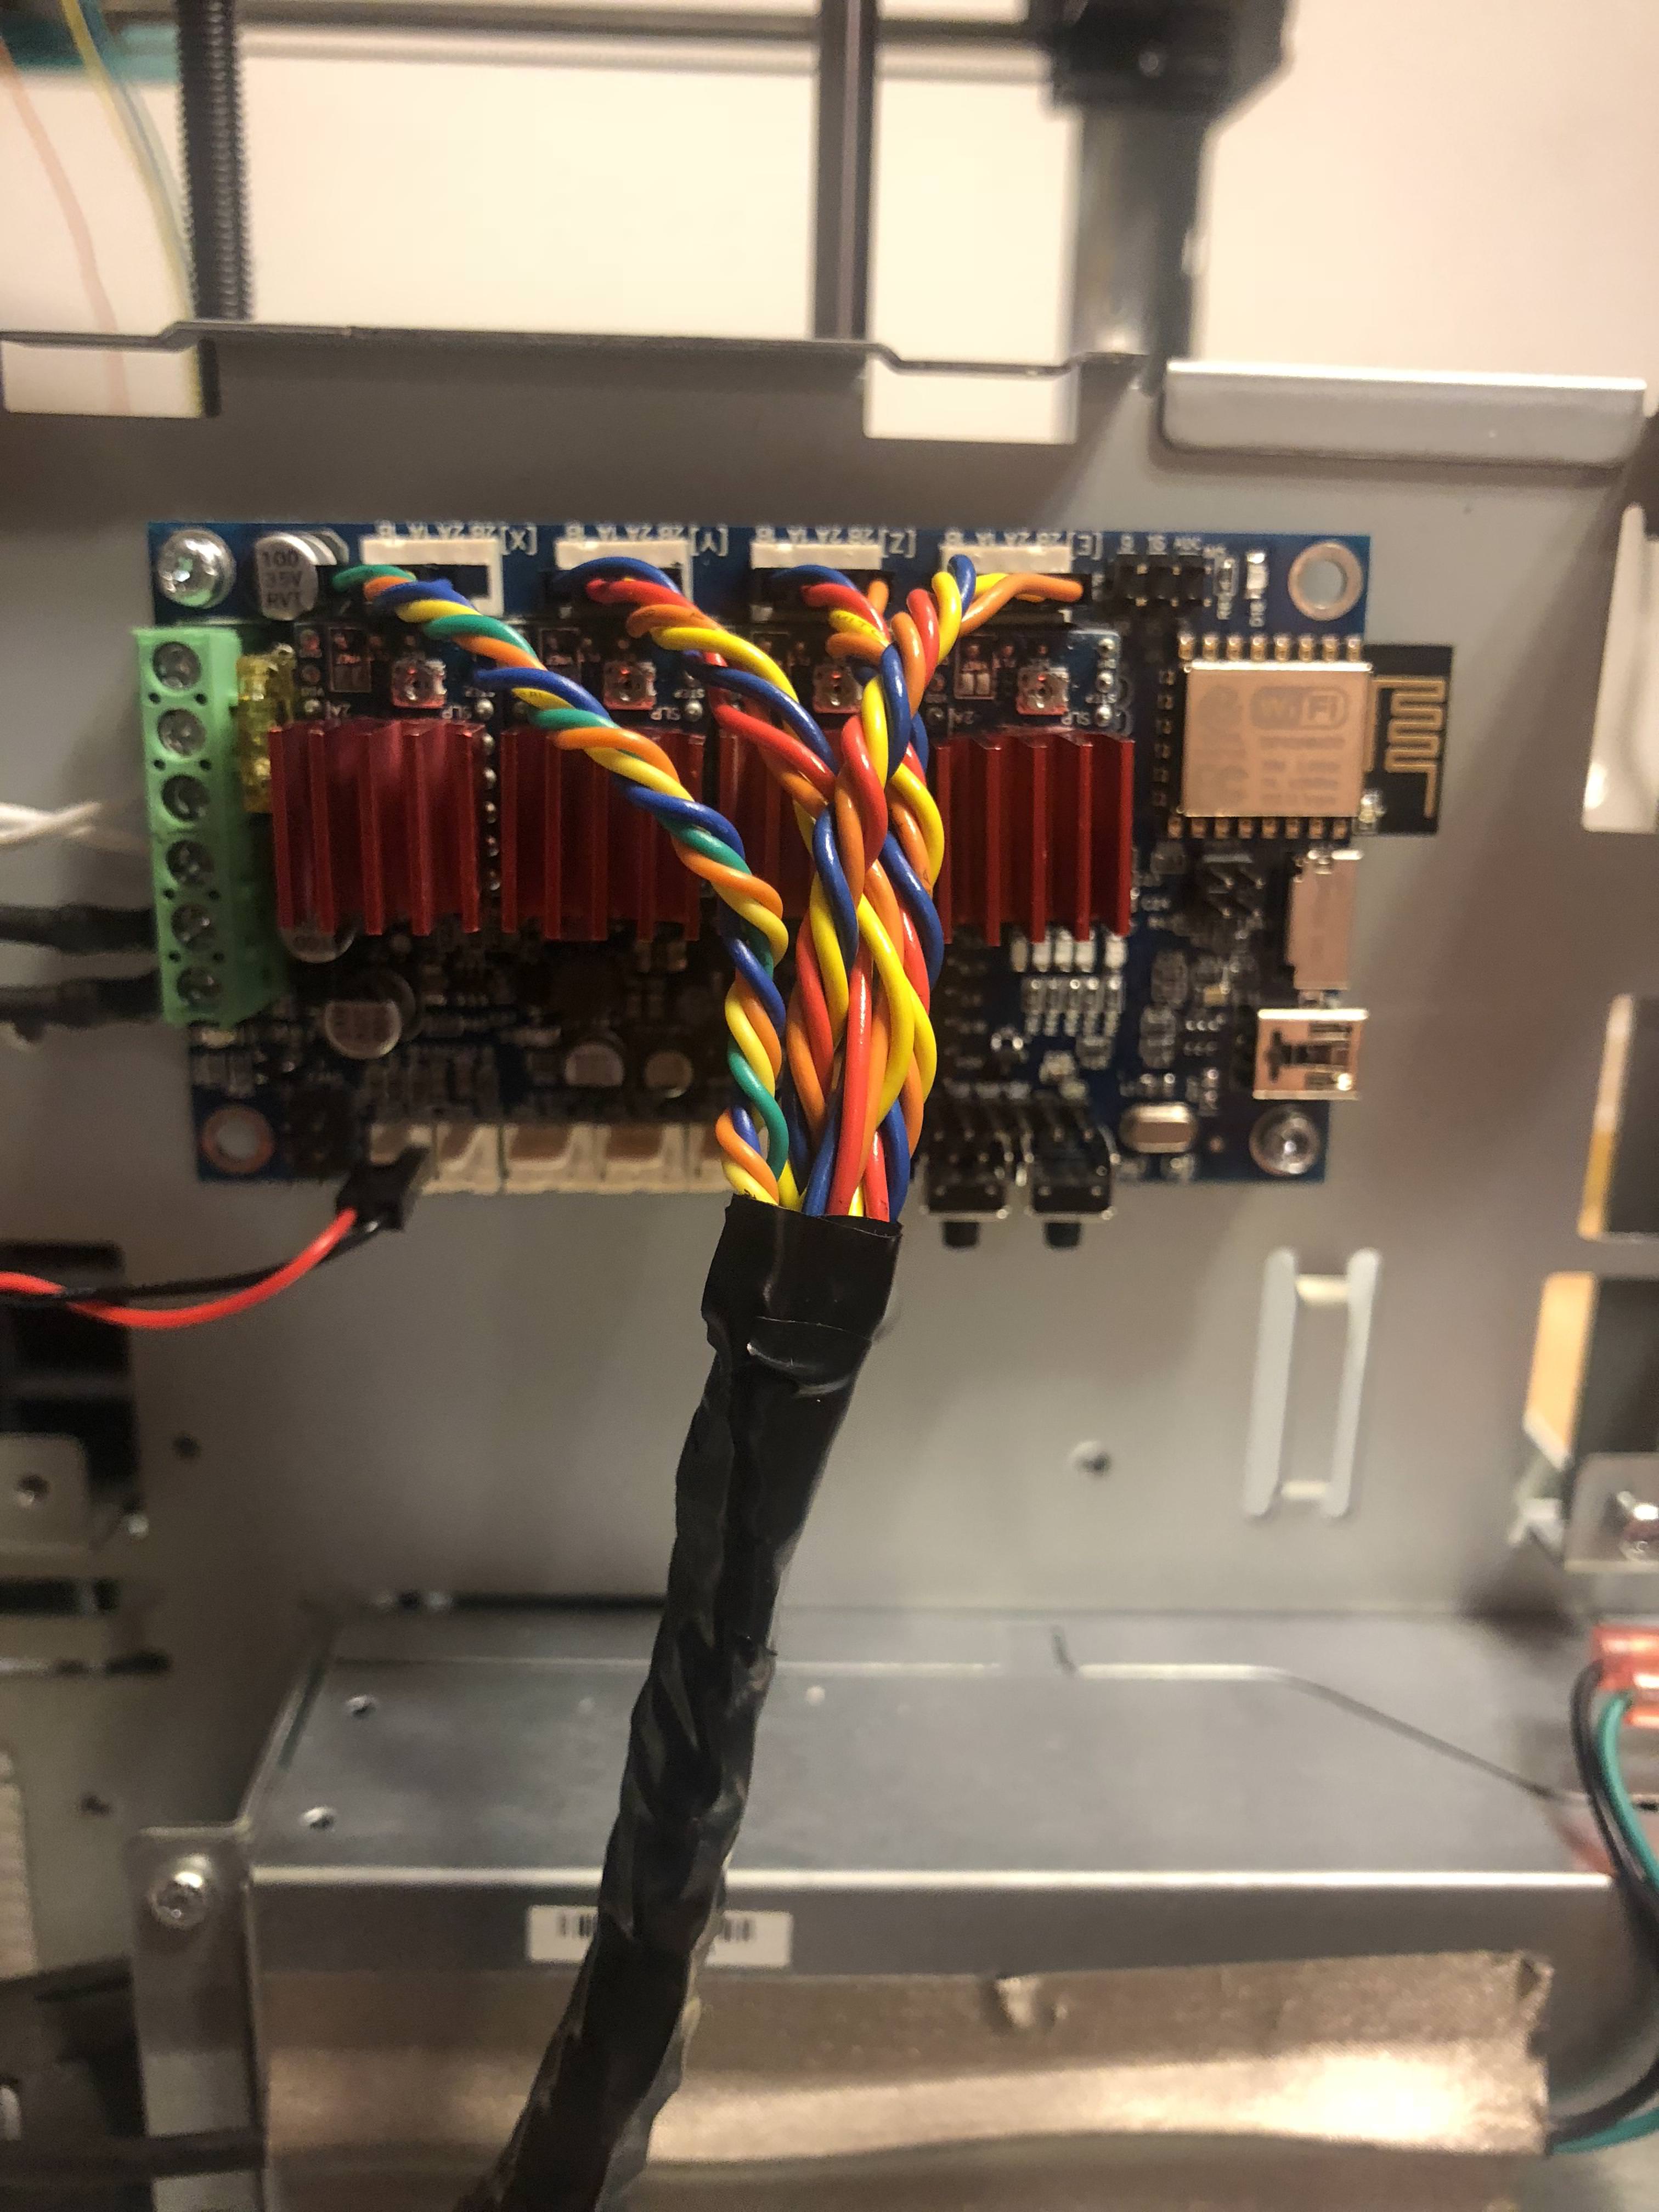
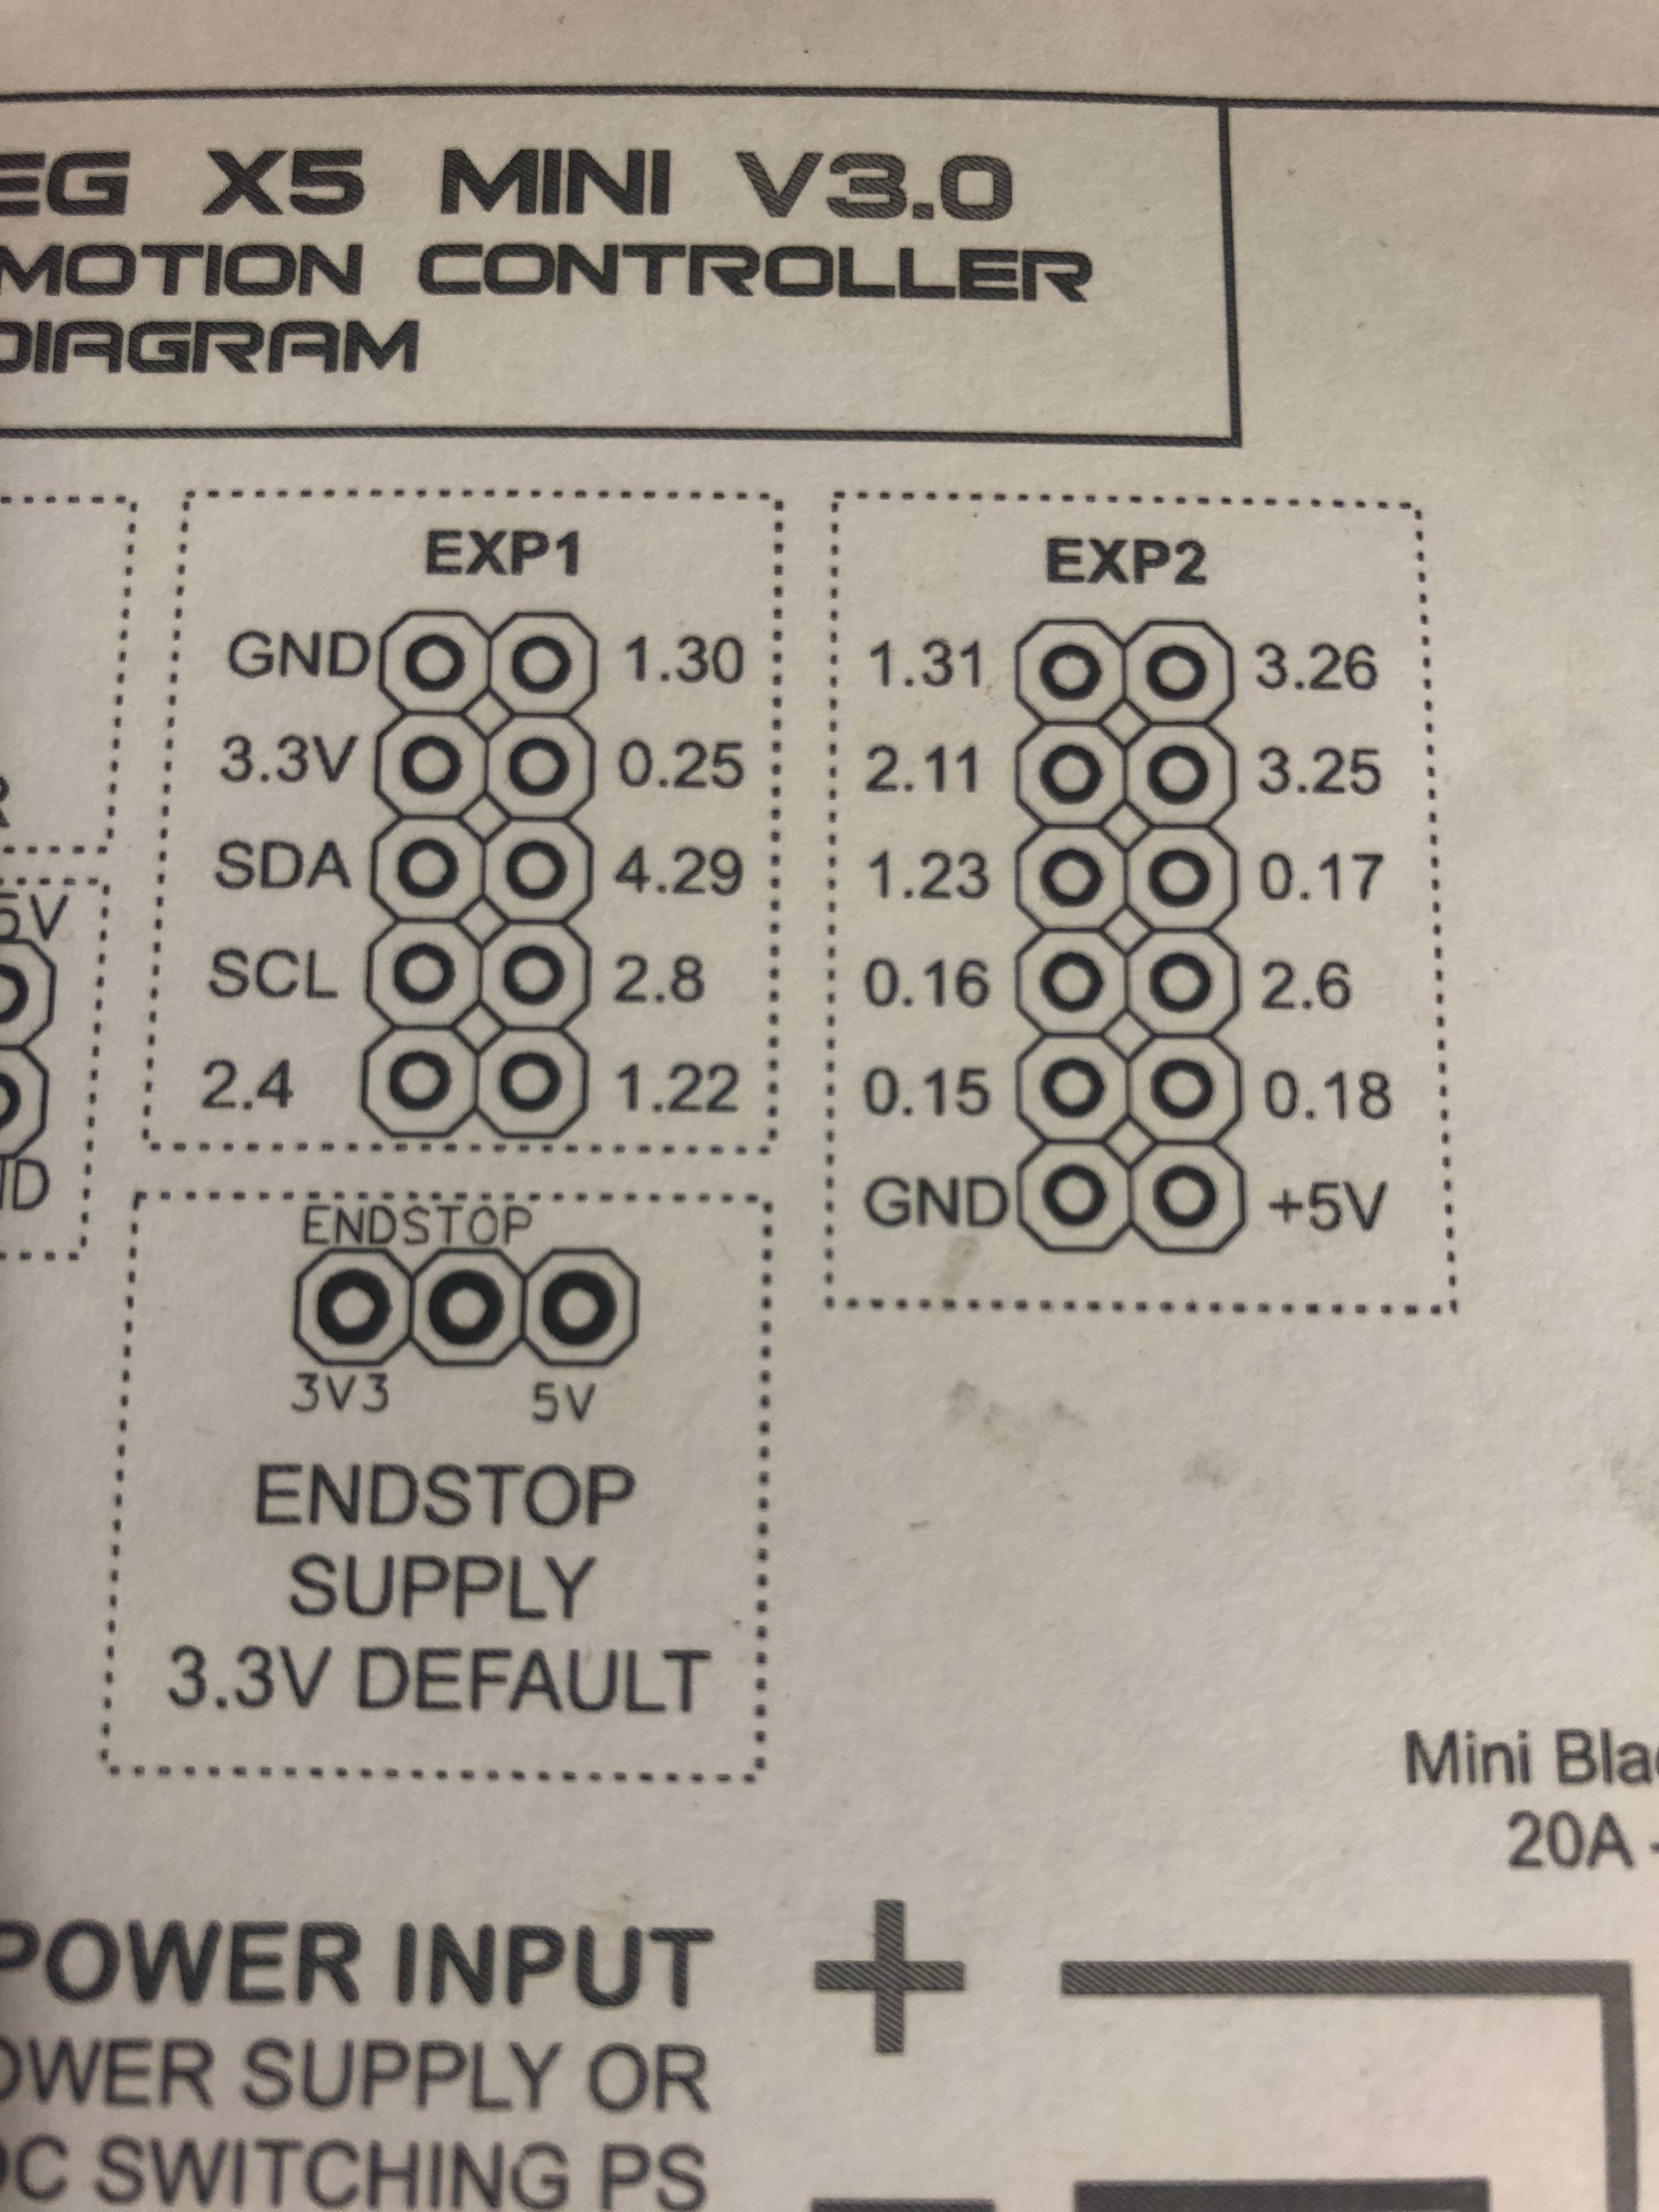
Hey guys! So recently I fried my stock board and decided to go with a differnt board.. had a few people helping me diag and suggest different things for the new project and I would like to thank you all for the help and support! So far I have stripped the printer down, removed all the original end stops, gutted everything I did not need or want from the original equipment. I installed a e3d v6 special edition gold hot end. I had a friend that I met on thingiverse username IronJoe13 print some of his files that he created or revised for the hot end install. He also sent me some other useful parts for the printer that he suggested like a z axis stabilizer, bearing stabilizers on the Y axis and a few other parts that were very nice/useful. I took the files from the FrankenVinci thread which was a ramps conversion and and Joe print me the .stl files of the mechanical end stop mounts used in that conversion/build. I added in LED strip lights to the printer housing along with BuildTak for the printer bed. I am getting ready to install and start setting up the board this week and wanted to get some info from you all on what you recommend for software on my laptop for g code generation and possibly some help on getting the board up and running once installed! Also I bought 8825 steppers with the Board. Thanks guys

Da Vinci 1.0 Azteeg x5 mini WiFi running Smoothieware, e3d v6.

2

Re: Da Vinci 1.0 Azteeg x5 WiFi Build

It's open source so it will work on any host. The smoothieware firmware has a learning curve but once you get used to it, it blows the other two away. I have the none wifi version. I hope you got a Viki controller as well?

Printing since 2009 and still love it!
Anycubic 4MAX best $225 ever invested.
Voxelabs Proxima SLA. 6 inch 2k Mono LCD.
Anycubic Predator, massive Delta machine. 450 x 370 print envelope.

3

Re: Da Vinci 1.0 Azteeg x5 WiFi Build

carl_m1968 wrote:

It's open source so it will work on any host. The smoothieware firmware has a learning curve but once you get used to it, it blows the other two away. I have the none wifi version. I hope you got a Viki controller as well?

Yes I got the Viki 2, how do you like the board and the controller?

Da Vinci 1.0 Azteeg x5 mini WiFi running Smoothieware, e3d v6.

4

Re: Da Vinci 1.0 Azteeg x5 WiFi Build

I love them both, I also have an X3 Pro and Viki controller as well. Never any issues with them. The only tricky part is if you use thermocouples like my printer does instead of thermistors. Thermocouples are a bit more of a pain as they require some pin mapping changes.

Printing since 2009 and still love it!
Anycubic 4MAX best $225 ever invested.
Voxelabs Proxima SLA. 6 inch 2k Mono LCD.
Anycubic Predator, massive Delta machine. 450 x 370 print envelope.

5

Re: Da Vinci 1.0 Azteeg x5 WiFi Build

carl_m1968 wrote:

I love them both, I also have an X3 Pro and Viki controller as well. Never any issues with them. The only tricky part is if you use thermocouples like my printer does instead of thermistors. Thermocouples are a bit more of a pain as they require some pin mapping changes.

Awesome, panucatt has been lacking response to me but from what I understand the board and controller should be here within the next 2 days. I’m sure I will need some help setting everything up so if you are around towards the end of the week maybe I can get ahold of you. If you don’t mind maybe PM me your cell number we could text if that’s cool. Thanks carl

Da Vinci 1.0 Azteeg x5 mini WiFi running Smoothieware, e3d v6.

6 (edited by evanboothe 2018-06-07 03:28:57)

Re: Da Vinci 1.0 Azteeg x5 WiFi Build

Mounted the new board tonight onto the printer and started to re pin everything and re wire! Had a few questions for you guys! The stock Da Vinci stepper motors.. I ohmed the wires and found each pair A and B. But I am curious if there is a way to find out which pair is A and which pair is B.. I know I could just run it and find out then.. if there opposite just flip them but I am trying to avoid that.. so if there is anyway to determine which set is A and which set is B that would be great. Next question for you all was if I were to in the future to upgrade my motors to something more torquey and more accurate what would be a good product or model.. I was looking at Nema 17 steppers but was not sure if that would be over kill.. thanks. Oh also, I got 100k thermistors with the Board and I am going to run one of them instead of the original da Vinci thermistor.. wiring diagram for the thermistor says positive and negative.. does that polarity matter?? If so how am I supposed to tell which wire is which off the thermistor as they are the same color

Da Vinci 1.0 Azteeg x5 mini WiFi running Smoothieware, e3d v6.

7

Re: Da Vinci 1.0 Azteeg x5 WiFi Build

For the motor phases you would need to look for a datasheet based on the motors part number. That would be the only way to determine which is which.

NEMA 17 is the standard motor used in most printers. It is simply the size and mounting format. Within the NEMA 17 spec there are motors with varied current and holding torque. The holding torque would be the only number to indicate a stronger or more accurate motor. But with higher torque comes added weight which is then counter productive if the motor rides on the axis in question.

As for the thermistor it is nothing but a resistor that has a varied resistance based on temperature. So with that there is no polarity. The reason the Azteeg board shows polarity is because it can be configured to use thermocouples as well which do have polarity.

Printing since 2009 and still love it!
Anycubic 4MAX best $225 ever invested.
Voxelabs Proxima SLA. 6 inch 2k Mono LCD.
Anycubic Predator, massive Delta machine. 450 x 370 print envelope.

8 (edited by evanboothe 2018-06-08 16:03:18)

Re: Da Vinci 1.0 Azteeg x5 WiFi Build

carl_m1968 wrote:

For the motor phases you would need to look for a datasheet based on the motors part number. That would be the only way to determine which is which.

NEMA 17 is the standard motor used in most printers. It is simply the size and mounting format. Within the NEMA 17 spec there are motors with varied current and holding torque. The holding torque would be the only number to indicate a stronger or more accurate motor. But with higher torque comes added weight which is then counter productive if the motor rides on the axis in question.

As for the thermistor it is nothing but a resistor that has a varied resistance based on temperature. So with that there is no polarity. The reason the Azteeg board shows polarity is because it can be configured to use thermocouples as well which do have polarity.

Okay thanks for the info! Going to continue wiring up things and will update you guys as I can. I’m excited to see how the printer quality is compared to the stock board and firmware.. I honestly don’t know what to expect out of it, I know it won’t be amazing but it should be somewhat better wouldn’t you think? Also what is your suggestion on making sure I put the stepper drivers in the correct orientation? Again I got the 8825’s


http://soliforum.com/i/?rIoJyZh.jpg

Da Vinci 1.0 Azteeg x5 mini WiFi running Smoothieware, e3d v6.

9

Re: Da Vinci 1.0 Azteeg x5 WiFi Build

The drivers and the board both have pin one marked. So should be a no Brainer for installing those.

Printing since 2009 and still love it!
Anycubic 4MAX best $225 ever invested.
Voxelabs Proxima SLA. 6 inch 2k Mono LCD.
Anycubic Predator, massive Delta machine. 450 x 370 print envelope.

10

Re: Da Vinci 1.0 Azteeg x5 WiFi Build

carl_m1968 wrote:

The drivers and the board both have pin one marked. So should be a no Brainer for installing those.

Okay and what about the 2 pin jumpers that came with the board

Da Vinci 1.0 Azteeg x5 mini WiFi running Smoothieware, e3d v6.

11

Re: Da Vinci 1.0 Azteeg x5 WiFi Build

evanboothe wrote:
carl_m1968 wrote:

The drivers and the board both have pin one marked. So should be a no Brainer for installing those.

Okay and what about the 2 pin jumpers that came with the board

Those go on the headers that are under each driver and decides on your microstepping. I'm guessing you bought this from a no name on ebay. I would suggest you to the the link below. It is the page for your board from the actual creator and builders store (Panucatt Devices). It has wiring diagrams, pin assignments, and even sample firmware text files.

http://www.panucatt.com/azteeg_X5_mini_ … x5mini.htm

Printing since 2009 and still love it!
Anycubic 4MAX best $225 ever invested.
Voxelabs Proxima SLA. 6 inch 2k Mono LCD.
Anycubic Predator, massive Delta machine. 450 x 370 print envelope.

12

Re: Da Vinci 1.0 Azteeg x5 WiFi Build

carl_m1968 wrote:
evanboothe wrote:
carl_m1968 wrote:

The drivers and the board both have pin one marked. So should be a no Brainer for installing those.

Okay and what about the 2 pin jumpers that came with the board

Those go on the headers that are under each driver and decides on your microstepping. I'm guessing you bought this from a no name on ebay. I would suggest you to the the link below. It is the page for your board from the actual creator and builders store (Panucatt Devices). It has wiring diagrams, pin assignments, and even sample firmware text files.

http://www.panucatt.com/azteeg_X5_mini_ … x5mini.htm

No they came with the board from panucatt..

Da Vinci 1.0 Azteeg x5 mini WiFi running Smoothieware, e3d v6.

13 (edited by carl_m1968 2018-06-09 18:11:44)

Re: Da Vinci 1.0 Azteeg x5 WiFi Build

evanboothe wrote:
carl_m1968 wrote:
evanboothe wrote:

Okay and what about the 2 pin jumpers that came with the board

Those go on the headers that are under each driver and decides on your microstepping. I'm guessing you bought this from a no name on ebay. I would suggest you to the the link below. It is the page for your board from the actual creator and builders store (Panucatt Devices). It has wiring diagrams, pin assignments, and even sample firmware text files.

http://www.panucatt.com/azteeg_X5_mini_ … x5mini.htm

No they came with the board from panucatt..

Here is a more direct answer to your questions about the jumpers the board came with.

Set micro step jumpers.

Each driver slot has 3 jumper headers to set micro stepping. Most drivers use 2 or 3 jumpers to set the desired configuration. See your driver's documentation for details on which jumpers to place.

The jumpers are labeled M1,M2 and M3. On some drivers these are called MS1, MS2 and MS3 or M0,M1 and M2. Jumpers are placed across each header pair according to the desired setting for each driver.


Micro step table for Panucatt Drivers. For 3rd party drivers, check spec sheet for similar table.

Select the table for your stepper driver model.
OFF = No jumper
ON = With jumper

http://soliforum.com/i/?8sIB3JC.jpg

Since you are using the 8825's you will want to set them for 1/32 microstepping to maximize control and resolution.

Printing since 2009 and still love it!
Anycubic 4MAX best $225 ever invested.
Voxelabs Proxima SLA. 6 inch 2k Mono LCD.
Anycubic Predator, massive Delta machine. 450 x 370 print envelope.

14

Re: Da Vinci 1.0 Azteeg x5 WiFi Build

Okay thanks for all of that information. Like I said I’m new to al of this but I am trying to take In as much as I can at once. So all I need is one number in the 1/32 slot per driver correct? Just out of curiosity what is the measurement there using here 1/32 of what?

Da Vinci 1.0 Azteeg x5 mini WiFi running Smoothieware, e3d v6.

15

Re: Da Vinci 1.0 Azteeg x5 WiFi Build

evanboothe wrote:

Okay thanks for all of that information. Like I said I’m new to al of this but I am trying to take In as much as I can at once. So all I need is one number in the 1/32 slot per driver correct? Just out of curiosity what is the measurement there using here 1/32 of what?

I actually just watched a pretty good video on micro stepping.. 1/16 divides 1 revolution of the stepper driver into 16ths. I see that torque goes down quiet a bit when you have More steps in each revolution. Am I understanding this correctly?

Da Vinci 1.0 Azteeg x5 mini WiFi running Smoothieware, e3d v6.

16

Re: Da Vinci 1.0 Azteeg x5 WiFi Build

evanboothe wrote:
evanboothe wrote:

Okay thanks for all of that information. Like I said I’m new to al of this but I am trying to take In as much as I can at once. So all I need is one number in the 1/32 slot per driver correct? Just out of curiosity what is the measurement there using here 1/32 of what?

I actually just watched a pretty good video on micro stepping.. 1/16 divides 1 revolution of the stepper driver into 16ths. I see that torque goes down quiet a bit when you have More steps in each revolution. Am I understanding this correctly?


This is true but the only axis that really depends on torque is the extruder. The rest of the motors unless you are pushing them to their speed limits never really have a torque issue. I have been running 1/32 on all my motors since the ability was implemented years ago with no issues. As for selecting 1/32 for your drivers you will need a jumper on M1 and M3 or as the center graph shows placing jumpers on M1, M2, and M3 will enable 1/32 for 8825 drivers.

Printing since 2009 and still love it!
Anycubic 4MAX best $225 ever invested.
Voxelabs Proxima SLA. 6 inch 2k Mono LCD.
Anycubic Predator, massive Delta machine. 450 x 370 print envelope.

17

Re: Da Vinci 1.0 Azteeg x5 WiFi Build

Now I should have x y z and the extruder jumped for 1/32 correct

Da Vinci 1.0 Azteeg x5 mini WiFi running Smoothieware, e3d v6.

18

Re: Da Vinci 1.0 Azteeg x5 WiFi Build

evanboothe wrote:

Now I should have x y z and the extruder jumped for 1/32 correct

Sorry also, on the graph above it has two 1/32 columns. Does that mean I need to jump all 3? Or is there just two options

Da Vinci 1.0 Azteeg x5 mini WiFi running Smoothieware, e3d v6.

19 (edited by carl_m1968 2018-06-09 20:49:23)

Re: Da Vinci 1.0 Azteeg x5 WiFi Build

evanboothe wrote:
evanboothe wrote:

Now I should have x y z and the extruder jumped for 1/32 correct

Sorry also, on the graph above it has two 1/32 columns. Does that mean I need to jump all 3? Or is there just two options


For 8825's either column works. I jumper all three just for simplicity.

Printing since 2009 and still love it!
Anycubic 4MAX best $225 ever invested.
Voxelabs Proxima SLA. 6 inch 2k Mono LCD.
Anycubic Predator, massive Delta machine. 450 x 370 print envelope.

20

Re: Da Vinci 1.0 Azteeg x5 WiFi Build

Ok looks like the jumpers are only 2 pin.. not home to look at them but I might be wrong... also I jumps all 4 motors correct??

Da Vinci 1.0 Azteeg x5 mini WiFi running Smoothieware, e3d v6.

21

Re: Da Vinci 1.0 Azteeg x5 WiFi Build

evanboothe wrote:

Ok looks like the jumpers are only 2 pin.. not home to look at them but I might be wrong... also I jumps all 4 motors correct??

Yes there will be three two pin jumpers under each driver and you will do all the motors you are using. In the firmware you will need to adjust the steps per mm accordingly but that is a given and a norm in any board install.

Printing since 2009 and still love it!
Anycubic 4MAX best $225 ever invested.
Voxelabs Proxima SLA. 6 inch 2k Mono LCD.
Anycubic Predator, massive Delta machine. 450 x 370 print envelope.

22

Re: Da Vinci 1.0 Azteeg x5 WiFi Build

Cool so I will use all 12 jumpers.

Da Vinci 1.0 Azteeg x5 mini WiFi running Smoothieware, e3d v6.

23 (edited by evanboothe 2018-06-10 03:28:37)

Re: Da Vinci 1.0 Azteeg x5 WiFi Build

http://soliforum.com/i/?Hw8wCwk.jpg

Jumpers and steppers installed with the heat sinks mounted!

http://soliforum.com/i/?fTXmN9e.jpg

Next annoying question for you. Above is the wiring diagram for the fans and LEDs.. it says + volts in and then at the bottom you have a +5v pin.. what are the two differences between the two? And what does the 1.25 and .26 stand for under the fan pictures. Trying to wire up my extruder fan and don’t know which positive terminal to attach it to.. also if I wanted to add another fan to cool the board above the motor drivers that is okay correct? Any idea what kind of amps a normal computer fan pulls? Also I installed strip LEDs in the printer can I just run those straight 12 volts from the power supply? With no fuse? If I should run a fuse is a inline blade fuse acceptable


http://soliforum.com/i/?LOSVnU3.jpg

EXP2 is where I will put the connector for the viki 2 correct?

Da Vinci 1.0 Azteeg x5 mini WiFi running Smoothieware, e3d v6.

24 (edited by carl_m1968 2018-06-10 16:11:09)

Re: Da Vinci 1.0 Azteeg x5 WiFi Build

On the Fan/LED headers the top two pins are what ever voltage your power supply is. The two pins in the middle are switched grounds. In most modern logic power is sent to the device in question and then the ground is switched off and on to allow current flow. The bottom two pins in that header are 5 volt regardless of what you power supply voltage is.

This board can operate on 12 to 30 volts so you have a wide power supply range you can use at either 12 or 24 volts.

The numbers that have a decimal are the pin numbers at the CPU if you look up the Pin Table on the board which is also on Panucatts website.

For fans that you don't need to have controlled like a board cooler, just tap off of the 12 volt lines of the existing power supply. When it is on those fans are on. The outputs on the board are for managed devices that turn on at certain times or a certain event. The only fan the outputs on the board should run is the extruder fan since you don't want it to run during the first layer or two.

As for the LCD, If I remember correctly I had to get a special cable for it and the X5. There is something different about it. I will need to check my notes if I can remember where they are. It's been a few years since I have used the X5 it is now actually in a drawer collecting dust.

Ok, I found my notes. I attached the wiring diagram I have that does include the X5.

Post's attachments

Viki2_Wiring_Diagram.pdf 1.42 mb, 11 downloads since 2018-06-10 

You don't have the permssions to download the attachments of this post.
Printing since 2009 and still love it!
Anycubic 4MAX best $225 ever invested.
Voxelabs Proxima SLA. 6 inch 2k Mono LCD.
Anycubic Predator, massive Delta machine. 450 x 370 print envelope.

25

Re: Da Vinci 1.0 Azteeg x5 WiFi Build

carl_m1968 wrote:

On the Fan/LED headers the top two pins are what ever voltage your power supply is. The two pins in the middle are switched grounds. In most modern logic power is sent to the device in question and then the ground is switched off and on to allow current flow. The bottom two pins in that header are 5 volt regardless of what you power supply voltage is.

This board can operate on 12 to 30 volts so you have a wide power supply range you can use at either 12 or 24 volts.

The numbers that have a decimal are the pin numbers at the CPU if you look up the Pin Table on the board which is also on Panucatts website.

For fans that you don't need to have controlled like a board cooler, just tap off of the 12 volt lines of the existing power supply. When it is on those fans are on. The outputs on the board are for managed devices that turn on at certain times or a certain event. The only fan the outputs on the board should run is the extruder fan since you don't want it to run during the first layer or two.

As for the LCD, If I remember correctly I had to get a special cable for it and the X5. There is something different about it. I will need to check my notes if I can remember where they are. It's been a few years since I have used the X5 it is now actually in a drawer collecting dust.

Ok, I found my notes. I attached the wiring diagram I have that does include the X5.

awesome great diagram..so pretty much the supplied ribbon cable and the other cable are plug and play to the board!

Da Vinci 1.0 Azteeg x5 mini WiFi running Smoothieware, e3d v6.