Re: Taurino Power + RAMPS 1.4 Bundle install
Thanks for your time. They don't flicker, on all the time. I even removed the bottom card from the top card. It does the same.
You are not logged in. Please login or register.
SoliForum - 3D Printing Community → Solidoodle Press → Taurino Power + RAMPS 1.4 Bundle install
Thanks for your time. They don't flicker, on all the time. I even removed the bottom card from the top card. It does the same.
Disregard that last post, they made change. I need to look at the RAMPS I have and see if I can tell anything. Sounds to me like your lower board may have been killed. But lets not panic yet.
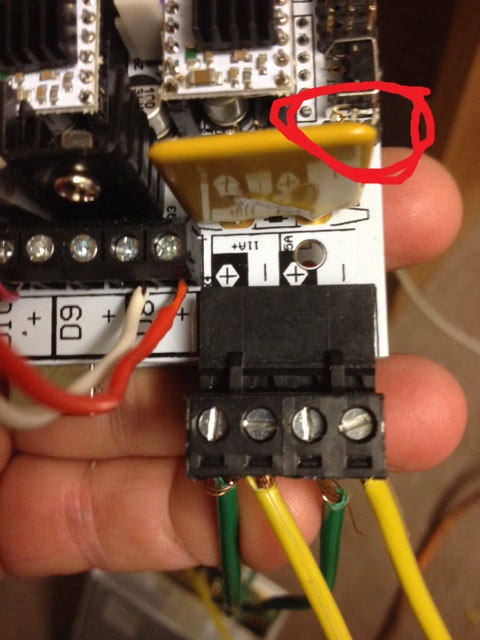
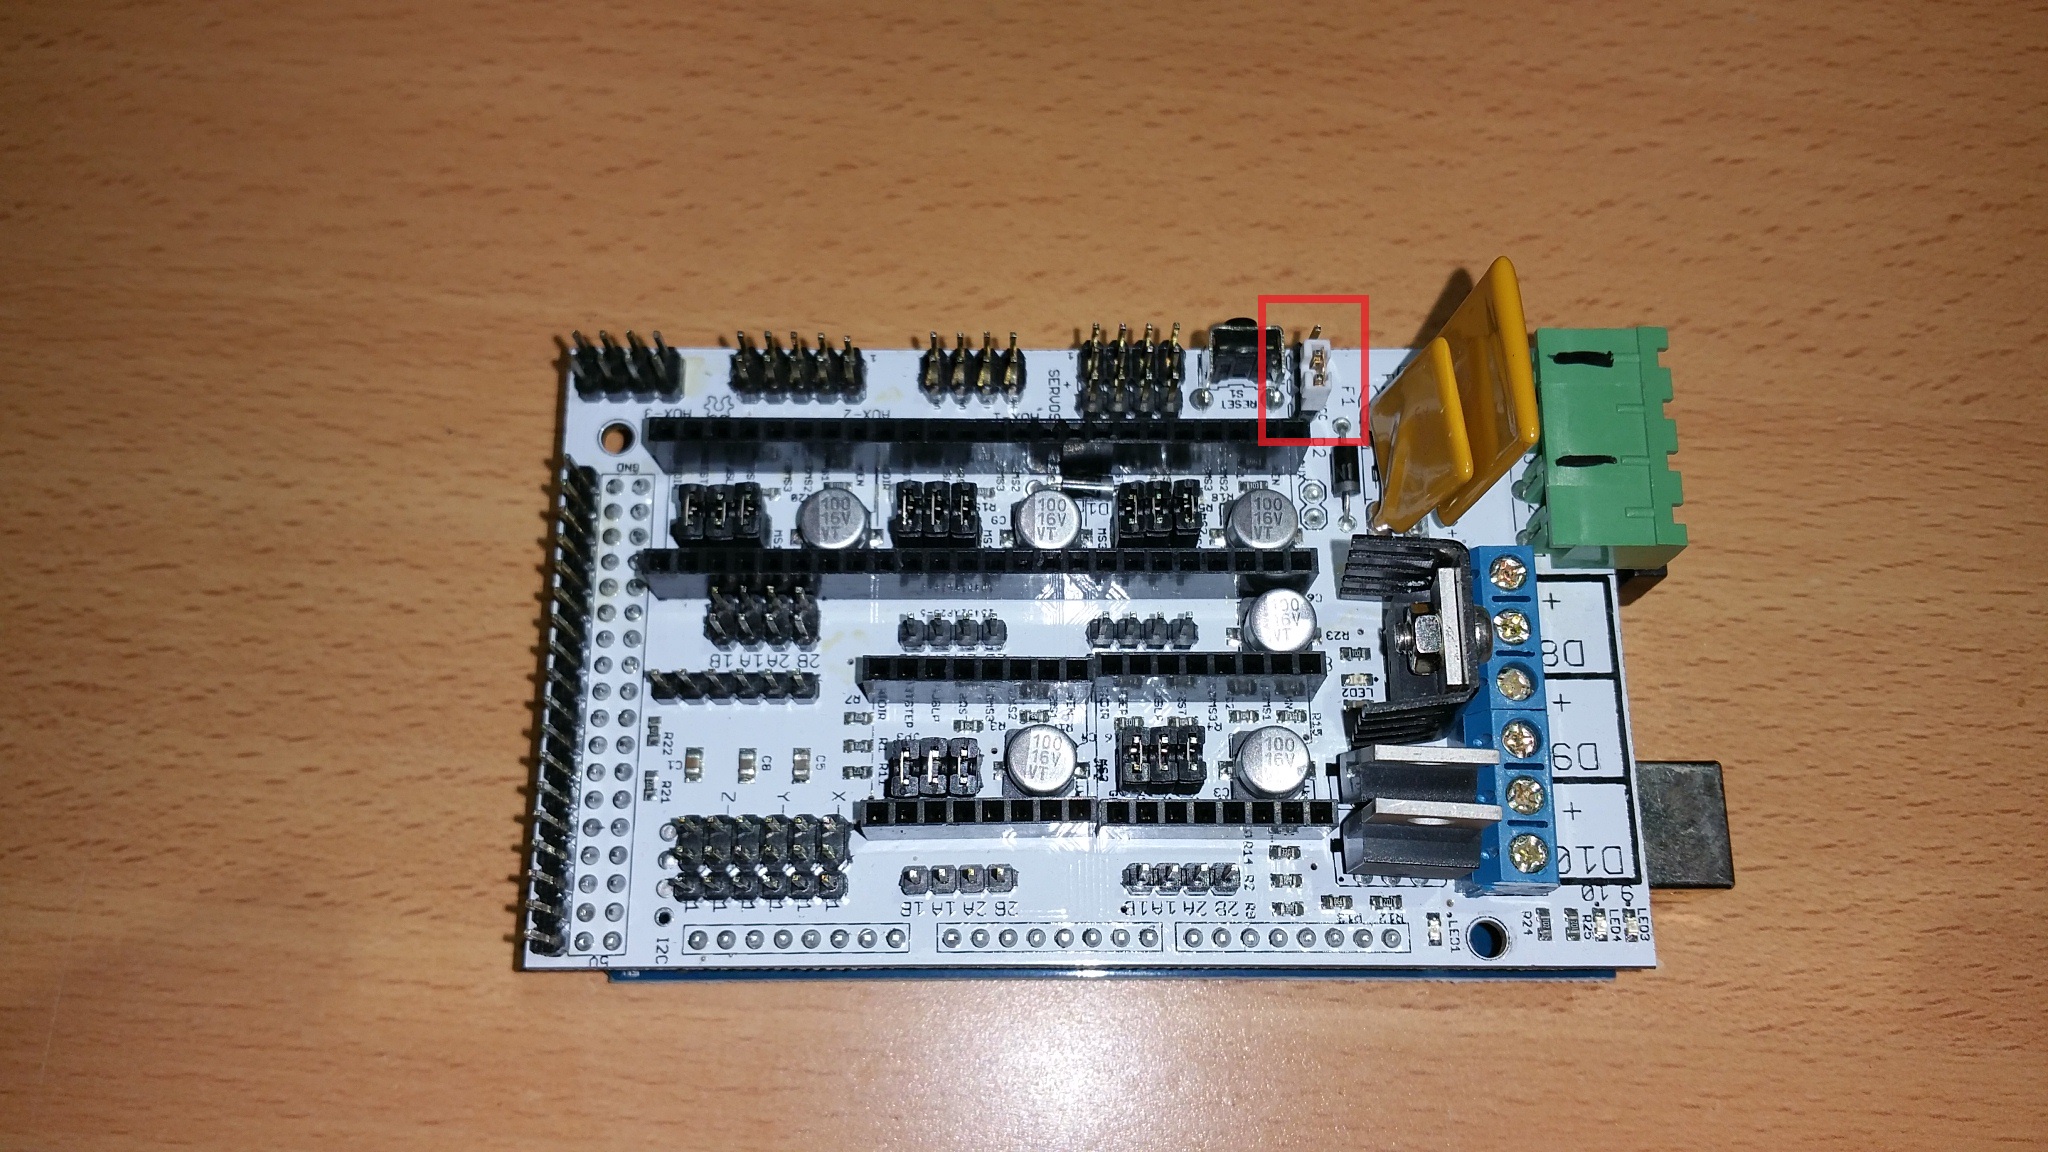
I have a Delta Printer with the same board as your mine is just the 12 volt version. I was messing around trying to reproduce your issue and I am now with a dead Adruino board jjst like you. The issue is that you don;t have the jumper installed that had originally posted a pic of. The location is just behind the polyfuse by the power connector. Those three pins should not be empty. If you try to power up the board with those pins empty the power is not supplied correctly and it causes something to go wrong with the Arduino which is the bottom board. Mine now has two leds on solid and I have an LCD which shows two solid lines which means the firmware is trashed.
I have a second Arduino that works so I am going to put it back with the RAMPS to confirm that it is the Arduino and not the RAMPS.
After that I will try to see what happened to the Arduino.
Short story you need a jumper on the two pins furthest from the edge of the board on that three pin header.
However that may still not fix your problem as like me your Arduino/Taurino may be dead.
Ok, after more testing I have confirmed my RAMPS (top board) is not working and not allowing the Arduino (bottom board) to work now. This was after I powered it up without the jumper I mentioned installed.
Originally that jumper was populated on pins 2 and 3 and I never gave it any thought since it was not mentioned in my build instructions. But after looking at schematics and board artwork it seems that jumper determines if the board uses 5 volts from USB or VCC which is from the power supply.
So am now going to have to order a new RAMPS.
I am sure the Bottom boards are ok as I can separate them, plug them into usb and talk to them through Repetier Host.
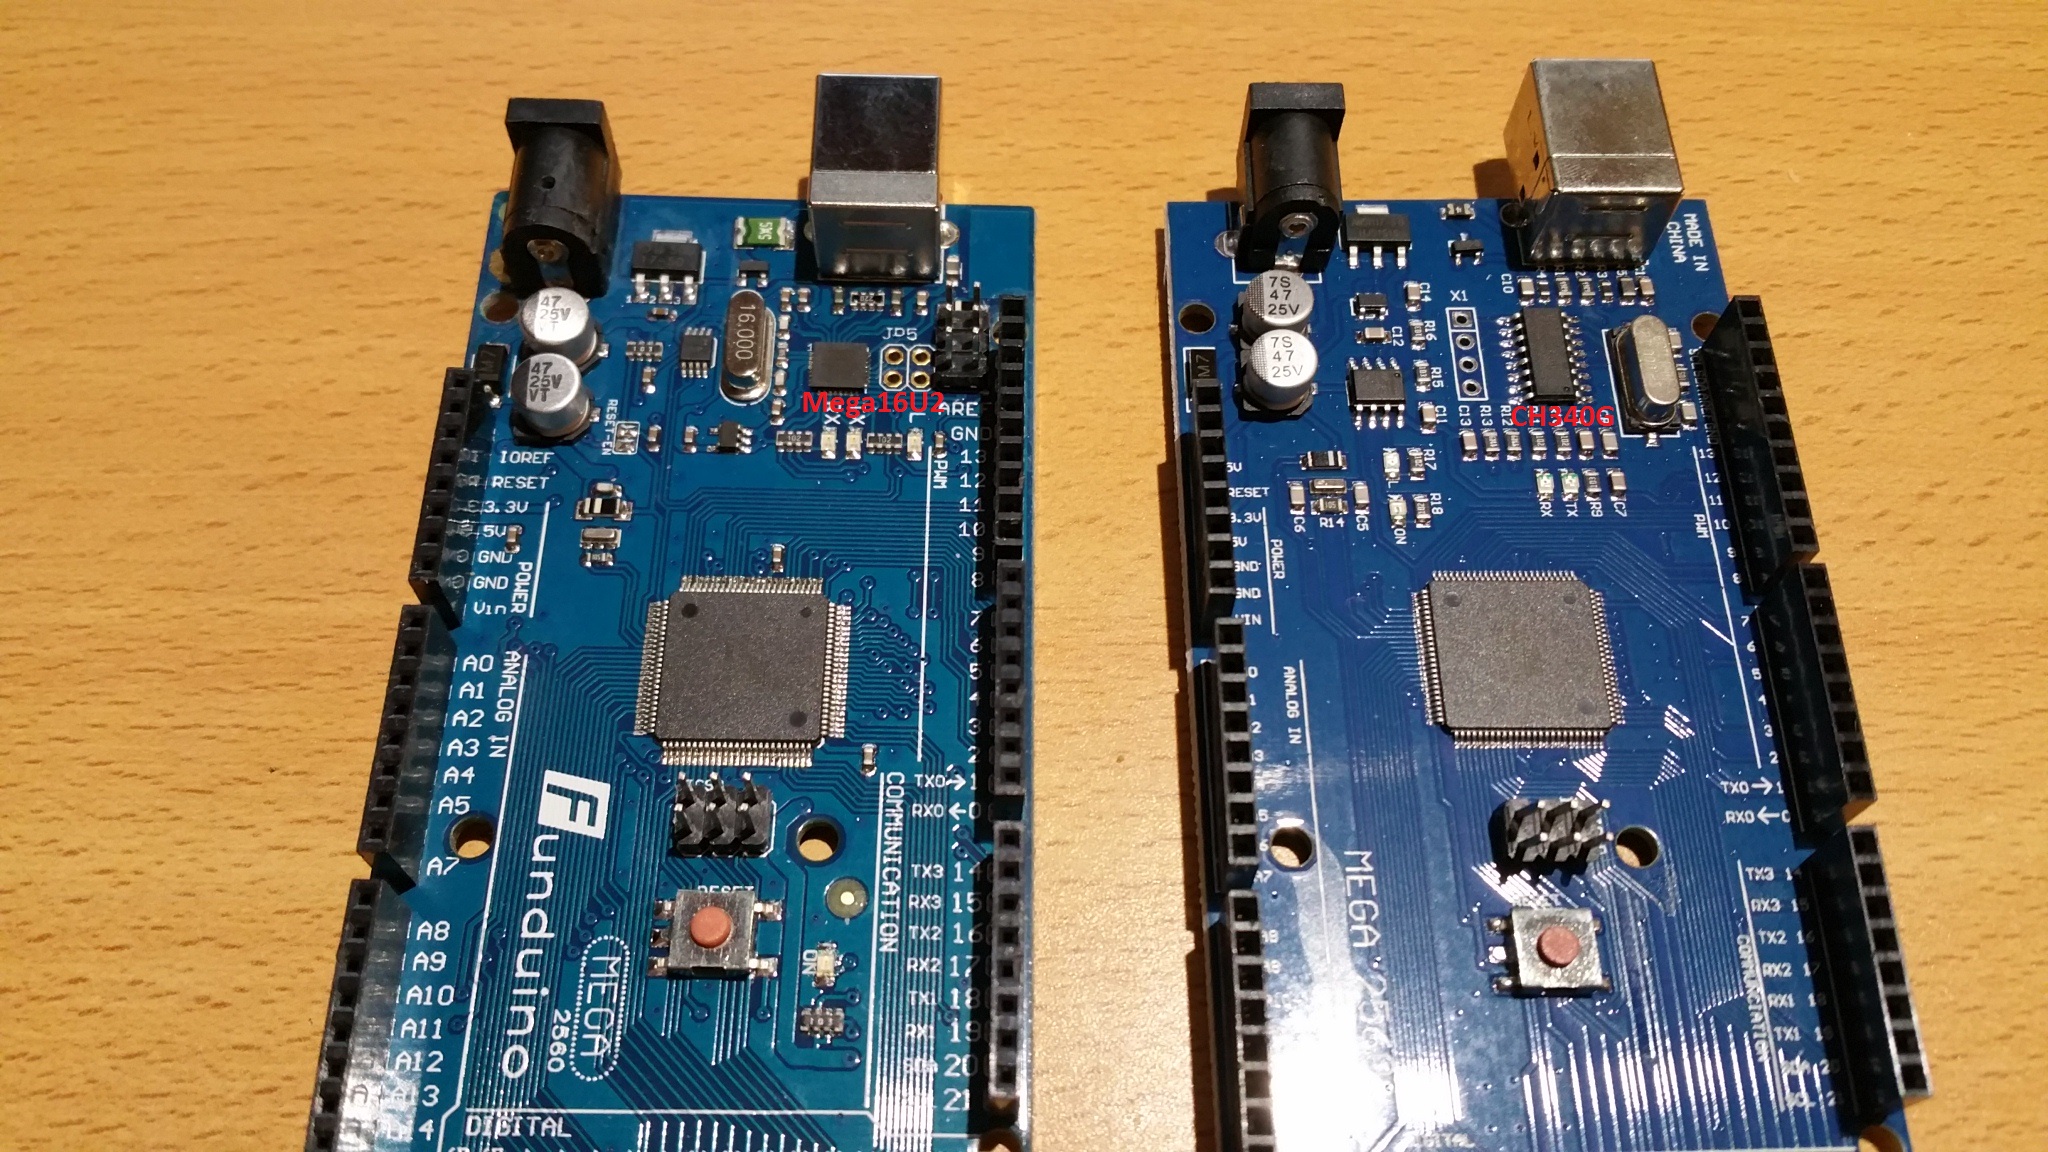
I also found one of them had a different USB controller called a CH340G which required special drivers to be downloaded. The ones that come with Most printer software and Arduino will not support that controller.
The board on the left is the normal chip used. The board on the right is the oddball Chinese chip.
Followup:
I have confirmed that if the jumper in question is not installed as shown the board is not actually booting. This explain your erratic behavior as well..
Without the jumper my LCD will not come up which means the board is not booting or loading the firmware. You also cannot connect to or flash the board without that jumper being installed as the board is not getting the power it should.
When I though my RAMPS was dead it was because I had the jumper on the two outside pins. Once I moved it back as pictured the RAMPS and Arduino came up and the LCD loaded as well..
First, thanks so much for taking time out of your day to work on my problem. I feel terrible that you may have a bad board because of it.
The issue is that you don;t have the jumper installed that had originally posted a pic of.
I can't remember there ever being a jumper there. I cannot find a pic that I posted that shows one either. could yo post that so I can verify that i'm crazy?
I also, just installed a jumper there and tried it. Nothing different. Still constant yellow lights.
First, thanks so much for taking time out of your day to work on my problem. I feel terrible that you may have a bad board because of it.
carl_m1968 wrote:The issue is that you don;t have the jumper installed that had originally posted a pic of.
I can't remember there ever being a jumper there. I cannot find a pic that I posted that shows one either. could yo post that so I can verify that i'm crazy?
I also, just installed a jumper there and tried it. Nothing different. Still constant yellow lights.
The pic I posted with the jumper location marked is your pic and there is no jumper there.
The pic I posted with the jumper location marked is your pic and there is no jumper there.
Oh, I understand. I thought there was a pic that had a jumper on. Ya, I don't think it ever had one.
carl_m1968 wrote:The pic I posted with the jumper location marked is your pic and there is no jumper there.
Oh, I understand. I thought there was a pic that had a jumper on. Ya, I don't think it ever had one.
Well it needs to be there and you might be able to save the Taurino by teflashing while not stacked under the RAMPS and just plugged into USB.
Well it needs to be there and you might be able to save the Taurino by teflashing while not stacked under the RAMPS and just plugged into USB.
Thanks. I tried that, but the computer still doesn't recognize the card.

For what it's worth I've never had the jumper installed and my card is recognized every time...I've had more issues with the card not being recognized by having the endstop wiring plugs in backwards. Try disconnecting them and seeing if the card is recognized...
Try disconnecting them and seeing if the card is recognized...
Even with just the lower card and nothing else, none of my computers can find it. Should I get another one of these lower boards? will any mega 2560 board work? I am already out of money on this. I hate to spend another $150 on another.
Check your PM...
Just an update. I had to buy yet another board. The computer now recognizes the hardware. sandcub1971 has given me a firmware. I have wired according to the instructions given. The bed and extruder will heat. No response from any motors.
Check your PM
Well, today I took everything apart and reassembled. I decided to narrow it down to one motor at a time and removed all the drivers except one. I started with the Y. I use repetier host. I can hit the Y home button and it will move slightly, sometimes. I can jog the Y one direction (sometimes) but not the other. I then hooked up the extruder. It would move sometimes, but clicked more than anything. I adjusted the driver in every way possible, but it made no difference. tried it again later and it would work. tried it again a little later, and the driver instantly caught FIRE when i tried to move the motor. I replaced the driver and it seems to be working now. Thats all I have so far.
Also, the Y axis gives me this in the log.
echo:endstops hit: Y:0.00
I'm guessing that has to do with why it doesnt want to move. It might as well be written in japanese for me.
Your endstops are showing triggered when they are not activated. All you have to do is change the setting in your firmware for ENDSTOP_INVERTED to the opposite it is now.
Your endstops are showing triggered when they are not activated. All you have to do is change the setting in your firmware for ENDSTOP_INVERTED to the opposite it is now.
Im having a hard time finding that. this is the closest I can find.
/ The pullups are needed if you directly connect a mechanical endswitch between the signal and ground pins.
const bool X_MIN_ENDSTOP_INVERTING = true; // set to true to invert the logic of the endstop.
const bool Y_MIN_ENDSTOP_INVERTING = true; // set to true to invert the logic of the endstop.
const bool Z_MIN_ENDSTOP_INVERTING = false; // set to true to invert the logic of the endstop.
const bool X_MAX_ENDSTOP_INVERTING = false; // set to true to invert the logic of the endstop.
const bool Y_MAX_ENDSTOP_INVERTING = false; // set to true to invert the logic of the endstop.
const bool Z_MAX_ENDSTOP_INVERTING = false; // set to true to invert the logic of the endstop.
//#define DISABLE_MAX_ENDSTOPS
//#define DISABLE_MIN_ENDSTOPS
carl_m1968 wrote:Your endstops are showing triggered when they are not activated. All you have to do is change the setting in your firmware for ENDSTOP_INVERTED to the opposite it is now.
Im having a hard time finding that. this is the closest I can find.
/ The pullups are needed if you directly connect a mechanical endswitch between the signal and ground pins.
const bool X_MIN_ENDSTOP_INVERTING = true; // set to true to invert the logic of the endstop.
const bool Y_MIN_ENDSTOP_INVERTING = true; // set to true to invert the logic of the endstop.
const bool Z_MIN_ENDSTOP_INVERTING = false; // set to true to invert the logic of the endstop.
const bool X_MAX_ENDSTOP_INVERTING = false; // set to true to invert the logic of the endstop.
const bool Y_MAX_ENDSTOP_INVERTING = false; // set to true to invert the logic of the endstop.
const bool Z_MAX_ENDSTOP_INVERTING = false; // set to true to invert the logic of the endstop.
//#define DISABLE_MAX_ENDSTOPS
//#define DISABLE_MIN_ENDSTOPS
That is the right spot and the if that is what they currently are set to, then you need to change "true" to "false" on the X and Y MIN and if the Z is doing the same thing where it only moves one way or does not move then the Z MIN needs to be changed from "false" to "true". Then save and upload back to the printer..
If you have a program such as Repetier or PronterFace that has an input window then you can type in M119 and return or send and you got a reponse on the output window that tells you what the current limit switch status is.. With each AXIS in the Home position. You should get a 1 back for each. If you get a o then that switch needs it's INVERT changed.
Reviving this thread instead of starting my own. I'm going through the configuration right now, basing it on MacGyverX's E3DV6 firmware here https://github.com/ymilord/Solidoodle-P … guration.h
It appears that the probe deployment options have been removed at some point. I'm working off the latest Marlin.
MacGyverX:
//============================= Bed Auto Leveling ===========================

#define ENABLE_AUTO_BED_LEVELING // Delete the comment to enable (remove // at the start of the line)
//#define Z_PROBE_REPEATABILITY_TEST  // If not commented out, Z-Probe Repeatability test will be included if Auto Bed Leveling is Enabled.

#ifdef ENABLE_AUTO_BED_LEVELING

// There are 2 different ways to pick the X and Y locations to probe:

//  - "grid" mode
//    Probe every point in a rectangular grid
//    You must specify the rectangle, and the density of sample points
//    This mode is preferred because there are more measurements.
//    It used to be called ACCURATE_BED_LEVELING but "grid" is more descriptive

//  - "3-point" mode
//    Probe 3 arbitrary points on the bed (that aren't colinear)
//    You must specify the X & Y coordinates of all 3 points

  #define AUTO_BED_LEVELING_GRID
  // with AUTO_BED_LEVELING_GRID, the bed is sampled in a
  // AUTO_BED_LEVELING_GRID_POINTSxAUTO_BED_LEVELING_GRID_POINTS grid
  // and least squares solution is calculated
  // Note: this feature occupies 10'206 byte
  #ifdef AUTO_BED_LEVELING_GRID

    // set the rectangle in which to probe
    #define LEFT_PROBE_BED_POSITION 30
    #define RIGHT_PROBE_BED_POSITION 170
    #define BACK_PROBE_BED_POSITION 170
    #define FRONT_PROBE_BED_POSITION 30

    // set the number of grid points per dimension
    #define AUTO_BED_LEVELING_GRID_POINTS 3


  #else  // not AUTO_BED_LEVELING_GRID
    // with no grid, just probe 3 arbitrary points.  A simple cross-product
    // is used to estimate the plane of the print bed

      #define ABL_PROBE_PT_1_X 170
      #define ABL_PROBE_PT_1_Y 170
      #define ABL_PROBE_PT_2_X 170
      #define ABL_PROBE_PT_2_Y 30
      #define ABL_PROBE_PT_3_X 30
      #define ABL_PROBE_PT_3_Y 30

  #endif // AUTO_BED_LEVELING_GRID

    #define PROBE_DOWN_ENTER 190
    #define PROBE_DOWN_EXIT  130
    #define PROBE_UP_ENTER    30
    #define PROBE_UP_EXIT     95

  // these are the offsets to the probe relative to the extruder tip (Hotend - Probe)
  #define X_PROBE_OFFSET_FROM_EXTRUDER -30.825
      #define X_PROBE_OFFSET_RANGE_MIN -40
        #define X_PROBE_OFFSET_RANGE_MAX -20
  #define Y_PROBE_OFFSET_FROM_EXTRUDER -1.1
      #define Y_PROBE_OFFSET_RANGE_MIN -10
        #define Y_PROBE_OFFSET_RANGE_MAX 10
  #define Z_PROBE_OFFSET_FROM_EXTRUDER 3.2
      #define Z_PROBE_OFFSET_RANGE_MIN 0
        #define Z_PROBE_OFFSET_RANGE_MAX 10

  #define XY_TRAVEL_SPEED 8000         // X and Y axis travel speed between probes, in mm/min

  #define Z_RAISE_BEFORE_PROBING 8   //How much the extruder will be raised before traveling to the first probing point.
  #define Z_RAISE_BETWEEN_PROBINGS 2  //How much the extruder will be raised when traveling from between next probing points

  //#define Z_PROBE_SLED // turn on if you have a z-probe mounted on a sled like those designed by Charles Bell
  //#define SLED_DOCKING_OFFSET 5 // the extra distance the X axis must travel to pickup the sled. 0 should be fine but you can push it further if you'd like.

  //If defined, the Probe servo will be turned on only during movement and then turned off to avoid jerk
  //The value is the delay to turn the servo off after powered on - depends on the servo speed; 300ms is good value, but you can try lower it.
  // You MUST HAVE the SERVO_ENDSTOPS defined to use here a value higher than zero otherwise your code will not compile.

//  #define PROBE_SERVO_DEACTIVATION_DELAY 300


//If you have enabled the Bed Auto Leveling and are using the same Z Probe for Z Homing,
//it is highly recommended you let this Z_SAFE_HOMING enabled!!!

  #define Z_SAFE_HOMING   // This feature is meant to avoid Z homing with probe outside the bed area.
                          // When defined, it will:
                          // - Allow Z homing only after X and Y homing AND stepper drivers still enabled
                          // - If stepper drivers timeout, it will need X and Y homing again before Z homing
                          // - Position the probe in a defined XY point before Z Homing when homing all axis (G28)
                          // - Block Z homing only when the probe is outside bed area.

  #ifdef Z_SAFE_HOMING

    #define Z_SAFE_HOMING_X_POINT 103    // X point for Z homing when homing all axis (G28)
    #define Z_SAFE_HOMING_Y_POINT 100    // Y point for Z homing when homing all axis (G28)

  #endif

#endif // ENABLE_AUTO_BED_LEVELING
Current Marlin
//===========================================================================
//============================ Bed Auto Leveling ============================
//===========================================================================

// @section bedlevel

#define AUTO_BED_LEVELING_FEATURE // Delete the comment to enable (remove // at the start of the line)
//#define DEBUG_LEVELING_FEATURE
#define Z_MIN_PROBE_REPEATABILITY_TEST  // If not commented out, Z Probe Repeatability test will be included if Auto Bed Leveling is Enabled.

#if ENABLED(AUTO_BED_LEVELING_FEATURE)

  // There are 2 different ways to specify probing locations:
  //
  // - "grid" mode
  //   Probe several points in a rectangular grid.
  //   You specify the rectangle and the density of sample points.
  //   This mode is preferred because there are more measurements.
  //
  // - "3-point" mode
  //   Probe 3 arbitrary points on the bed (that aren't collinear)
  //   You specify the XY coordinates of all 3 points.

  // Enable this to sample the bed in a grid (least squares solution).
  // Note: this feature generates 10KB extra code size.
  #define AUTO_BED_LEVELING_GRID

  #if ENABLED(AUTO_BED_LEVELING_GRID)

    #define LEFT_PROBE_BED_POSITION 30
    #define RIGHT_PROBE_BED_POSITION 170
    #define FRONT_PROBE_BED_POSITION 30
    #define BACK_PROBE_BED_POSITION 170

    #define MIN_PROBE_EDGE 10 // The Z probe minimum square sides can be no smaller than this.

    // Set the number of grid points per dimension.
    // You probably don't need more than 3 (squared=9).
    #define AUTO_BED_LEVELING_GRID_POINTS 3

  #else  // !AUTO_BED_LEVELING_GRID

    // Arbitrary points to probe.
    // A simple cross-product is used to estimate the plane of the bed.
    #define ABL_PROBE_PT_1_X 170
    #define ABL_PROBE_PT_1_Y 170
    #define ABL_PROBE_PT_2_X 170
    #define ABL_PROBE_PT_2_Y 30
    #define ABL_PROBE_PT_3_X 30
    #define ABL_PROBE_PT_3_Y 30

  #endif // AUTO_BED_LEVELING_GRID

  // Z Probe to nozzle (X,Y) offset, relative to (0, 0).
  // X and Y offsets must be integers.
  //
  // In the following example the X and Y offsets are both positive:
  // #define X_PROBE_OFFSET_FROM_EXTRUDER 10
  // #define Y_PROBE_OFFSET_FROM_EXTRUDER 10
  //
  //    +-- BACK ---+
  //    |           |
  //  L |    (+) P  | R <-- probe (20,20)
  //  E |           | I
  //  F | (-) N (+) | G <-- nozzle (10,10)
  //  T |           | H
  //    |    (-)    | T
  //    |           |
  //    O-- FRONT --+
  //  (0,0)
  #define X_PROBE_OFFSET_FROM_EXTRUDER -30.825  // X offset: -left  +right  [of the nozzle]
  #define Y_PROBE_OFFSET_FROM_EXTRUDER -1.1  // Y offset: -front +behind [the nozzle]
  #define Z_PROBE_OFFSET_FROM_EXTRUDER 3.2   // Z offset: -below +above  [the nozzle]

  #define XY_TRAVEL_SPEED 8000         // X and Y axis travel speed between probes, in mm/min.

  #define Z_RAISE_BEFORE_PROBING 8   // How much the Z axis will be raised before traveling to the first probing point.
  #define Z_RAISE_BETWEEN_PROBINGS 2  // How much the Z axis will be raised when traveling from between next probing points.
  #define Z_RAISE_AFTER_PROBING 15    // How much the Z axis will be raised after the last probing point.

  //#define Z_PROBE_END_SCRIPT "G1 Z10 F12000\nG1 X15 Y330\nG1 Z0.5\nG1 Z10" // These commands will be executed in the end of G29 routine.
                                                                             // Useful to retract a deployable Z probe.

  // Probes are sensors/switches that need to be activated before they can be used
  // and deactivated after their use.
  // Allen Key Probes, Servo Probes, Z-Sled Probes, FIX_MOUNTED_PROBE, ... . You have to activate one of these for the AUTO_BED_LEVELING_FEATURE

  // A fix mounted probe, like the normal inductive probe, must be deactivated to go below Z_PROBE_OFFSET_FROM_EXTRUDER
  // when the hardware endstops are active.
  //#define FIX_MOUNTED_PROBE

  // A Servo Probe can be defined in the servo section below.

  // An Allen Key Probe is currently predefined only in the delta example configurations.

  // Enable if you have a Z probe mounted on a sled like those designed by Charles Bell.
  //#define Z_PROBE_SLED
  //#define SLED_DOCKING_OFFSET 5 // The extra distance the X axis must travel to pickup the sled. 0 should be fine but you can push it further if you'd like.

  // A Mechanical Probe is any probe that either doesn't deploy or needs manual deployment
  // For example any setup that uses the nozzle itself as a probe.
  //#define MECHANICAL_PROBE

  // If you've enabled AUTO_BED_LEVELING_FEATURE and are using the Z Probe for Z Homing,
  // it is highly recommended you also enable Z_SAFE_HOMING below!

#endif // AUTO_BED_LEVELING_FEATURE
I would just copy these four lines, but I didn't find any mention of these settings in the rest of the files.
    #define PROBE_DOWN_ENTER 190
    #define PROBE_DOWN_EXIT  130
    #define PROBE_UP_ENTER    30
    #define PROBE_UP_EXIT     95
What can I do to get the automatic deployment and retraction to work?
Thanks!
Also seeing this error trying to compile
Arduino: 1.6.9 (Windows 10), Board: "Arduino/Genuino Mega or Mega 2560, ATmega2560 (Mega 2560)"

In file included from sketch\Marlin.ino.cpp:1:0:

Configuration.h:606: error: floating constant in preprocessor expression

   #define X_PROBE_OFFSET_FROM_EXTRUDER -30.825  // X offset: -left  +right  [of the nozzle]

                                         ^

C:\Program Files (x86)\Arduino\hardware\arduino\avr\cores\arduino/Arduino.h:85:24: note: in definition of macro 'max'

 #define max(a,b) ((a)>(b)?(a):(b))

                        ^

sketch\Conditionals.h:354:53: note: in expansion of macro 'X_PROBE_OFFSET_FROM_EXTRUDER'

     #define MIN_PROBE_X (max(X_MIN_POS, X_MIN_POS + X_PROBE_OFFSET_FROM_EXTRUDER))

                                                     ^

sketch\SanityCheck.h:278:37: note: in expansion of macro 'MIN_PROBE_X'

       #if LEFT_PROBE_BED_POSITION < MIN_PROBE_X

                                     ^

Configuration.h:606: error: floating constant in preprocessor expression

   #define X_PROBE_OFFSET_FROM_EXTRUDER -30.825  // X offset: -left  +right  [of the nozzle]

                                         ^

C:\Program Files (x86)\Arduino\hardware\arduino\avr\cores\arduino/Arduino.h:85:32: note: in definition of macro 'max'

 #define max(a,b) ((a)>(b)?(a):(b))

                                ^

sketch\Conditionals.h:354:53: note: in expansion of macro 'X_PROBE_OFFSET_FROM_EXTRUDER'

     #define MIN_PROBE_X (max(X_MIN_POS, X_MIN_POS + X_PROBE_OFFSET_FROM_EXTRUDER))

                                                     ^

sketch\SanityCheck.h:278:37: note: in expansion of macro 'MIN_PROBE_X'

       #if LEFT_PROBE_BED_POSITION < MIN_PROBE_X

                                     ^

Configuration.h:606: error: floating constant in preprocessor expression

   #define X_PROBE_OFFSET_FROM_EXTRUDER -30.825  // X offset: -left  +right  [of the nozzle]

                                         ^

C:\Program Files (x86)\Arduino\hardware\arduino\avr\cores\arduino/Arduino.h:84:24: note: in definition of macro 'min'

 #define min(a,b) ((a)<(b)?(a):(b))

                        ^

sketch\Conditionals.h:355:53: note: in expansion of macro 'X_PROBE_OFFSET_FROM_EXTRUDER'

     #define MAX_PROBE_X (min(X_MAX_POS, X_MAX_POS + X_PROBE_OFFSET_FROM_EXTRUDER))

                                                     ^

sketch\SanityCheck.h:280:40: note: in expansion of macro 'MAX_PROBE_X'

       #elif RIGHT_PROBE_BED_POSITION > MAX_PROBE_X

                                        ^

Configuration.h:606: error: floating constant in preprocessor expression

   #define X_PROBE_OFFSET_FROM_EXTRUDER -30.825  // X offset: -left  +right  [of the nozzle]

                                         ^

C:\Program Files (x86)\Arduino\hardware\arduino\avr\cores\arduino/Arduino.h:84:32: note: in definition of macro 'min'

 #define min(a,b) ((a)<(b)?(a):(b))

                                ^

sketch\Conditionals.h:355:53: note: in expansion of macro 'X_PROBE_OFFSET_FROM_EXTRUDER'

     #define MAX_PROBE_X (min(X_MAX_POS, X_MAX_POS + X_PROBE_OFFSET_FROM_EXTRUDER))

                                                     ^

sketch\SanityCheck.h:280:40: note: in expansion of macro 'MAX_PROBE_X'

       #elif RIGHT_PROBE_BED_POSITION > MAX_PROBE_X

                                        ^

Configuration.h:607: error: floating constant in preprocessor expression

   #define Y_PROBE_OFFSET_FROM_EXTRUDER -1.1  // Y offset: -front +behind [the nozzle]

                                         ^

C:\Program Files (x86)\Arduino\hardware\arduino\avr\cores\arduino/Arduino.h:85:24: note: in definition of macro 'max'

 #define max(a,b) ((a)>(b)?(a):(b))

                        ^

sketch\Conditionals.h:356:53: note: in expansion of macro 'Y_PROBE_OFFSET_FROM_EXTRUDER'

     #define MIN_PROBE_Y (max(Y_MIN_POS, Y_MIN_POS + Y_PROBE_OFFSET_FROM_EXTRUDER))

                                                     ^

sketch\SanityCheck.h:282:40: note: in expansion of macro 'MIN_PROBE_Y'

       #elif FRONT_PROBE_BED_POSITION < MIN_PROBE_Y

                                        ^

Configuration.h:607: error: floating constant in preprocessor expression

   #define Y_PROBE_OFFSET_FROM_EXTRUDER -1.1  // Y offset: -front +behind [the nozzle]

                                         ^

C:\Program Files (x86)\Arduino\hardware\arduino\avr\cores\arduino/Arduino.h:85:32: note: in definition of macro 'max'

 #define max(a,b) ((a)>(b)?(a):(b))

                                ^

sketch\Conditionals.h:356:53: note: in expansion of macro 'Y_PROBE_OFFSET_FROM_EXTRUDER'

     #define MIN_PROBE_Y (max(Y_MIN_POS, Y_MIN_POS + Y_PROBE_OFFSET_FROM_EXTRUDER))

                                                     ^

sketch\SanityCheck.h:282:40: note: in expansion of macro 'MIN_PROBE_Y'

       #elif FRONT_PROBE_BED_POSITION < MIN_PROBE_Y

                                        ^

Configuration.h:607: error: floating constant in preprocessor expression

   #define Y_PROBE_OFFSET_FROM_EXTRUDER -1.1  // Y offset: -front +behind [the nozzle]

                                         ^

C:\Program Files (x86)\Arduino\hardware\arduino\avr\cores\arduino/Arduino.h:84:24: note: in definition of macro 'min'

 #define min(a,b) ((a)<(b)?(a):(b))

                        ^

sketch\Conditionals.h:357:53: note: in expansion of macro 'Y_PROBE_OFFSET_FROM_EXTRUDER'

     #define MAX_PROBE_Y (min(Y_MAX_POS, Y_MAX_POS + Y_PROBE_OFFSET_FROM_EXTRUDER))

                                                     ^

sketch\SanityCheck.h:284:39: note: in expansion of macro 'MAX_PROBE_Y'

       #elif BACK_PROBE_BED_POSITION > MAX_PROBE_Y

                                       ^

Configuration.h:607: error: floating constant in preprocessor expression

   #define Y_PROBE_OFFSET_FROM_EXTRUDER -1.1  // Y offset: -front +behind [the nozzle]

                                         ^

C:\Program Files (x86)\Arduino\hardware\arduino\avr\cores\arduino/Arduino.h:84:32: note: in definition of macro 'min'

 #define min(a,b) ((a)<(b)?(a):(b))

                                ^

sketch\Conditionals.h:357:53: note: in expansion of macro 'Y_PROBE_OFFSET_FROM_EXTRUDER'

     #define MAX_PROBE_Y (min(Y_MAX_POS, Y_MAX_POS + Y_PROBE_OFFSET_FROM_EXTRUDER))

                                                     ^

sketch\SanityCheck.h:284:39: note: in expansion of macro 'MAX_PROBE_Y'

       #elif BACK_PROBE_BED_POSITION > MAX_PROBE_Y

                                       ^

exit status 1
floating constant in preprocessor expression

This report would have more information with
"Show verbose output during compilation"
option enabled in File -> Preferences.Anyone successful at this point? I'm about to start my solidoodle press conversion to RAMPS 1.4 this week so if anyone has gotten this to work please share.
It's working now. Pretty sure that last error was because I needed to use whole numbers for those offsets
that's awesome, how is the print quality and success rate? also,would you mind sharing your marlin config files? I just bought the ramps board and that would definitely give me a jump start on getting this thing working again. did you have to alter the pinouts on any of the factory stepper or limit switch cabling or was it a direct plug and play setup?
Print quality is much better than stock. Success rate is like 90% as long as you have a fan cooling the board and your Bowden setup is good. The first thing I would do is reprint the arm that keeps pressure against the filament with the spring and bearing. The one that came in the kit broke eventually (creep, probably.) I redid it at 90% infill.
I'll see about getting that file when I get home
SoliForum - 3D Printing Community → Solidoodle Press → Taurino Power + RAMPS 1.4 Bundle install
Powered by PunBB, supported by Informer Technologies, Inc.